RCA DRC8005N User Guide - Page 16
Select the Signal that's connected to the RF, ANTENNA/CABLE INPUT jack, Channel Search, Channel List - remote
 |
UPC - 034909320204
View all RCA DRC8005N manuals
Add to My Manuals
Save this manual to your list of manuals |
Page 16 highlights
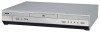
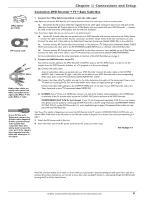
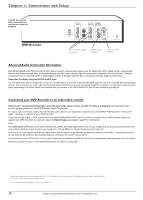
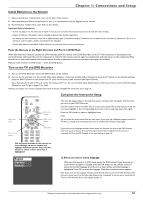
Chapter 1: Connections and Setup Antenna-Cable Antenna-Cable Done 2) Select the Signal that's connected to the RF ANTENNA/CABLE INPUT jack Completing this information lets the DVD Recorder know what program signals are being sent to it. Choose the type of signal that is connected to the RF ANTENNA/CABLE INPUT jack. Press the right arrow button to access the choices: Antenna-Cable (cable without a cable box) Antenna Only (no cable service, just off-air antenna) Cable Receiver (cable service with a cable box) Note: If the DVD Recorder doesn't start searching for channels after you've selected the type of signal connected to the RF ANTENNA/CABLE INPUT jack, press the down arrow button to highlight Done and press OK. Searching channels... 35% complete 2 channels found Please wait..... 3) Channel Search The DVD Recorder automatically scans the signal coming through the cable connected to the RF ANTENNA/CABLE INPUT jack and prepares the channel list. The channel list determines what channels appear when you press the channel up and down buttons. A progress indicator appears on the TV screen.When the Channel Search reaches 100%, press OK (the Channel List appears). If the Channel List doesn't appear, check the RF ANTENNA/CABLE INPUT jack to make sure the cable is connected properly. Edit the list of channels found Ch 02 Ch 03 Ch 04 Select your local time zone: Eastern Central Mountain 4) Channel List The Channel List contains the channels you tune to when you press the CH+ and CH- (channel up and channel down) buttons on the remote control. From the Channel List screen, you can delete channels you rarely watch.You'll still be able to tune to the "deleted" channels directly by using the number buttons on the remote control, but the DVD Recorder won't tune to a channel you delete when you press the CH+/CH- buttons on the remote control. Press the down arrow button to scroll through the channels, or press the CHbutton to scroll a screen at a time. A checkmark in the box next to the channel means it has been stored in the channel list. Follow the on-screen instructions to delete a channel in the list, or add one that isn't in the list.You can also label channels by pressing the INFO button. To skip editing the channel list, press the right arrow button. 5) Time Zone Use the down arrow button to highlight your time zone, and press OK (the Daylight Savings Time screen appears). Should the clock be automatically adjusted for daylight savings time? Yes No 6) Daylight Savings Time If you live an area that recognizes Daylight Savings Time, press OK (the DVD Recorder's internal clock will automatically advance the time by 1 hour in the spring and set the clock back by 1 hour in the fall). If you live in an area that doesn't use Daylight Savings Time, press the right arrow button to highlight No, and press OK. 14 Graphics contained within this publication are for representation only.
-
 1
1 -
2
-
3
-
4
-
5
-
6
-
7
-
8
-
9
-
10
-
 11
11 -
 12
12 -
 13
13 -
 14
14 -
 15
15 -
 16
16 -
 17
17 -
 18
18 -
 19
19 -
 20
20 -
 21
21 -
22
-
23
-
24
-
25
-
26
-
27
-
28
-
29
-
30
-
31
-
32
-
33
-
34
-
35
-
36
-
37
-
38
-
39
-
40
-
41
-
42
-
43
-
44
-
45
-
46
-
47
-
48
-
49
-
50
-
51
-
52
-
53
-
54
-
55
-
56
-
57
-
58
-
59
-
60
 |
 |