RCA RCR6473R Owner/User Manual - Page 3
Tour of the Remote, Advanced Functions - remote control manual
 |
View all RCA RCR6473R manuals
Add to My Manuals
Save this manual to your list of manuals |
Page 3 highlights
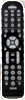
e Note: To program for a DVD player, you must first press and hold the DVD key. While you're holding the DVD key, press the 3. Once the unit turns back on, you have found another code that operates the device. Press the OK key. Advanced Functions Co Onc er number 3 key. Then release both keys. 4. Test the key's functionality again by trying a variety of functions. If the code controls the majority of the device's Programming the DVR•AUX1 and you used 1. Manually turn on the device you functions, programming is complete. If the code stored does not give maximum functionality, try another code. VCR•AUX2 Keys To Control Other Devices the c belo want to control. The DVR•AUX1 key defaults to control a DVR, and the your Tour of the Remote VCR•AUX2 key defaults to control a VCR. If you want these keys to control different kinds of devices (an additional TV, rem five- DVD, satellite or cable box, for example), you must reassign it. will 2. Press and hold the device key you want to program. While you're holding down the device key, use your other hand to press and hold the remote's POWER key at the same time. In most cases, the keys on this remote perform the same functions as the keys on your 1. Press and hold the key you want to program (DVR•AUX1 or VCR•AUX2 key. The indicator light turns on. 2. While holding down the DVR•AUX1 or VCR•AUX2 key, agai met whic original remotes once you've press and release the number key on the keypad for the programmed this remote to device you want to control (see the chart below). The operate your components. indicator light turns off. Many keys on this remote have other functions as well. DVR•AUX1 or VCR•AUX2 KEY CONTROLS: 3. Wait until the remote's indicator light ght comes on and stays on. Then release both keys. Device keys (TV, SAT•CBL•STRM, DVD, DVR•AUX1, AUDIO, VCR•AUX2) put the remote in the right mode to control your Additional TV press 1 VCR or DVR press 2 Additional DVD press 3 2. Additional audio device press 4 device. Additional streaming player, satellite press 5 4. Point the remote directly at the front panel of the device you want to control. Press SKIP FWD on the remote and wait 2 seconds. The remote is testing a single code for your device. Did your device turn off? YES: Press the OK key to store SLOW•ASPECT key changes between full- and widescreen formats on HDTVs; it also activates slow playback on DVDs and DVRs. receiver, cable box, or DTV converter 3. 3. Release the DVR•AUX1 or VCR•AUX2 key. The indicator 4. light blinks four times and then turns off. The DVR•AUX1 or VCR•AUX2 key is now set to control the device type you selected. the code. You're done! You've GUIDE•HOME and MENU put 4. Follow the directions in the auto, brand, direct entry, ts programmed this device key. the remote in menu/guide or manual code search to program the DVR•AUX1 or 3 mode; they also access the NO: Press SKIP FWD again. The same features as the keys on remote tests the next code for your original remotes. your device. x de Keep pressing SKIP FWD every 2 seconds until your device turns off. When it does, press OK. CLEAR exits remote programming; it also performs the same functions as on your original remotes. VCR•AUX2 key. Volume Punch-Through Volume Punch-through allows the VOL and MUTE keys, when pressed in SAT•CBL•STRM, DVD, DVR or VCR modes, to "punch through" to either TV or AUDIO, whichever was accessed last. Volume Punch-Through occurs automatically No DV the sa TV 5. he TIP: Because there are so many codes, you may have to press Arrow keys act as navigation the SKIP FWD key many times-possibly hundreds of times. keys in device guides and de menu systems. NOTES e Throughout the programming of each key, keep the remote pointed at the IR sensor of the device you are programming the remote to control. The INPUT and - (dash) key has three functions: (1) it toggles through all the video or audio sources connected de Test the remote with the device to make sure the device key is programmed with the correct code for maximum to your TV or audio device; (2) when the remote is in functionality. If some features don't work, try a different VCR mode, this button code. See the "Testing the Code for Maximum Functionality" toggles between VCR and section below for more information. the TV input; (3) when you're During the Manual Code Search, the remote ignores entering digital channel and allows you to control the volume without exiting the current mode. (If either AUX key has been programmed with a TV or AUDIO code, volume can punch through to these devices TIP as well.) CL Note: Volume Punch-Through does not occur in cases where No the component code has its own volume/mute controls, such pro as some satellite receivers. va Advanced Punch-Through AU tim Volume Punch-Through, as described above, occurs tim automatically. If you want to specify whether Volume Punch-Through is directed to the TV or AUDIO while in SAT•CBL•STRM, DVD, DVR•AUX1 or VCR•AUX2 modes, follow the steps below. e he hat es t keypresses that aren't part of the search. The search times out after two minutes (the indicator light blinks four times and turns off, and the last programmed code under that device key is retained). The indicator light blinks four times and turns off when the remote has gone through all the codes. The remote exits the Manual Code Search. If your device hasn't turned off yet, try a different search method. numbers directly, this button lets you separate the main channel number from the sub-channel number (such as 59.1). Actual model may vary from illustration IMPORTANT Note: This option can also be enabled for an AUX key, if it is programmed with a VCR, DVR, DVD, CD, SAT or TV code. 1. Press and hold the key whose volume commands you want to send to the TV or audio device. The indicator light turns on. 2. While holding down the device key, press and hold the VOL up key. The indicator light turns off. 3. After holding down both keys for 3 seconds, the indicator , Testing the Code for Maximum Functionality 1. Try a variety of the device's functions with the remote. If some features of your devices don't work, go to the next or a step to try a different code. nd 2. Repeat the Manual Code Search and Entry Method from the beginning. When the device turns off for the first time, eed don't press the OK key, which would store the same code. rt Instead, with the unit now off, continue to press the SKIP FWD key repeatedly until the unit turns back on. Because this remote controls more than one device, you must first "tell" the remote which device you wish to operate. That means, if you wish to operate your TV, you must first press the TV key to put the remote in the TV Mode. The remote stays in that device mode until you press a different device key. For example, if your remote is in TV Mode and you want to operate the DVD player, you must press the DVD key to change device modes. light turns on and stays on. Release both keys. 4. Press and release the device key you want the Volume Punch-Through to be directed to from the selected mode (TV, AUDIO or AUX key). The indicator light flashes, then turns off. Note: The device key pressed in step 4 must be programmed with a TV or AUDIO component. If an invalid key is pressed, the LED flashes four times, then turns off. Important: Once you have programmed any device with a specified Volume Punch-Through, the Volume Punch-Through for all other devices defaults to AUDIO. If you do not want other components' Volume Punch-Through to default to AUDIO, you must manually program them, using steps 1-4.
-
 1
1 -
 2
2 -
 3
3 -
 4
4
 |
 |
