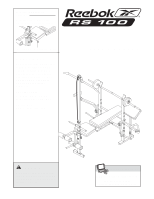
Reebok Rs 100 Bench English Manual - Page 6
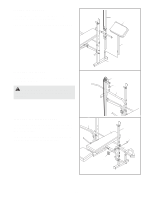
Attach the Leg Lever 5 to the Bench Leg 2
 |
View all Reebok Rs 100 Bench manuals
Add to My Manuals
Save this manual to your list of manuals |
Page 6 highlights
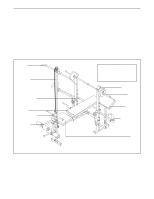
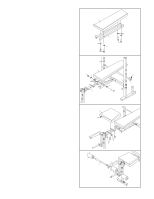
2. Orient the Stabilizer (57) so that the indents 2 around the holes are on the bottom. Attach the Bench Leg (2) to the Stabilizer with two M8 x 50mm Carriage Bolts (53) and two M8 Nylon Locknuts (17). Do not tighten the Locknuts. 2 17 17 3. Attach the Bench Frame (1) to the Bench Leg (2) with two M8 x 39mm Bolts (52), two M8 Washers (32), and two M8 Nylon Locknuts (17). Make sure that the bolt heads fit inside the hexagonal holes in the Bench Frame. Do not tighten the Locknuts. 57 Indents 53 3 52 1 32 32 17 2 4. Attach the Bench Frame (1) to the Crossbar (3) 4 with an M8 x 54mm Bolt (43) and an M8 Nylon Locknut (17); and with two M8 x 52mm Bolts (18), two M8 Washers (32), and two M8 Nylon Locknuts (17). Do not tighten the Locknuts. 43 1 18 32 17 3 17 5. Lubricate an M10 x 65mm Bolt (44) with grease. 5 Attach the Leg Lever (5) to the Bench Leg (2) with the Bolt and an M10 Nylon Locknut (51). Do not overtighten the Locknut; the Leg Lever must be able to pivot easily. 5 51 44 Grease 2 6
-
 1
1 -
 2
2 -
 3
3 -
 4
4 -
 5
5 -
 6
6 -
 7
7 -
 8
8 -
 9
9 -
 10
10 -
 11
11 -
 12
12 -
13
-
14
-
15
-
16
-
17
-
18
-
19
 |
 |
