Reebok T 12.80 Treadmill English Manual - Page 9
Slide the Right Upright Sleeve 96 up against
 |
View all Reebok T 12.80 Treadmill manuals
Add to My Manuals
Save this manual to your list of manuals |
Page 9 highlights
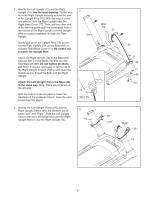
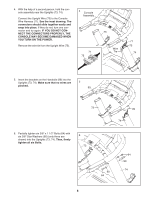
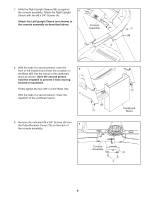
7. Slide the Right Upright Sleeve (96) up against the console assembly. Attach the Right Upright 7 Sleeve with two #8 x 3/4" Screws (4). Attach the Left Upright Sleeve (not shown) to the console assembly as described above. Console Assembly 4 4 96 8. With the help of a second person, raise the front of the treadmill and insert the crossbar on 8 the Base (83) into the cutout in the cardboard stand as shown. Have the second person hold the treadmill to prevent it from moving forward or backward. Firmly tighten the four 3/8" x 3 3/4" Bolts (72). With the help of a second person, lower the treadmill off the cardboard stand. 9. Remove the indicated #8 x 3/4" Screws (4) from the Pulse Receiver Cover (70) on the back of 9 the console assembly. 83 72 72 Cardboard Stand Console Assembly 70 4 9
-
 1
1 -
2
-
3
-
 4
4 -
 5
5 -
 6
6 -
 7
7 -
 8
8 -
 9
9 -
 10
10 -
 11
11 -
 12
12 -
 13
13 -
 14
14 -
15
-
16
-
17
-
18
-
19
-
20
-
21
-
22
-
23
-
24
-
25
-
26
-
27
-
28
-
29
-
30
-
31
-
32
 |
 |
