Reebok Trainer Rx 4.0 Bike English Manual
Reebok Trainer Rx 4.0 Bike Manual
 |
View all Reebok Trainer Rx 4.0 Bike manuals
Add to My Manuals
Save this manual to your list of manuals |
Reebok Trainer Rx 4.0 Bike manual content summary:
- Reebok Trainer Rx 4.0 Bike | English Manual - Page 1
QUESTIONS? If you have questions, or if parts are damaged or missing, DO NOT CONTACT manual) before contacting Customer Care. CALL TOLL-FREE: 1-877-994-4999 Mon.-Fri. 6 a.m.-6 p.m. MT Sat. 8 a.m.-4 p.m. MT ON THE WEB: www.reebokservice.com CAUTION Read all precautions and instructions in this manual - Reebok Trainer Rx 4.0 Bike | English Manual - Page 2
PRECAUTIONS 3 BEFORE YOU BEGIN 4 ASSEMBLY 5 HOW TO USE THE EXERCISE BIKE 11 MAINTENANCE AND TROUBLESHOOTING 17 EXERCISE GUIDELINES 18 FCC INFORMATION 19 PART LIST 20 EXPLODED DRAWING 22 ORDERING REPLACEMENT PARTS Back Cover LIMITED WARRANTY Back Cover WARNING DECAL PLACEMENT This drawing - Reebok Trainer Rx 4.0 Bike | English Manual - Page 3
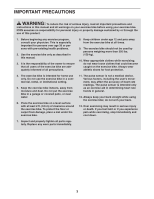
important precautions and instructions in this manual and all warnings on your exercise bike before using your exercise bike. ICON assumes no problems. 2. Use the exercise bike only as described in this manual. 3. It is the responsibility of the owner to ensure that all users of the exercise bike - Reebok Trainer Rx 4.0 Bike | English Manual - Page 4
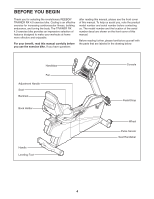
REEBOK® TRAINER RX 4.0 exercise bike. Cycling is an effective exercise for increasing cardiovascular fitness, building endurance, and toning the body. The TRAINER RX 4.0 exercise bike front cover of this manual. Before reading further, please familiarize yourself with the parts that are labeled in - Reebok Trainer Rx 4.0 Bike | English Manual - Page 5
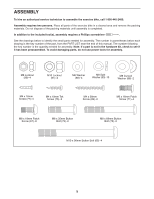
service technician to assemble the exercise bike, call 1-800-445-2480. Assembly requires two persons. Place all parts of the exercise bike the part, from the PART LIST near the end of this manual. The number following the key number is the quantity needed for assembly. Note: If a part is - Reebok Trainer Rx 4.0 Bike | English Manual - Page 6
1. To make assembly easier, read the 1 information on page 5 before you begin. Orient the Front Stabilizer (15) so that the Wheels (17) are in the position shown. Attach the Front Stabilizer (15) to the Frame (1) with two M10 x 96mm Button Bolts (65) and two M10 Locknuts (91). Note: Only one - Reebok Trainer Rx 4.0 Bike | English Manual - Page 7
4. Tip: Do not damage the wires inside the Seat Handlebar (11) during this step. 4 Attach the Seat Handlebar (11) to the Seat Carriage (41) with two M8 x 68mm Button Bolts (70), two M8 Curved Washers (86), and two M8 Locknuts (99). Make sure that the Locknuts are in the hexagonal holes in the Seat - Reebok Trainer Rx 4.0 Bike | English Manual - Page 8
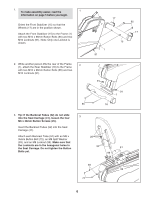
6. Attach the Seat (9) to the Seat Carriage (41) with four M6 x 16mm Patch Screws (71) and 6 four M6 Washers (88). Note: Only two Patch 9 Screws and two Washers are shown. 41 88 71 7. Have another person hold the Upright (2) near the Frame (1). See the inset drawing. Locate the wire tie in - Reebok Trainer Rx 4.0 Bike | English Manual - Page 9
the Left Pedal (not shown) counterclockwise into the Left Crank Arm (not shown). IMPORTANT: Tighten both pedals as firmly as possible. After using the exercise bike for one week, retighten the pedals. Adjust the strap on the Right Pedal (21) to the desired position, and then press the end of the - Reebok Trainer Rx 4.0 Bike | English Manual - Page 10
the 11 front of the exercise bike. To plug the Power Adapter (51) into an outlet, see HOW TO PLUG IN THE POWER ADAPTER on page 11. 51 12. Make sure that all parts are properly tightened before you use the exercise bike. Note: After assembly is completed, some extra parts may be left over. Place - Reebok Trainer Rx 4.0 Bike | English Manual - Page 11
seat to the desired position, and then push downward on the handle to lock the seat in place. Seat Handle HOW TO LEVEL THE EXERCISE BIKE If the exercise bike rocks slightly on your floor during use, turn one or both of the leveling feet under the rear stabilizer until the rocking motion is - Reebok Trainer Rx 4.0 Bike | English Manual - Page 12
performance workouts. Each workout automatically changes the resistance of the pedals and prompts you to vary your pedaling pace as it guides voice of a personal trainer coaches you through your exercise. To activate the console, see page 13. To turn off the console, see page 13. To use the manual - Reebok Trainer Rx 4.0 Bike | English Manual - Page 13
will turn off and the display will be reset. When you are finished exercising, unplug the power adapter. IMPORTANT: If you do not do this, the electrical components on the exercise bike may wear prematurely. HOW TO USE THE MANUAL MODE 1. Begin pedaling or press any button on the console to turn on - Reebok Trainer Rx 4.0 Bike | English Manual - Page 14
hands excessively or to squeeze the metal contacts tightly. For optimal performance, clean the metal contacts using a soft cloth; never use alcohol the fan will turn off automatically. 7. When you are finished using the exercise bike, the console will turn off automatically. See HOW TO TURN OFF THE - Reebok Trainer Rx 4.0 Bike | English Manual - Page 15
workout. To select a preset workout, press the Performance Workouts or the Wt. Loss Workouts button repeatedly until is too high or too low, you can manually override the setting by pressing the Resistance buttons. finished using the exercise bike, the console will turn off automatically. See HOW TO - Reebok Trainer Rx 4.0 Bike | English Manual - Page 16
of this manual. iFit while you exercise, plug a personal trainer will begin guiding you through your workout. iFit workouts function in the same way as preset workouts. To use the workout, see steps 3 to 7 on page 15. 3. When you are finished exercising finished exercising. Store - Reebok Trainer Rx 4.0 Bike | English Manual - Page 17
MAINTENANCE AND TROUBLESHOOTING Inspect and tighten all parts of the exercise bike regularly. Replace any worn parts immediately. To clean the exercise bike, use a damp cloth and a small amount of mild soap. IMPORTANT: To avoid damage to the console, keep liquids away from the console and keep the - Reebok Trainer Rx 4.0 Bike | English Manual - Page 18
exercising at the proper intensity is the key to achieving results. You can use your heart rate as a guide perform aerobic exercise, which is activity that requires large amounts of oxygen for prolonged periods of time. For aerobic exercise, adjust the intensity of your exercise -exercise problems. - Reebok Trainer Rx 4.0 Bike | English Manual - Page 19
comply with the limits for a Class B digital device, pursuant to part 15 of the FCC Rules. These limits are designed to provide reasonable protection energy and, if not installed and used in accordance with the instructions, may cause harmful interference to radio communications. However, there is - Reebok Trainer Rx 4.0 Bike | English Manual - Page 20
PART LIST-Model No. RBEX14910.0 R0810B Key No. Qty. 1 1 2 1 3 1 4 1 5 1 6 1 7 1 8 1 9 1 10 2 11 1 12 1 13 1 14 1 15 1 16 1 17 2 18 2 19 2 20 1 21 1 22 1 23 1 24 1 25 4 26 1 - Reebok Trainer Rx 4.0 Bike | English Manual - Page 21
M4 x 12mm Flange Screw M6 x 8mm Hex Screw M3.5 x 12mm Screw M6 x 65mm Hex Screw M5 Washer Assembly Tool Userʼs Manual Note: Specifications are subject to change without notice. For information about ordering replacement parts, see the back cover of this manual. *These parts are not illustrated. 21 - Reebok Trainer Rx 4.0 Bike | English Manual - Page 22
EXPLODED DRAWING A-Model No. RBEX14910.0 R0810B 67 49 93 67 93 7 64 58 42 4 49 43 77 50 24 22 92 2 67 93 93 67 93 20 93 67 16 48 19 65 95 35 34 95 39 99 99 93 93 93 28 33 46 77 45 91 79 93 67 93 67 66 17 48 91 33 15 80 91 80 1 91 91 68 32 31 30 61 102 37 101 38 - Reebok Trainer Rx 4.0 Bike | English Manual - Page 23
EXPLODED DRAWING B-Model No. RBEX14910.0 R0810B 77 13 77 77 14 77 77 77 77 77 9 77 77 77 77 88 77 77 77 3 75 89 10 77 11 86 70 86 8 77 88 71 71 52 82 27 97 94 26 88 25 97 63 84 81 88 52 25 57 74 93 74 93 55 59 76 97 85 96 73 6 83 41 54 96 40 74 74 93 57 54 - Reebok Trainer Rx 4.0 Bike | English Manual - Page 24
part(s) (see the PART LIST and the EXPLODED DRAWING near the end of this manual) LIMITED WARRANTY IMPORTANT: You must register this product within 30 days of the purchase date to avoid added fees for service of or in connection with the use or performance of the product; damages with respect to any
-
 1
1 -
 2
2 -
 3
3 -
 4
4 -
 5
5 -
 6
6 -
 7
7 -
8
-
9
-
10
-
11
-
12
-
13
-
14
-
15
-
16
-
17
-
18
-
19
-
20
-
21
-
22
-
23
-
24
 |
 |

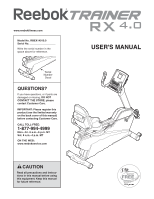
USER'S MANUAL
CAUTION
Read all precautions and instruc-
tions in this manual before using
this equipment. Keep this manual
for future reference.
Serial
Number
Decal
Model No. RBEX14910.0
Serial No.
Write the serial number in the
space above for reference.
www.reebokfitness.com
QUESTIONS?
If you have questions, or if parts are
damaged or missing,
DO NOT
CONTACT THE STORE; please
contact Customer Care.
IMPORTANT: Please register this
product (see the limited warranty
on the back cover of this manual)
before contacting Customer Care.
CALL TOLL-FREE:
1-877-994-4999
Mon.–Fri. 6 a.m.–6 p.m. MT
Sat. 8 a.m.–4 p.m. MT
ON THE WEB:
www.reebokservice.com