Ricoh 3035 Copy Reference
Ricoh 3035 - Aficio B/W Laser Manual
 |
View all Ricoh 3035 manuals
Add to My Manuals
Save this manual to your list of manuals |
Ricoh 3035 manual content summary:
- Ricoh 3035 | Copy Reference - Page 1
Operating Instructions Copy Reference 1 Placing Originals 2 Copying 3 Troubleshooting 4 User Tools (Copier/Document Server Features) 5 Specifications Read this manual carefully before you use this machine and keep it handy for future reference. For safe and correct use, be sure to read the Safety - Ricoh 3035 | Copy Reference - Page 2
. Notes: The model names of the machines do not appear in the following pages. Check the type of your machine before reading this manual. (For details, see p.3 "Machine Types".) • Type 1: Aficio 3035 • Type 2: Aficio 3045 Certain types might not be available in some countries. For details, please - Ricoh 3035 | Copy Reference - Page 3
Instructions" • CD-ROM 2 "Scanner Driver and Document Management Utility" ❖ General Settings Guide (PDF file - CD-ROM1) Provides an overview of the machine and describes System Settings (such as Tray Paper Settings), Document Server functions, and troubleshooting. Refer to this manual for Address - Ricoh 3035 | Copy Reference - Page 4
(PDF file - CD-ROM1) Describes operations, functions, and troubleshooting for the machine's scanner function. ❖ Manuals for DeskTopBinder Lite DeskTopBinder Lite is a utility included on the CD-ROM labeled "Scanner Driver and Document Management Utility". • DeskTopBinder Lite Setup Guide (PDF file - Ricoh 3035 | Copy Reference - Page 5
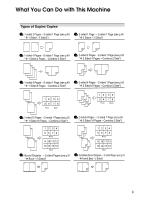
What You Can Do with This Machine iii - Ricoh 3035 | Copy Reference - Page 6
iv - Ricoh 3035 | Copy Reference - Page 7
v - Ricoh 3035 | Copy Reference - Page 8
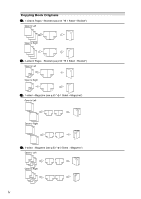
Machine iii Notice ...1 How to Read This Manual 2 Machine Types ...3 Functions that Require Options Detectable by the Auto Paper Select 10 Missing Image Area 11 Placing Originals 12 Copying from the Bypass Tray 20 Copier Functions 23 Adjusting Image Density 23 Selecting Original Type - Ricoh 3035 | Copy Reference - Page 9
As You Want 80 When Memory Is Full 83 4. User Tools (Copier/Document Server Features) User Tools Menu (Copier/Document Server Features 85 Accessing User Tools (Copier/Document Server Features 91 Changing Default Settings 91 Exiting User Tools ...91 General Features P.1/4 92 General Features - Ricoh 3035 | Copy Reference - Page 10
viii - Ricoh 3035 | Copy Reference - Page 11
which reproduction is prohibited by law. Copying or printing the following items is generally prohibited by local law: bank notes, revenue stamps, bonds, stock certificates, bank drafts, checks, passports, driver's licenses. The preceding list is meant as a guide only and is not inclusive. We assume - Ricoh 3035 | Copy Reference - Page 12
set of symbols is used in this manual. R WARNING: This symbol indicates a potentially hazardous situation that might result in death or serious injury when you misuse the machine without following the instructions under this symbol. Be sure to read the instructions, all of which are described in the - Ricoh 3035 | Copy Reference - Page 13
Machine Types This machine comes in two models which vary by copy speed. To make sure which model you have, see the inside front cover of this manual. Copy speed Type 1 35 copies/minute (A4K, 81/2" × 11"K) Type 2 45 copies/minute (A4K, 81/2" × 11"K) 3 - Ricoh 3035 | Copy Reference - Page 14
Options Batch mode SADF Auto Document Feeder Mixed Size mode Shift Sort Shift Stack Staple Saddle Stitch Punch Auto Document Feeder (ADF) 1000-Sheet finisher *1 2 Tray finisher *1 Booklet finisher *1 ❍❍❍ ❍❍❍ ❍❍❍ ❍ ❍❍❍❍ *1 The bridge unit and paper tray unit are required when you install the - Ricoh 3035 | Copy Reference - Page 15
status. • d: Add Staple indicator • D: Add Toner indicator • B: Load Paper indicator • L: Service Call indicator • M: Open Cover indicator • x: Misfeed indicator See "Control Panel", General Settings Guide. 3. {User Tools/Counter} key • User Tools Press to change the default and conditions to meet - Ricoh 3035 | Copy Reference - Page 16
Sample copy". 13. {Start} key Press to start copying. Press to start scanning and printing in Document Server mode. 14. {Clear/Stop} key • Clear Press to delete to select the following functions: • Copier: • Document Server: • Facsimile: • Printer: • Scanner: 18. Function status indicator These show - Ricoh 3035 | Copy Reference - Page 17
following illustrations are examples for the machine with the optional 2 Tray finisher and Large Capacity Tray (LCT) installed. ❖ Initial copy display 4. The number of originals scanned into memory, number of copies set, and number of copies made. 5. Sort, Stack, Staple or Punch mode. AHU007S 6. - Ricoh 3035 | Copy Reference - Page 18
8 - Ricoh 3035 | Copy Reference - Page 19
damage to the originals. Place these originals on the exposure glass instead. • Originals other than those specified on p.9 "Sizes and Weights of Recom- mended Originals". • Stapled or clipped originals • Perforated or torn originals • Curled, folded, or creased originals • Pasted originals 9 - Ricoh 3035 | Copy Reference - Page 20
other projecting parts • Sticky such as books • Transparent 8" × 13" with User Tools (System Settings). See "Size Setting" in "General Features", General Settings Guide. *2 The machine cannot detect KL 81/2" × 13" L 10" × 14" L × × × × ❍❍❍ × × × × ❍× × - Ricoh 3035 | Copy Reference - Page 21
❖ Exposure glass Positioning mark Maximum scanning area mm) mm) ❖ ADF GCSIZE1E Originals 1 GCSIZE2E of the following originals, so select the paper size manually. • Originals with indexes, tags, or other projecting parts • Transparent originals such as OHP transparencies or translucent paper - Ricoh 3035 | Copy Reference - Page 22
For example, to copy A3Kor 11" × 17"K originals with the Staple function selected: Original Orientation You can set the original orientation in copies as you want. This is useful for copying large originals with the Staple, Duplex, Combine or Stamp functions. GCGSET3E Note ❒ It is recommended to - Ricoh 3035 | Copy Reference - Page 23
the exposure glass. The original should be aligned to the rear left corner. C Press [OK]. ZEWH050E 1. Positioning mark 2. Left scale Note ❒ Start with the first page to be copied. C Lower the exposure glass cover or ADF. 13 - Ricoh 3035 | Copy Reference - Page 24
machine to detect the size of the scanned image incorrectly or display a paper misfeed malfunction. ZGHS060E 1. Limit mark 2. Document guide Note ❒ Straighten curls in the originals pages as one document, even if it is placed on the ADF in parts. A Press [Special Original]. 1. Sensors - Ricoh 3035 | Copy Reference - Page 25
originals have been scanned. Mixed size mode F Press the {Start} key. SADF mode In SADF mode, even when an original is placed page by page in the ADF, each page is automatically fed when placed. Preparation To use the SADF function, you should make a setting in User Tools (Copier/Document Server - Ricoh 3035 | Copy Reference - Page 26
length of 128-1,260 mm (5"- 49") can be placed with this function. A Press [Special Original]. CP19AE 1. Place into the ADF 2. Vertical size D Adjust the guide to the widest original size. E Place the aligned originals face up into the ADF. F Press the {Start} key. B Press [Custm Size Origi - Ricoh 3035 | Copy Reference - Page 27
"Authentication Information", General Settings Guide. When Basic Authentication, Windows Authentication, LDAP Authentication, or Integration Server Authentication is set, the authentication screen will be displayed. Enter your login user name and user password, and then press [Login]. See "When the - Ricoh 3035 | Copy Reference - Page 28
you want to interrupt a long copy job to make urgently needed copies. Limitation ❒ You cannot use the Interrupt Copy function when fax originals are being scanned or the scanner function is being used. A Press the {Interrupt} key. The Interrupt indicator goes on. When the originals stop - Ricoh 3035 | Copy Reference - Page 29
. When the current copy job is finished, the next job will start automatically. A Press [NextJob] when "Copying..." is shown. B Set up the next copy job. C Place the originals in the ADF, and then press the {Start} key. All originals are scanned. D Press [To "Printing"]. Returns to the initial copy - Ricoh 3035 | Copy Reference - Page 30
A5KL, version 81/2" × 13"L Preparation Inch A3L, 11" × 17"L, When the duplex unit is attached, the default is [1 Sided→2 Sided]. When copying from the bypass tray, select [1 Sided] for copying 23.4" *1 ZDSH110J *1 The range is 148-432 mm (5.8"-17") when the booklet finisher is installed. 20 - Ricoh 3035 | Copy Reference - Page 31
want to copy facing down until you hear the beep, and then align the paper guide to the paper size. C Select the type and size of the pa- per. out the extender to support paper sizes larger than A4L, 81/2" × 11"L. ❒ Fan paper to get air between the sheets and avoid a multi-sheet feed. C Select - Ricoh 3035 | Copy Reference - Page 32
originals, and then press the {Start} key. Note ❒ When copying onto OHP trans- parencies, remove copied sheets one by one. E When your copy job is finished, press the {Clear Modes} key to clear the settings. 22 - Ricoh 3035 | Copy Reference - Page 33
Copier Functions Copier Functions Adjusting Image Density Manual image density A There are three types of adjustment Press [Auto Image Density] to cancel available: ❖ Auto Image Density it. B Press [Lighter] or [Darker] to adjust 2 The machine automatically adjusts the image density. - Ricoh 3035 | Copy Reference - Page 34
originals: 2 ❖ Text Select this mode when your origi- nals contain only text (no pictures). ❖ Text/Photo Select [Text / Photo] when your originals contain photographs or pictures with text. ❖ Photo Delicate tones of photographs and pictures can be reproduced with this mode. ❖ Pale Select this - Ricoh 3035 | Copy Reference - Page 35
Copier Functions Selecting Copy Paper There are two ways to select copy paper: ❖ Auto Paper Select The machine selects a suitable size of copy paper automatically based on original size and reproduction ratio. 2 ❖ Manual 81/2" × 11"KL, 51/2" × 81/2"KL, 10" × 14"L ❒ Only the paper trays set to [ - Ricoh 3035 | Copy Reference - Page 36
] is selected. 2 Note ❒ Trays with a key mark will not be automatically selected. See "Paper Type" in "Tray Paper Settings", General Settings Guide. Manual Paper Select A Select the paper tray, bypass tray or the LCT. The indicator corresponding to the selected paper tray is highlighted. Reference - Ricoh 3035 | Copy Reference - Page 37
Copier selected. See p.25 "Auto Paper Select". 2 GCROTA0E Note ❒ The default for Auto Tray Switching is With image rotation, you cannot use the 2" or "Top 2" is selected for stapling or if the Punch function is selected when using the 2 Tray finisher. See p.37 "Staple" and p.43 "Punch". ❒ You - Ricoh 3035 | Copy Reference - Page 38
The base point of Reduce/Enlarge differs depending on how the original is scanned. When the original is placed on the exposure glass, the upper left D Place your originals, and then press the {Start} key. -Create margin mode Use Create Margin to reduce the image to 93% of its original size with - Ricoh 3035 | Copy Reference - Page 39
Copier Functions B A Press [Create 1%, press [n] or [o]. To change the ratio in increments of 10%, press and hold down [n] or [o]. ❒ If you have incorrectly preset ratio near the desired ratio using [Reduce] or [Enlarge], and then adjust the ratio with [n] or [o]. A Press [Reduce / Enlarge]. A - Ricoh 3035 | Copy Reference - Page 40
Copying Auto Reduce/Enlarge The machine can choose an appropriate reproduction ratio based on the paper and original sizes you select. A Press [Auto Reduce/Enlarge]. 2 B Select the paper tray. C Place your originals, and then press the {Start} key. Note ❒ You cannot use the bypass tray with - Ricoh 3035 | Copy Reference - Page 41
Copier Functions C Make sure that [Specifd. Ratio] is highlighted. D Enter the length of Note ❒ You can also select a preset ratio close to the desired ratio using [Reduce] or [Enlarge], then adjust with [n] or [o]. A Press [Reduce / Enlarge]. B Press [Specifd. Ratio]. C Press [Direct. Mag.%]. - Ricoh 3035 | Copy Reference - Page 42
ratio in increments of 1%. Pressing and holding down [n] or [o] changes it in increments of 10%. ❒ If you have incorrectly entered the ratio, readjust the ratio with [n] or [o]. D Press [Vertical]. E Adjust the ratio with [n] or [o]. F Press [OK]. D Press [OK]. E Place your originals, and then press - Ricoh 3035 | Copy Reference - Page 43
Copier Functions A Press [Reduce / Enlarge]. Sort The machine can scan originals into memory and automatically sort size of the copy with the number keys, and then press [#]. Copies are assembled as sets in sequential order. F Enter the vertical size of the origi- General Settings Guide. 33 - Ricoh 3035 | Copy Reference - Page 44
or those of each job are deliv- ered, the next copy is shifted when delivered so you can sep- arate each set or job. 2 • 2 Tray finisher (optional) The shift tray moves backward or forward each time the copies of one set or those of each job are delivered, causing the next - Ricoh 3035 | Copy Reference - Page 45
press the {#} key after all the originals have been scanned. D Press the {Start} key. Note ❒ If you press [Suspend] after checking the results, return to step A to adjust the copy set- tings as necessary. You can change the settings for Staple, Duplex (one-sided → one-sid- ed, one-sided → two - Ricoh 3035 | Copy Reference - Page 46
ADF us- so that you can separate each job ing Batch mode, press the {#} by page. key after all the originals have been scanned. 333 • Booklet finisher (optional) Each time the copies of one page are delivered, the finisher shift tray moves backward or forward , causing the top sheet of each - Ricoh 3035 | Copy Reference - Page 47
Copier Functions Staple An optional finisher and the bridge unit are required for this function. Each copy set can be stapled together. 2 Note ❒ You cannot use the bypass tray with this function. Reference Related initial settings p.104 "Select Stapling Position" Stapling position and original - Ricoh 3035 | Copy Reference - Page 48
Copying ❖ 1000-Sheet finisher 2 STAPLEAE STAPLECE STAPLEDE STAPLEEE Top 2 Left 2 Bottom Top Original location Exposure glass ADF K Stapling position *1 L K L K STAPLE25 STAPLE28 STAPLE27 STAPLE30 *2 L K L STAPLE31 STAPLE22ADA STAPLE10ADA STAPLE33 STAPLE24ADA *2 STAPLE20ADA 38 - Ricoh 3035 | Copy Reference - Page 49
❖ 2 Tray finisher STAPLEAE Top Copier Functions Original location Exposure glass ADF K Stapling position *1 2 L K Top Slant STAPLEBE STAPLECE L K L Bottom STAPLEDE K L Left 2 STAPLE25 STAPLE26 STAPLE27 STAPLE28 STAPLE29 *2 STAPLE30 STAPLE31 STAPLE32 STAPLE33 39 - Ricoh 3035 | Copy Reference - Page 50
Copying 2 STAPLEEE ❖ Booklet finisher Top 2 Original location Exposure glass ADF K Stapling position *1 L STAPLE22ADA STAPLE23ADA STAPLE24ADA *2 STAPLE10ADA STAPLE14ADA STAPLE20ADA Original location Exposure glass ADF K Stapling position *1 Top STAPLEAE STAPLECE L K L Bottom - Ricoh 3035 | Copy Reference - Page 51
STAPLEDE Left 2 Original location Exposure glass ADF K Copier Functions Stapling position *1 *2 L 2 K STAPLE31 STAPLE32 STAPLE33 Top 2 STAPLEEE L STAPLE22ADA STAPLE23ADA STAPLE24ADA *2 L STAPLE10ADA STAPLE14ADA STAPLE20ADA Saddle Stitch STAPLEFE K STAPLE34 STAPLE35 STAPLE36 - Ricoh 3035 | Copy Reference - Page 52
stapling positions. ❖ 1000-Sheet finisher 2 ❖ 2 Tray finisher ❖ Booklet finisher Note ❒ When you select the stapling position, Sort mode is automatically selected. Reference p.37 "Stapling with the first page to be cop- ied. When placing an original in the ADF, set so the last page is on the bottom - Ricoh 3035 | Copy Reference - Page 53
Copier Functions Punch The optional 2 Tray finisher and the bridge unit are required for this function. You can make punch holes in copies. ❖ 2 holes 2 ❖ 3 holes GCPNCH1E ❖ 4 holes GCPNCH3E GCPNCH0E Note ❒ You cannot use the bypass tray - Ricoh 3035 | Copy Reference - Page 54
Copying ❖ Punch hole positions Original location Exposure glass ADF 2 holes K 2 L 3 holes K Standard L 4 holes K L Punch hole positions *1 44 - Ricoh 3035 | Copy Reference - Page 55
Original location Exposure glass ADF 2 holes K L 3 holes K L 4 holes K L Copier Functions Punch hole positions *1 2 90º Turn *1 This table shows the punch hole positions, not the orientation of delivery. A Select one of the punch hole positions. B - Ricoh 3035 | Copy Reference - Page 56
Copies 2 one-sided pages on 1 two- or horizontal L ). sided page. 2 ❖ 2 Sided→2 Sided Copies 1 two-sided page on 1 twosided page. ❖ 2 Sided 17-28 lb. (55-90 kg, 121.3-198.4 lb.). Reference p.60 "Margin Adjustment" Related initial settings p.97 "Front Margin: Left/Right" p.97 "Back Margin: Left/ - Ricoh 3035 | Copy Reference - Page 57
placing an original in the ADF, set so the last page is on the bottom. Originals and copy orientation You can select the orientation. 2 • Top to Top Duplex1 • Top to Bottom Duplex2 Note ❒ You can change the default orien- tation with User Tools. See p.94 "Copy Orientation in Duplex Mode" and - Ricoh 3035 | Copy Reference - Page 58
→ Combine 1 Side Copies 1 two-sided original to one side of a sheet. ❖ 2 Sided 2 Pages → Combine 1 Side Copies 2 two-sided originals to one side of a sheet. ❖ 2 Sided 4 Pages → Combine 1 Side Copies 4 two-sided originals to one side of a sheet. GCSHUY2E ❖ Placing originals (originals placed in the - Ricoh 3035 | Copy Reference - Page 59
Copier Functions Reference Related initial settings Two-Sided Combine p.97 "Erase Original Shadow in Combine" Combines various pages of originals into one sheet with two sides. p.99 "Copy Order in Combine" ❖ 1 Sided 4 Pages → Combine 2 Side p.99 "Separation Line in Combine" Copies 4 one- - Ricoh 3035 | Copy Reference - Page 60
" p.99 "Copy Order in Combine" p.99 "Separation Line in Combine" A Press [Dup./Combine/Series]. GCSHVY1E ❖ 2 Sided 8 Pages → Combine 2 Side Copies 4 two-sided originals to one sheet with four pages per side. B Press [1 Sided] or [2 Sided] for Orig- inal, and then press [Combine 2 Side] for Copy - Ricoh 3035 | Copy Reference - Page 61
Copier Functions Reference p.47 "Originals and copy orientation" C Select the number of originals to combine, and then press [OK]. ❖ Book→2 Sided Copies a two-page spread original onto one sheet with one page per side. D Select the paper size. E Press [OK]. 2 F Place your originals, and then - Ricoh 3035 | Copy Reference - Page 62
selected. G Place your original on the expo- sure glass, and then press the {Start} key. Note ❒ Press the {#} key after all origi- nals have been scanned. GCBOOK1E ❖ 2 Sided→Booklet Make two-sided originals to copies in page order for a folded booklet as shown. ❖ Open to left 52 GCAH010E - Ricoh 3035 | Copy Reference - Page 63
Copier Functions ❖ Open to right ❖ 2 Sided→Magazine Copies two or more originals of two-sided to make copies in page order when they are folded and stacked. ❖ Open to left 2 GCAH020E ❖ 1 Sided→Magazine Copies two or more originals to make copies in page order when they are folded and stacked. - Ricoh 3035 | Copy Reference - Page 64
using Batch mode, press the {#} key after all the originals have been scanned. GCBOOK6E Note ❒ You cannot use the bypass tray with this function. Open to right" with User Tools. Reference p.99 "Orientation: Booklet, Magazine" B Press [Dup./Combine/Series]. C Press [Series / Book]. 54 Image Repeat - Ricoh 3035 | Copy Reference - Page 65
Copier Functions ❖ Original: A5K / Copy paper: A4K or Original: A5L / Copy paper A4L 4 repeats (71%) 16 repeats (35%) G Place your original, and then press the {Start} - Ricoh 3035 | Copy Reference - Page 66
❒ The originals of size A5L, B6 JISKL, 51/2" × 81/2"L cannot be detected properly on the exposure glass. Be sure to select the copy pa- per manually or place the originals in the ADF. Note ❒ You cannot use the bypass tray with this function. ❒ The original sizes and orientations for centring are - Ricoh 3035 | Copy Reference - Page 67
Copier Functions Positive/Negative Erase If your original is black and white, copy images are inverted. This function erases the centre and/or all four sides - Ricoh 3035 | Copy Reference - Page 68
GCCENT3E Reference The erase width is set to 10 mm (0.4") as a default. You can change this setting with User Tools. p.97 "Erase Centre Width" p.97 "Erase Border Width" Note ❒ The relationship between the original orientation and the erased part is as follows: L original K original ❒ 1: Erased - Ricoh 3035 | Copy Reference - Page 69
Selecting [Diff. Width] A Press [Diff. Width]. Copier Functions Centre/Border erase A Press [Edit / Stamp]. 2 B Press the key for the border you want to change and set an erase border width with [n] and [o]. C - Ricoh 3035 | Copy Reference - Page 70
of 0.1") version A Press [Edit / Stamp]. B Press the key for the part you want to change, and then set an erase margin width with [n] and [o]. Sided Auto Margin: TtoT" 60 B Press [Margin Adjustment]. C Set a binding margin for a front page. Press [←] and [→] when setting the left and right - Ricoh 3035 | Copy Reference - Page 71
Copier Functions F Press [OK]. G Place your originals, and then press the {Start} key ]. Background Numbering F Press [OK]. G Use this function to have numbers Place your originals, and then 2 printed on the background of copies. press the {Start} key. It can help you to keep track of confi- - Ricoh 3035 | Copy Reference - Page 72
D Select the desired message. E Press [All Pages] or [1st Page Only] to select the print page. Note ❒ You can change the position, 2 density A Press [Change]. B Select the position for print, size, and density, and then press [OK]. User Stamp Copies with the registered stamp. B Press [Stamp - Ricoh 3035 | Copy Reference - Page 73
original orientation Copier Functions D Select the stamp you require. E Press [All Pages] or [1st Page Only] to select the print page. 2 GCSTMP6E press [OK]. To program the user stamp Note ❒ The range of stamp images for readability is 10-297 mm high (0.4"-11.7") and 10-432 mm (0.4"- 17") wide. - Ricoh 3035 | Copy Reference - Page 74
on the display panel. You can register up to 10 characters. I Press [OK]. Reference "Entering Text", General Settings Guide To delete the user stamp Important ❒ You cannot restore a deleted stamp. A Make sure that the machine is in copier mode. B Press the {User Tools/Counter} key. ZCAS100E 64 - Ricoh 3035 | Copy Reference - Page 75
Delete], and then press [Exit]. I Press [Exit]. The display returns to the Copier/Document Server Features main menu. J Press [Exit]. Exits settings and gets ready to copy. Date Stamp Use this function to print dates on your copies. Stamp position and original orientation GCSTMP7E Note ❒ You cannot - Ricoh 3035 | Copy Reference - Page 76
[Edit / Stamp]. To change the style of date A Press [Change Format]. 2 B Press [Stamp]. C Press [Date Stamp]. D Press [All Pages] or [1st Page Only] to select the print page. B Select the date format, and then press [OK]. To change the stamp position A Press [Change]. Note ❒ You can change the - Ricoh 3035 | Copy Reference - Page 77
Copier Functions Page Numbering Use this function to print page numbers on your copies. Note ❒ You cannot use the bypass tray with this function. Reference Related initial settings p.101 "Font" p.102 "Size" 2 p.102 "Superimpose" p.102 "Stamp Format" p.102 "Duplex Back Page Stamping Position - Ricoh 3035 | Copy Reference - Page 78
press the {Start} key. Note Changing the stamp position A Press [Change]. B Select the desired position, and then press [OK]. Specifying the first printing page and start number ❒ To change the number entered, press [Clear] or the {Clear/Stop} key, and then enter a new number. C Press [Numbering - Ricoh 3035 | Copy Reference - Page 79
Copier Functions D Press [Last Number], enter the number of the page at which to stop numbering with 2/5...) A Press [Change] on the right side. B Press [First Printing Page], enter the original sheet number from which to start printing, and then press the {#} key. Proceed to step E when not - Ricoh 3035 | Copy Reference - Page 80
the front and back covers are copied one-sided or two-sided. See "Cover Sheet Tray"in "Tray Paper Settings", General Settings Guide. ❖ Front cover The first page of your originals is copied on specific paper sheet for covers, or a cover sheet is inserted before the first copy. • Copy • Blank 70 - Ricoh 3035 | Copy Reference - Page 81
Copier Functions ❖ Front/Back covers The first and last pages of your original are copied on specific paper for use as covers. • Copy Designate Use this function to have certain pages "Slip Sheet Tray"in " Tray Paper Settings", General Settings Guide. Note ❒ The slip sheets should be the same size - Ricoh 3035 | Copy Reference - Page 82
the I Select the paper tray that contains the sheet paper to copy the origi- nals. number keys, and then press the {#} key. F To specify another page location, J Place your originals in the ADF, repeat steps D to E. and then press the {Start} key. Note ❒ To select chapters 11 to 20, press - Ricoh 3035 | Copy Reference - Page 83
Copier Functions Slip Sheets Using this function, you can insert a slip sheet between OHP transparencies or stacks. You can also print on the inserted slip sheet. . See "Slip Sheet Tray" in "Tray Paper Settings", General Settings Guide. Note ❒ Load the slip sheets in the same size and orientation - Ricoh 3035 | Copy Reference - Page 84
set to be deleted after three days by the factory default. You can specify the period after which For more Guide. A Press [Store File]. B Enter a file name, user name, or password if necessary. 74 F Press the {Start} key. Originals are scanned and stored in memory. Note ❒ To stop scanning - Ricoh 3035 | Copy Reference - Page 85
Program 2 Note ❒ You can store up to 10 programs. ❒ You can select the standard mode or program No. 10 as the mode to be set when modes tray prioritized with User Tools (System Settings) will be selected first. See "Paper Tray Priority" in "Tray Paper Settings", General Settings Guide. ❒ Programs - Ricoh 3035 | Copy Reference - Page 86
Copying F Press [OK]. D Press [Yes]. When the settings are successfully The program is deleted, and the stored, m appears on the left side display returns to the initial copy and the program name appears on display. the right side of the registered pro- gram number. The display returns to - Ricoh 3035 | Copy Reference - Page 87
messages. If other messages appear, follow the instructions as they are displayed. Note ❒ For messages that are not listed here, see General Settings Guide. Message Causes Solutions Cannot detect original size. Improper original is Select paper manually, not in Auto placed. See p.11 "Sizes - Ricoh 3035 | Copy Reference - Page 88
to use restricted to authentified this function. users only. Authentication has The entered login user Inquire the user administrator for failed. name or login password is the correct login user name and not correct. login password. The machine cannot per- Contact the administrator - Ricoh 3035 | Copy Reference - Page 89
the image density. See p.23 "Adjusting Image Density". The paper size is not appropriate. Use the recommended paper. Note ❒ A light copy may result when you use damp or rough grain paper. Toner bottle is almost emp- Add toner. See General Settings ty. Guide. Parts of the image are not The - Ricoh 3035 | Copy Reference - Page 90
. See p.103 "Memory Full Auto Scan Restart". Paper does not output dur- When you stop printing Press the {Reset} key and cancel ing printing with stapling. while using the staple func- copy settings, including stapling. tion, papers not stapled during printing may be left in the staple unit. 80 - Ricoh 3035 | Copy Reference - Page 91
are not scanned Place the originals correctly. 3 correctly. In Margin Adjustment mode, parts of the original image are not copied. You set a wide erased mar- Set a narrower margin with User proper reproduction ratio. ❖ Stamp Problem The stamp position is wrong. - Ricoh 3035 | Copy Reference - Page 92
Troubleshooting ❖ Combine Problem Causes Solutions You cannot make a book from Booklet or Magazine mode by folding specified a reproduc- When you specify a reproduction parts of the image are not tion ratio that does not ratio using Manual Paper Select copied. match the sizes of your - Ricoh 3035 | Copy Reference - Page 93
Scan Restart] in User Tools (see p.103 "Memory Full Auto Scan scanned. Press [Print] to copy scanned origi- The scanned original exceeds the number of pages that can be stored in memory. Press [Print] to copy scanned originals and cancel the scanning data. Press [Clear] to cancel the scanning - Ricoh 3035 | Copy Reference - Page 94
Troubleshooting 3 84 - Ricoh 3035 | Copy Reference - Page 95
remains Job End Call Default On With Image Rotation Display Text Display Text: On Text/Photo: On Photo: Off Pale: On Generation Copy: On Text: Normal Text/Photo: Normal Photo: Print Photo Pale: Normal Generation Copy: Normal Text: Normal Text/Photo: Normal Photo: Normal Pale: Normal Generation - Ricoh 3035 | Copy Reference - Page 96
Features) User Tools Item Names Default General Features P.3/4 (See p.94 "General Features P.3/4".) Copy Function Key: F1-F5 • F1: 1 Sided→2 Sided: T to T • F2: 2 Sided: T to T→2 Sided: T to T • F3: 1 Sided→1 Sided Combine • F4: 1 Sided→1 Sided Combine: 4 originals • F5: Create Margin General - Ricoh 3035 | Copy Reference - Page 97
User Tools Menu (Copier/Document Server Features) User Tools Item Names Default Reproduction Ratio P.2/2 ( Metric version: 71% Inch version: 73% Ratio for Create Margin 93% R/E Priority Reduce Edit P.1/2 (See p.96 Erase Border Width Metric version: 10 mm Inch version: 0.4" Erase Original - Ricoh 3035 | Copy Reference - Page 98
User Tools (Copier/Document Server Features) User Tools Item Names Default Edit P.2/2 (See p.98 " Top Margin: 1.0" • Right Margin: 1.0" Stamp Format Size: 1× Density: Normal Page to Stamp: All Pages User Stamp Program/Delete Stamp Stamp Position: 1-4 Metric version • Position: Top Right • - Ricoh 3035 | Copy Reference - Page 99
Tools Item Names Date Stamp User Tools Menu (Copier/Document Server Features) Default Format Metric version: DD / MM / YYYY Inch version: MM / DD / YYYY Font Font 1 Stamp Position Metric version • Position: Top Left • Top Margin: 8 mm • Left Margin: - Ricoh 3035 | Copy Reference - Page 100
User Tools (Copier/Document Server Features) 4 90 User Tools Item Names Default Page Numbering Stamp Format P1, P2... Font Font 1 Size Auto Duplex Back Page Stamping Opposite Position Position Page Numbering in Combine Per Original Stamp on Designating Slip Sheet No Stamp Position - Ricoh 3035 | Copy Reference - Page 101
Basic Authentication, Win- dows Authentication, LDAP Authentication, or Integration Server Authentication is set, the authentication screen will be displayed. Enter your login name and login password, and then press [Login]. Note ❒ You can also quit User Tools by pressing the {User Tools/Counter - Ricoh 3035 | Copy Reference - Page 102
User Tools (Copier/Document Server Features) General Features P.1/4 ❖ Auto Paper Select Priority As a default, Auto Paper Select is selected. You can cancel this setting. See p.25 "Selecting Copy Paper". Note ❒ Default: Yes ❖ Paper Display You can choose to have the available paper trays and sizes - Ricoh 3035 | Copy Reference - Page 103
Photo For a photo original, adjust the finish quality level to match the type of photo original. Note ❒ Default: Text: On, Text/Photo: On, Photo: Off, Pale: On, Generation Copy: On Note ❒ Default: Print Photo ❒ [Custom Setting] is the value set during service setup. ❖ Copy Quality You can adjust - Ricoh 3035 | Copy Reference - Page 104
❒ Default: On ❒ If Panel Tone of User Tools (System Settings) is [Off], the beeper does not sound irrespective of the Tone: Original remains set- to: Normal, Photo: Normal, Pale: ting. See "Panel Tone" in "Gen- Normal, Generation Copy: Normal eral Features", General Settings Guide. 4 ❖ Copy - Ricoh 3035 | Copy Reference - Page 105
Accessing User Tools (Copier/Document Server Features) Note ❒ Default: Reproduction Ratio P.1/2 • Copy Function Key: F1: 1 Sided→2 Sided: T to F4: 1 Sided→1 Sided Combine: 4 originals • Copy Function Key: F5: Create Margin large ratio and have them shown on the initial display. You can also - Ricoh 3035 | Copy Reference - Page 106
User Tools (Copier/Document Server Features) ❒ When selecting [User Enlrg. Ratio], enter a ratio using the number keys (from 101 to 400%). ❖ Priority Setting: Enlarge You can set the ratio with priority when [Reduce / Enlarge] is pressed, followed by [Enlarge]. Note ❒ Default: • Metric version: 141 - Ricoh 3035 | Copy Reference - Page 107
Accessing User Tools (Copier/Document Server Features) ❖ Front Margin: Left/Right You can specify left and right margins on the front side of copies in Margin Adjustment mode. Note Note ❒ Default: • Metric version: Right 5 mm • Inch version: Right 0.2" ❒ Default: ❖ 1 Sided→2 Sided Auto Margin: - Ricoh 3035 | Copy Reference - Page 108
User Tools (Copier/Document Server Features) Edit P.2/2 Note ❒ The image area of approximately 1.5 mm (0.06") wide on the Broken B, or Crop Marks. 4 • None • Solid • Broken A • Solid • Broken B • Broken A • Crop Marks • Broken B • Crop Marks Note ❒ Default: None Note ❒ Default: None 98 - Ricoh 3035 | Copy Reference - Page 109
User Tools (Copier/Document Server Features) ❖ Separation Line in Combine You can select a separation line in Combine mode from None, Solid, Broken A, Broken B, or Crop Marks. See p.48 "One-Sided Combine" and p.49 "Two-Sided Combine". • None Note ❒ Default: Combine ❖ Copy on Designating Page - Ricoh 3035 | Copy Reference - Page 110
the arrow keys to adjust the position. Note ❒ Default: Normal ❒ Normal: The stamp is printed on the image. You cannot check which parts will overlap. ❒ Lighter : The image can be seen through the stamp. ❒ Lightest : You can see the image even clearer than in the Lighter setting. • Page to Stamp You - Ricoh 3035 | Copy Reference - Page 111
• Top Margin: 1.0" • Right Margin: 1.0" ❖ Stamp Format 1 - 4 You can adjust the print page for User Stamps 1 to 4 already registered. • Page to Stamp Sets whether to print the stamp on all pages or only on the first page. Note ❒ Default: All Pages Date Stamp ❖ Format You can select the date format - Ricoh 3035 | Copy Reference - Page 112
. Press the arrow keys to adjust the position. Note ❒ Default: Font 1 ❖ Size You can set the size of the stamp printed in Page Numbering mode. Note ❖ Superimpose You can have page numbers printed in white when they overlap black parts of the image. Note ❒ Default: No ❒ Default: Auto ❖ Duplex Back - Ricoh 3035 | Copy Reference - Page 113
Accessing User Tools (Copier/Document Server Default: Batch ❖ Memory Full Auto Scan Restart When memory becomes full while scanning originals, the machine ❖ SADF Auto Reset In SADF mode, an original must be set within a specified time after the previous original has been fed. You can adjust - Ricoh 3035 | Copy Reference - Page 114
User Tools (Copier/Document Server Features) ❖ Select Stapling Position Specify which Top 2 staples or Bottom shown on the initial display with priority. Note ❒ Default: Top 2 ❒ The optional 2 Tray finisher or booklet finisher is required to use this function. Administrator Tools ❖ Menu Protect - Ricoh 3035 | Copy Reference - Page 115
5. Specifications Combination Chart The combination chart given below shows which modes can be used together. When you read the chart, see the following table: ❍ These modes - Ricoh 3035 | Copy Reference - Page 116
Specifications Supplementary Informations ❖ Mixed Size mode • Since small originals may not be correctly aligned with the original guide, the copy image may be slanted. • Copying speed and scanning 13"K, 11"×14"L, 11"×15"L, 10"×14"L, 10"×15"L, 81/4"×14"L, 8"×101/2"KL, 8"×10"KL • When the beeper is - Ricoh 3035 | Copy Reference - Page 117
copies. ❖ Size Magnification • If the calculated ratio is over the maximum or under the minimum ratio, it is automatically adjusted to within available range. However, with some ratios, parts of the image might not be copied or margins will appear on copies. • The reproduction ratios you can specify - Ricoh 3035 | Copy Reference - Page 118
Specifications ❖ Sort, Rotate Sort, Stack • Paper sizes and orientations that can be used in the Shift Sort and Stack functions are as follows: Paper size and orientation 1000-Sheet finisher A3L, B4 JISL, A4KL, B5 JISKL, A5KL, 51/2" × 81/2"KL, 11" × 17"L, 81/2" × 14"L, 81/4" × 13"L, 8" × 13"L, 81 - Ricoh 3035 | Copy Reference - Page 119
g/m2) (20 lb.) Booklet finisher Finisher upper tray A3L, B4 JISL 10 sheets: 15 sets • 11-15 sheets: 10 sets *1 250 sheets when the optional bridge unit is installed. *2 125 sheets when the optional bridge unit is installed. *3 1,500 sheets when stapled. Note ❒ When using the Rotate Sort or Staple - Ricoh 3035 | Copy Reference - Page 120
Specifications ❖ Staple • The following type of paper cannot be stapled using Double Copies, or [1 Sided 2 Pages→ 1 Sided Combine] and [1 Sided 4 Pages→ 2 Sided Combine] in Combine mode, select L paper for K original. • When the booklet finisher is installed, even if you place different size orig- - Ricoh 3035 | Copy Reference - Page 121
Supplementary Informations • Paper sizes and orientation that can be used in the Staple function and the stapler capacity are as follows: Paper size Stapler capacity 1000-Sheet finisher A4KL, B5 JISKL, 81/2" × 11"KL, 71/4" × 101/2"KL 50 sheets (80 g/m2) (20 lb.) A3L, B4 JISL, 12" × 18"L, 11" × - Ricoh 3035 | Copy Reference - Page 122
Specifications 5 112 • The tray capacity for the stapled sheets is as follows: (paper weight: 80 g/m2, 20 lb.) Paper size and orientation Tray capacity 1000-Sheet finisher A4K, 81/2" × 11"K • 10-50 sheets: 100- 20 sets • 2-9 sheets: 100 sets A4L, B5 JISKL, 81/2" × 11"L • 10-50 sheets: 50-10 - Ricoh 3035 | Copy Reference - Page 123
staples the paper, and folds it like a book, then delivers the paper folded. ❖ Punch • When using Punch and Combine, Double Copies, or Auto Reduce/Enlarge, the message "Blank part . • Punchable paper sizes are as follows: With 2 Tray finisher Punch kit type 2 & 4 holes type 4 holes type 2 & - Ricoh 3035 | Copy Reference - Page 124
odd number of originals is placed in the ADF, the back of the last page of copied paper is blank. • During copying, the image is shifted to allow is under the minimum ratio, it is automatically adjusted to within available range. However, with some ratios, parts of the image might not be copied. • - Ricoh 3035 | Copy Reference - Page 125
after scanning originals. • When the optional booklet finisher is installed, if you select Saddle Stitch function in Magazine mode, the machine staples and folds the paper in the 5 centre, then delivers the paper folded. ❖ Image Repeat Depending on the paper size, ratio, and orientation, parts - Ricoh 3035 | Copy Reference - Page 126
some cases. ❖ Preset Stamp • You can change the size and density of the stamp with User Tools. Depending on the setting, density may change. • Depending on paper size, if you change the stamp size, parts of the stamp might not be printed. ❖ Date Stamp 5 When using Combine mode, the date stamp is - Ricoh 3035 | Copy Reference - Page 127
Informations ❖ Page Numbering When page numbering is used with Combine mode, page numbers are printed as follows: • Page Numbering per original: Combined with 1 Sided / 2 Sided in the Combine function GCANPE0E Combined with the Magazine or Booklet function 5 GCANPE1E • Page Numbering per - Ricoh 3035 | Copy Reference - Page 128
Paper Type has the priority. See "Paper Type" and "Cover Sheet Tray" in "Tray Paper Settings", General Settings Guide. ❖ Designate When Combine mode ("1 Sided→2 Sided") has been selected, the page numbers you designate will always be copied onto the front of copies in the same way as Chapter mode - Ricoh 3035 | Copy Reference - Page 129
size, 62 stored program, 76 Changing Default Settings, 91 Check Modes key, 5 Clear Modes key, 5 Clear/Stop key, 6 Combination chart, 105 Combined auto and manual image density, 23 Control panel, 5 Copier/document server features, 85 Copy functions, 23 adjusting copy image density, 23 auto reduce - Ricoh 3035 | Copy Reference - Page 130
Page Numbering Initial Letter, 102 position, 102 position and original orientation, 65 size, 102 stamp format, 102 superimpose, 102 Deleting program, 76 user scan restart, 103 rotate sort − auto paper continue, 103 SADF auto reset, 103 select punch type, 104 select stack function, 103 select stapling - Ricoh 3035 | Copy Reference - Page 131
printing page, 68 font, 102 page numbering in combine, 102 Page Numbering Initial Letter, 102 position, 68 position and original orientation, 63 size, 102 stamp format, 102 stamp on designating slip sheet, 102 stamp position, 102 start number, 68 superimpose, 102 Pale, 24 Photo for create margin, - Ricoh 3035 | Copy Reference - Page 132
115 margin adjustment, 116 mixed size mode, 106 page numbering, 117 preset enlarge/reduce, 106 preset stamp, 116 punch, 113 rotate sort, 108 size magnification, 107 slip sheets, 118 sort, 108 stack, 108 staple, 110 zoom, 107 T Text, 24 Text/Photo, 24 Tone - original remains, 94 Troubleshooting, 77 - Ricoh 3035 | Copy Reference - Page 133
herein are for identification purposes only and might be trademarks of their respective companies. We disclaim any and all rights to those marks. Copyright © 2005 Ricoh Co., Ltd. - Ricoh 3035 | Copy Reference - Page 134
3111 Operating Instructions Copy Reference Overseas Affiliates USA RICOH CORPORATION 5 Dedrick Place West Caldwell, New Jersey 07006 Phone: +1-973-882-2000 The Netherlands RICOH EUROPE B.V. Groenelaan 3, 1186 AA, Amstelveen Phone: +31-(0)20-5474111 United Kingdom RICOH UK LTD. Ricoh House, 1 Plane
-
 1
1 -
 2
2 -
 3
3 -
 4
4 -
 5
5 -
 6
6 -
 7
7 -
8
-
9
-
10
-
11
-
12
-
13
-
14
-
15
-
16
-
17
-
18
-
19
-
20
-
21
-
22
-
23
-
24
-
25
-
26
-
27
-
28
-
29
-
30
-
31
-
32
-
33
-
34
-
35
-
36
-
37
-
38
-
39
-
40
-
41
-
42
-
43
-
44
-
45
-
46
-
47
-
48
-
49
-
50
-
51
-
52
-
53
-
54
-
55
-
56
-
57
-
58
-
59
-
60
-
61
-
62
-
63
-
64
-
65
-
66
-
67
-
68
-
69
-
70
-
71
-
72
-
73
-
74
-
75
-
76
-
77
-
78
-
79
-
80
-
81
-
82
-
83
-
84
-
85
-
86
-
87
-
88
-
89
-
90
-
91
-
92
-
93
-
94
-
95
-
96
-
97
-
98
-
99
-
100
-
101
-
102
-
103
-
104
-
105
-
106
-
107
-
108
-
109
-
110
-
111
-
112
-
113
-
114
-
115
-
116
-
117
-
118
-
119
-
120
-
121
-
122
-
123
-
124
-
125
-
126
-
127
-
128
-
129
-
130
-
131
-
132
-
133
-
134
 |
 |
Operating Instructions
Copy Reference
Read this manual carefully before you use this machine and keep it handy for future reference. For safe and correct use, be sure to read the
Safety Information before using the machine.
Placing Originals
Copying
Troubleshooting
User Tools (Copier/Document Server Features)
Specifications
1
2
3
4
5