Ricoh BP20N User Guide - Page 47
If you want to set a specific IP address on a specific network, to set the specific IP address
 |
UPC - 026649024542
View all Ricoh BP20N manuals
Add to My Manuals
Save this manual to your list of manuals |
Page 47 highlights
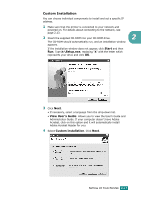
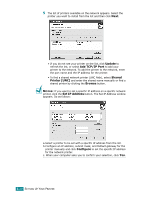
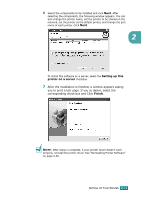
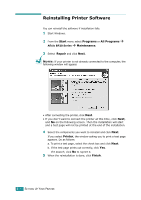
5 The list of printers available on the network appears. Select the printer you want to install from the list and then click Next. • If you do not see your printer on the list, click Update to refresh the list, or select Add TCP/IP Port to add your printer to the network. To add the printer to the network, enter the port name and the IP address for the printer. • To find a shared network printer (UNC Path), select Shared Printer [UNC] and enter the shared name manually or find a shared printer by clicking the Browse button. NOTES: If you want to set a specific IP address on a specific network printer, click the Set IP Address button. The Set IP Address window appears. Do as follows: a.Select a printer to be set with a specific IP address from the list. b.Configure an IP address, subnet mask, and Default gateway for the printer manually and click Configure to set the specific IP address for the network printer. c. When your computer asks you to confirm your selection, click Yes. 2.28 SETTING UP YOUR PRINTER
-
 1
1 -
2
-
3
-
4
-
5
-
6
-
7
-
8
-
9
-
10
-
11
-
12
-
13
-
14
-
15
-
16
-
17
-
18
-
19
-
20
-
21
-
22
-
23
-
24
-
25
-
26
-
27
-
28
-
29
-
30
-
31
-
32
-
33
-
34
-
35
-
36
-
37
-
38
-
39
-
40
-
41
-
 42
42 -
 43
43 -
 44
44 -
 45
45 -
 46
46 -
 47
47 -
 48
48 -
 49
49 -
 50
50 -
 51
51 -
 52
52 -
53
-
54
-
55
-
56
-
57
-
58
-
59
-
60
-
61
-
62
-
63
-
64
-
65
-
66
-
67
-
68
-
69
-
70
-
71
-
72
-
73
-
74
-
75
-
76
-
77
-
78
-
79
-
80
-
81
-
82
-
83
-
84
-
85
-
86
-
87
-
88
-
89
-
90
-
91
-
92
-
93
-
94
-
95
-
96
-
97
-
98
-
99
-
100
-
101
-
102
-
103
-
104
-
105
-
106
-
107
-
108
-
109
-
110
-
111
-
112
-
113
-
114
-
115
-
116
-
117
-
118
-
119
-
120
-
121
-
122
-
123
-
124
-
125
-
126
-
127
-
128
-
129
-
130
-
131
-
132
-
133
-
134
-
135
-
136
-
137
-
138
-
139
-
140
-
141
-
142
-
143
-
144
-
145
-
146
-
147
-
148
-
149
-
150
-
151
-
152
-
153
-
154
-
155
-
156
-
157
-
158
-
159
-
160
-
161
-
162
-
163
-
164
-
165
-
166
-
167
-
168
-
169
-
170
-
171
-
172
 |
 |
