Ricoh IM C3000 AirPrint Guide - Page 17
Scanning Documents Using OS X or macOS, Check [Use Document Feeder] when using the ADF.
 |
View all Ricoh IM C3000 manuals
Add to My Manuals
Save this manual to your list of manuals |
Page 17 highlights
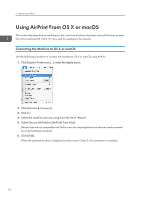
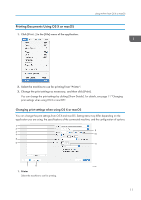
Using AirPrint From OS X or macOS Scanning Documents Using OS X or macOS 1. Place originals in the Auto Document Feeder (ADF) or on the exposure glass. For details about placing originals, see the web manual for your machine. 2. Click [System Preferences...] under the Apple menu. 3. Click [Printers & Scanners]. 4. Select the device to use for scanning from the list of "Printers". 5. Click [Scan]. 6. Click [Open Scanner...] 7. Change the scan settings as necessary and click [Scan]. Check [Use Document Feeder] when using the ADF. You can change the scan settings by clicking [Show Details]. For Details, see page 16 "Changing scan settings". When the scanned original is displayed on the [Scan] screen, scanning is complete. 15
-
 1
1 -
2
-
3
-
4
-
5
-
6
-
7
-
8
-
9
-
10
-
11
-
 12
12 -
 13
13 -
 14
14 -
 15
15 -
 16
16 -
 17
17 -
 18
18 -
 19
19 -
 20
20 -
 21
21 -
 22
22 -
23
-
24
-
25
-
26
-
27
-
28
 |
 |

Scanning Documents Using OS X or macOS
1.
Place originals in the Auto Document Feeder (ADF) or on the exposure glass.
For details about placing originals, see the web manual for your machine.
2.
Click [System Preferences...] under the Apple menu.
3.
Click [Printers & Scanners].
4.
Select the device to use for scanning from the list of "Printers".
5.
Click [Scan].
6.
Click [Open Scanner...]
7.
Change the scan settings as necessary and click [Scan].
Check [Use Document Feeder] when using the ADF.
You can change the scan settings by clicking [Show Details]. For Details, see page 16
"Changing scan settings".
When the scanned original is displayed on the [Scan] screen, scanning is complete.
Using AirPrint From OS X or macOS
15