Ricoh MP 3053 Manuals - Page 44
Check Status] key, Data In indicator facsimile and printer mode, Fax indicator, Menu] key, Return] key
 |
View all Ricoh MP 3053 manuals
Add to My Manuals
Save this manual to your list of manuals |
Page 44 highlights
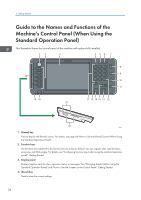
2. Getting Started 5. [Check Status] key Press to check the machine's system status, operational status of each function, and current jobs. You can also display the job history and the machine's maintenance information. 6. Data In indicator (facsimile and printer mode) Flashes when the machine is receiving print jobs or LAN-Fax documents from a computer. See Fax and Print. 7. Fax indicator Indicates the status of the fax functions. Flashes during data transmission and reception. Stays lit when receiving a fax via Confidential or Substitute Reception. 8. [Menu] key Displays the menu screen while Screen Features are enabled or applications available only on the Smart Operation Panel are used. 9. [Return] key Press this key to return to the previous screen while Screen Features are enabled or applications available only on the Smart Operation Panel are used. 10. Media access lamp Lights up when a memory storage device is inserted in the media slot. 11. Media slots Use to insert an SD card or a USB flash memory device. 42
-
 1
1 -
2
-
3
-
4
-
5
-
6
-
7
-
8
-
9
-
10
-
11
-
12
-
13
-
14
-
15
-
16
-
17
-
18
-
19
-
20
-
21
-
22
-
23
-
24
-
25
-
26
-
27
-
28
-
29
-
30
-
31
-
32
-
33
-
34
-
35
-
36
-
37
-
38
-
 39
39 -
 40
40 -
 41
41 -
 42
42 -
 43
43 -
 44
44 -
 45
45 -
 46
46 -
 47
47 -
 48
48 -
 49
49 -
50
-
51
-
52
-
53
-
54
-
55
-
56
-
57
-
58
-
59
-
60
-
61
-
62
-
63
-
64
-
65
-
66
-
67
-
68
-
69
-
70
-
71
-
72
-
73
-
74
-
75
-
76
-
77
-
78
-
79
-
80
-
81
-
82
-
83
-
84
-
85
-
86
-
87
-
88
-
89
-
90
-
91
-
92
-
93
-
94
-
95
-
96
-
97
-
98
-
99
-
100
-
101
-
102
-
103
-
104
-
105
-
106
-
107
-
108
-
109
-
110
-
111
-
112
-
113
-
114
-
115
-
116
-
117
-
118
-
119
-
120
-
121
-
122
-
123
-
124
-
125
-
126
-
127
-
128
-
129
-
130
-
131
-
132
-
133
-
134
-
135
-
136
-
137
-
138
-
139
-
140
-
141
-
142
-
143
-
144
-
145
-
146
-
147
-
148
-
149
-
150
-
151
-
152
-
153
-
154
-
155
-
156
-
157
-
158
-
159
-
160
-
161
-
162
-
163
-
164
-
165
-
166
-
167
-
168
-
169
-
170
-
171
-
172
-
173
-
174
-
175
-
176
-
177
-
178
-
179
-
180
-
181
-
182
-
183
-
184
-
185
-
186
-
187
-
188
-
189
-
190
-
191
-
192
-
193
-
194
-
195
-
196
-
197
-
198
-
199
-
200
-
201
-
202
-
203
-
204
-
205
-
206
-
207
-
208
-
209
-
210
-
211
-
212
-
213
-
214
-
215
-
216
-
217
-
218
-
219
-
220
-
221
-
222
-
223
-
224
-
225
-
226
-
227
-
228
-
229
-
230
-
231
-
232
-
233
-
234
-
235
-
236
-
237
-
238
-
239
-
240
 |
 |
