Ricoh MP 3055 User Guide - Page 135
Step 3: Specifying access privileges for the created shared folder, Registering an SMB Folder
 |
View all Ricoh MP 3055 manuals
Add to My Manuals
Save this manual to your list of manuals |
Page 135 highlights
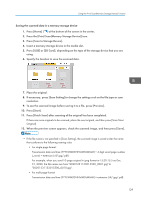
Basic Procedure When Using Scan to Folder Step 3: Specifying access privileges for the created shared folder If you want to specify access privileges for the created folder to allow other users or groups to access the folder, configure the folder as follows: 1. Right-click the folder created in Step 2, and then click [Properties]. 2. On the [Security] tab, click [Edit...]. 3. Click [Add...]. 4. In the [Select Users, Computers, Service Accounts, or Groups] window, click [Advanced...]. 5. Specify one or more object types, select a location, and then click [Find Now]. 6. From the list of results, select the groups and users you want to grant access to, and then click [OK]. 7. In the [Select Users, Computers, Service Accounts, or Groups] window, click [OK]. 8. In the [Groups or user names:] list, select a group or user, and then, in the [Allow] column of the permissions list, select either the [Full Control] or [Modify] check box. 9. Click [OK]. Registering an SMB Folder 1. Press [Home] ( ) at the bottom of the screen in the center. 2. Flick the screen to the left, and then press the [Address Book Management] icon. 3. Check that [Program / Change] is selected. 4. Press [New Program]. 5. Press [Change] under "Name". The name entry display appears. 6. Enter the name, and then press [OK]. 7. Press [ Next]. 133
-
 1
1 -
2
-
3
-
4
-
5
-
6
-
7
-
8
-
9
-
10
-
11
-
12
-
13
-
14
-
15
-
16
-
17
-
18
-
19
-
20
-
21
-
22
-
23
-
24
-
25
-
26
-
27
-
28
-
29
-
30
-
31
-
32
-
33
-
34
-
35
-
36
-
37
-
38
-
39
-
40
-
41
-
42
-
43
-
44
-
45
-
46
-
47
-
48
-
49
-
50
-
51
-
52
-
53
-
54
-
55
-
56
-
57
-
58
-
59
-
60
-
61
-
62
-
63
-
64
-
65
-
66
-
67
-
68
-
69
-
70
-
71
-
72
-
73
-
74
-
75
-
76
-
77
-
78
-
79
-
80
-
81
-
82
-
83
-
84
-
85
-
86
-
87
-
88
-
89
-
90
-
91
-
92
-
93
-
94
-
95
-
96
-
97
-
98
-
99
-
100
-
101
-
102
-
103
-
104
-
105
-
106
-
107
-
108
-
109
-
110
-
111
-
112
-
113
-
114
-
115
-
116
-
117
-
118
-
119
-
120
-
121
-
122
-
123
-
124
-
125
-
126
-
127
-
128
-
129
-
 130
130 -
 131
131 -
 132
132 -
 133
133 -
 134
134 -
 135
135 -
 136
136 -
 137
137 -
 138
138 -
 139
139 -
 140
140 -
141
-
142
-
143
-
144
-
145
-
146
-
147
-
148
-
149
-
150
-
151
-
152
-
153
-
154
-
155
-
156
-
157
-
158
-
159
-
160
-
161
-
162
-
163
-
164
-
165
-
166
-
167
-
168
-
169
-
170
-
171
-
172
-
173
-
174
-
175
-
176
-
177
-
178
-
179
-
180
-
181
-
182
-
183
-
184
-
185
-
186
-
187
-
188
-
189
-
190
-
191
-
192
-
193
-
194
-
195
-
196
-
197
-
198
-
199
-
200
-
201
-
202
-
203
-
204
-
205
-
206
-
207
-
208
-
209
-
210
-
211
-
212
-
213
-
214
-
215
-
216
-
217
-
218
-
219
-
220
-
221
-
222
-
223
-
224
-
225
-
226
-
227
-
228
-
229
-
230
-
231
-
232
-
233
-
234
-
235
-
236
-
237
-
238
-
239
-
240
-
241
-
242
-
243
-
244
-
245
-
246
-
247
-
248
-
249
-
250
-
251
-
252
-
253
-
254
-
255
-
256
 |
 |
