Ricoh Pro C550EX Quick Installation Guide - Page 2
Filling the PCU Units with, Developer, Reinstall the Toner Hopper, STC Soft Toner Cartridge,
 |
View all Ricoh Pro C550EX manuals
Add to My Manuals
Save this manual to your list of manuals |
Page 2 highlights
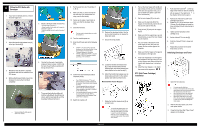
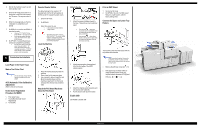
4 Filling the PCU Units with Developer 1. If you have not already done so, remove the toner hopper unit 2. Attach the transfer belt release lever [A] to the tip of the shaft [B]. 3. Rotate the lever [A] down to separate the transfer belt from the surfaces of the PCU drums. 4. Before attaching each bottle, loosen the developer to ensure that it will drain completely. Vigorously shake the bottle up and down 10 to 15 times. 5. Mount a developer bottle on each PCU. •Set each bottle as shown at ¬. •SwingthebottleÁ to the right until it snaps into place and is upright ®. •Install the bottles from left to right in this order: Y C M K. 6. Confirm that the neck of each bottle snaps and locks in place. Confirm that the neck of each bottle is parallel with the top of each PCU. 7. To prevent the bottle from falling off, hold the bottle [B] with the left hand as shown, pull the heat seal [A] out of the developer bottle and remove it. 8. Pull the seals from all of the bottles (Y, C, M, K). 9. Make sure that you have removed all the seal strips (you should have four strips, one for each bottle). 10. Gently tap the sides of each bottle to make sure that the developer flows freely. 11. Close the front door. The door must be closed before you switch the machine on. 12. Turn the machine power on. 13. Enter the SP mode and do the following SPs: SP3814-1. Fills all of the PCU units with developer from the attached bottles. It takes about 4 minutes. Press 'Exit' when 'Completed' appears on the display. SP3815. Confirms that SP3814-1 executed correctly. If SP3814-1 executed correctly, you will see "1111" (K M C Y). 14. Confirm that each developer bottle is completely empty. Even if SP3815 returned a "1" for each bottle to indicate successful completion of the operation, there may be toner remaining in a bottle. It is very important that you check each bottle visually for remaining developer. Shine a penlight on the bottle if it is difficult to see inside the bottle. If you see developer still remains in a bottle, do not disconnect the bottle. Refer to "Handling Problems with Developer Filling" under "PCU" in Section 3. 15. Switch the machine off. 16. Remove the developer bottles. Use the tip of a small screwdriver to release the bottle latch at [A]. 17. Discard the empty bottles. 18. Locate the transfer belt release lever [A]. (It was removed earlier with the shipping tape, and should already have been installed on the shaft in step 2.) 19. Attach the transfer belt release lever as shown above and turn it to the vertical position and make sure that it locks. Reinstall the Toner Hopper 1. Rotate the transfer release lever [A] up so that it locks. The transfer belt release lever must be turned up and locked before you install the toner hopper. If you forget to attach the transfer belt release lever [A], or if it is not locked, this will cause an image transfer roller position error (SC447). 2. Pull out the toner hopper left rail [B] and right rail [C] until they are fully extended. (If the rails were pushed in fully, use a pair of needle-nose pliers to pull them out of the machine.) 3. Set the toner hopper [D] on the rails. 4. Make sure the steel tabs [E] of the hopper are inserted fully into the left rail hole and the right rail hole [F]. 5. Push the lock [G] and push the support leg [H]. 6. Make sure that the support leg is up and locked before you push the toner hopper into the machine. 7. Put your hands at the bottom of the toner hopper at and, then push the hopper into the machine against the faceplate. 8. Make sure that the hopper is flat against the faceplate on the right side. 9. If the toner hopper [D] is not flat against the faceplate on the right side, pull it out a short distance and make sure that the transfer belt release lever is turned up fully. 10. Attach the toner hopper (x 3). Attach the screws in this sequence: STC (Soft Toner Cartridge) Installation 1. Push down the lock lever on the top edge of the Yellow bin (the bin at the far left) to release it. Then pull the bin in the direction of the front to open it. 2. Remove the Yellow STC (Soft Toner Cartridge) from its box. 3. Shake the STC [A] up and down about 10 times. Do not squeeze or knead the toner cartridge (this will make clumps in the toner). 4. Make sure the flat bottom of the cartridge is up. 5. Set the Yellow STC in the bin [B]. 6. Push the Yellow STC bin to close and lock it. 7. Repeat this procedure for the other three STCs (C, M, K) Initializing Developer and Toner 1. Open the front door [A]. You must open the front door. Turning on the machine with the front door open prevents the machine from performing the initial process control self-check. If the front door is closed, the drums will start rotating with no toner in the PCUs. If the drums rotate with no toner in the PCUs, this can cause the cleaning blades to catch on a dry drum and damage the drum surface. 2. With the front door open, turn on the main power switch. 3. Close the front door after "Open Cover" appears on the display. Page 2 of 3
-
 1
1 -
 2
2 -
 3
3
 |
 |
