Ricoh SP 3710DN AirPrint Guide - Page 9
Importing an Already Created Certificate
 |
View all Ricoh SP 3710DN manuals
Add to My Manuals
Save this manual to your list of manuals |
Page 9 highlights
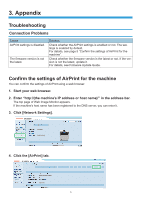
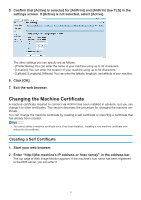
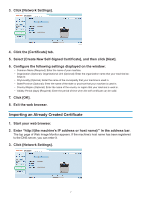
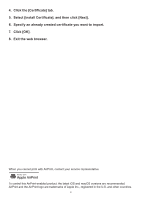
333 Click [Network Settings]. DYG651 444 Click the [Certificate] tab. 555 Select [Create New Self-Signed Certificate], and then click [Next]. 666 Configure the following settings displayed on the window: •• Common Name (Required): Enter the name of your machine. •• Organization (Optional), Organizational Unit (Optional): Enter the organization name that your machine be- longs to. •• City/Locality (Optional): Enter the name of the municipality that your machine is used in. •• State/Province (Optional): Enter the name of the state or province that your machine is used in. •• Country/Region (Optional): Enter the name of the country or region that your machine is used in. •• Validity Period (days) (Required): Enter the period of time when the self certificate can be valid. 777 Click [OK]. 888 Exit the web browser. Importing an Already Created Certificate 111 Start your web browser. 222 Enter "http://(the machine's IP address or host name)/" in the address bar. The top page of Web Image Monitor appears. If the machine's host name has been registered to the DNS server, you can enter it. 333 Click [Network Settings]. DYG651 7
-
 1
1 -
2
-
3
-
 4
4 -
 5
5 -
 6
6 -
 7
7 -
 8
8 -
 9
9 -
 10
10 -
 11
11 -
 12
12
 |
 |
