Ricoh SP C221N Operating Instructions - Page 14
If the network printer search fails, Recon the printer's IP address
 |
View all Ricoh SP C221N manuals
Add to My Manuals
Save this manual to your list of manuals |
Page 14 highlights
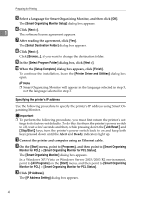
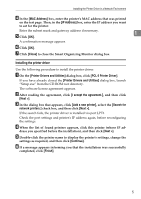
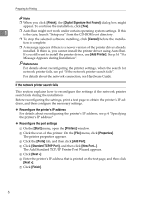
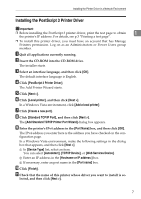
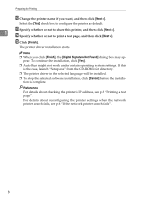
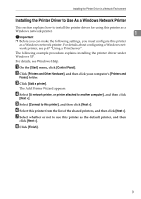
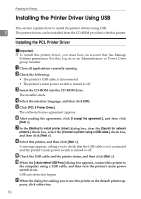
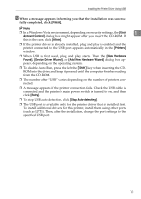
Preparing for Printing Note ❒ When you click [Finish], the [Digital Signature Not Found] dialog box might appear. To continue the installation, click [Yes]. 1 ❒ Auto Run might not work under certain operating system settings. If this is the case, launch "Setup.exe" from the CD-ROM root directory. ❒ To stop the selected software installing, click [Cancel] before the installation is complete. ❒ A message appears if there is a newer version of the printer driver already installed. If there is, you cannot install the printer driver using Auto Run. If you still want to install the printer driver, use [Add Printer]. See p.16 "If a Message Appears during Installation". Reference For details about reconfiguring the printer settings, when the search for network printer fails, see p.6 "If the network printer search fails". For details about the network connection, see Hardware Guide. If the network printer search fails This section explains how to reconfigure the settings if the network printer search fails during the installation. Before reconfiguring the settings, print a test page to obtain the printer's IP address, and then configure the necessary settings. ❖ Reconfigure the printer's IP address For details about reconfiguring the printer's IP address, see p.4 "Specifying the printer's IP address" ❖ Reconfigure the port settings A On the [Start] menu, open the [Printers] window. B Click the icon of this printer. On the [File] menu, click [Properties]. The printer properties appears. C Click the [Ports] tab, and then click [Add Port]. D Click [Standard TCP/IP Port], and then click [New Port...]. The Add Standard TCP/IP Printer Port Wizard appears. E Click [Next >] F Enter the printer's IP address that is printed on the test page, and then click [Next >]. G Click [Finish]. 6
-
 1
1 -
2
-
3
-
4
-
5
-
6
-
7
-
8
-
 9
9 -
 10
10 -
 11
11 -
 12
12 -
 13
13 -
 14
14 -
 15
15 -
 16
16 -
 17
17 -
 18
18 -
 19
19 -
20
-
21
-
22
-
23
-
24
-
25
-
26
-
27
-
28
-
29
-
30
-
31
-
32
-
33
-
34
-
35
-
36
-
37
-
38
-
39
-
40
-
41
-
42
-
43
-
44
-
45
-
46
-
47
-
48
-
49
-
50
-
51
-
52
-
53
-
54
-
55
-
56
-
57
-
58
-
59
-
60
-
61
-
62
-
63
-
64
-
65
-
66
-
67
-
68
-
69
-
70
-
71
-
72
-
73
-
74
-
75
-
76
-
77
-
78
-
79
-
80
-
81
-
82
-
83
-
84
-
85
-
86
-
87
-
88
-
89
-
90
-
91
-
92
-
93
-
94
-
95
-
96
-
97
-
98
-
99
-
100
-
101
-
102
-
103
-
104
-
105
-
106
-
107
-
108
-
109
-
110
 |
 |