Ridgid R3202 Owners Manual
Ridgid R3202 Manual
 |
View all Ridgid R3202 manuals
Add to My Manuals
Save this manual to your list of manuals |
Ridgid R3202 manual content summary:
- Ridgid R3202 | Owners Manual - Page 1
OPERATOR'S MANUAL 7-1/4 in. CIRCULAR SAW DOUBLE INSULATED R3202 Your circular saw has been engineered and manufactured to our high standards for dependability, ease of operation, and operator safety. When properly cared for, it will give you years of rugged, trouble-free performance. WARNING: To - Ridgid R3202 | Owners Manual - Page 2
Safety Warnings and Instructions 3-4 Circular Saw Safety Warnings and Instructions...4-5 Symbols...6-7 Electrical...8 Features...9-10 Assembly...10-11 Operation...12-17 Adjustments...18 Maintenance...19 Accessories...19 Warranty...21 Customer Service Information...Back page - Ridgid R3202 | Owners Manual - Page 3
the power tool on. A wrench or a key left attached to a rotating part of the power tool may result in personal injury. Do not overreach. Keep and do not allow persons unfamiliar with the power tool or these instructions to operate the power tool. Power tools are dangerous in the hands of untrained - Ridgid R3202 | Owners Manual - Page 4
POWER TOOL SAFETY WARNINGS AND INSTRUCTIONS SERVICE Have your power tool serviced by a qualified repair person using only identical replacement parts. This will ensure that the safety of the power tool is maintained. CIRCULAR SAW SAFETY WARNINGS AND INSTRUCTIONS DANGER: Keep hands away from - Ridgid R3202 | Owners Manual - Page 5
CIRCULAR SAW SAFETY WARNINGS AND INSTRUCTIONS Check the operation of the lower guard spring. If the guard and the spring are not operating properly, they must be serviced before use. Lower guard may operate sluggishly due to damaged parts, gummy deposits, or a build-up of debris. Lower guard - Ridgid R3202 | Owners Manual - Page 6
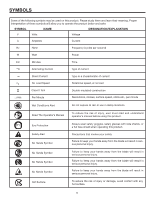
., per minute Wet Conditions Alert Do not expose to rain or use in damp locations. Read The Operator's Manual To reduce the risk of injury, user must read and understand operator's manual before using this product. Eye Protection Safety Alert No Hands Symbol Always wear safety goggles, safety - Ridgid R3202 | Owners Manual - Page 7
parts. WARNING: To avoid serious personal injury, do not attempt to use this product until you read thoroughly and understand completely the operator's manual. If you do not understand the warnings and instructions in the operator's manual, do not use this product. Call RIDGID® customer service - Ridgid R3202 | Owners Manual - Page 8
center for repair. Always use original factory replacement parts when servicing. ELECTRICAL CONNECTION This tool has a precision-built electric motor. It should be connected to a power supply that is 120 volts, AC only (normal household current), 60 Hz. Do not operate this tool on direct current (DC - Ridgid R3202 | Owners Manual - Page 9
FEATURES PRODUCT SPECIFICATIONS Blade Diameter 7-1/4 in. Blade Arbor 5/8 in. Cutting Depth at 0 2-3/8 in. Cutting Depth at 45 1-3/4 in. SWITCH TRIGGER Cutting Depth at 51.5 1-5/8 in. Input 120 V, AC only, 60 Hz, 15 Amps No Load Speed 5,800 r/min. (RPM) Net Weight 10 lbs. SPINDLE LOCK DUST - Ridgid R3202 | Owners Manual - Page 10
Circular Saw Blade 6 mm Blade Wrench Operator's Manual WARNING: If any parts are damaged or missing, do not operate this product until the parts are on the spindle. Larger blades will come in contact with the blade guides, while thicker blades will prevent blade screw from securing blade on spindle - Ridgid R3202 | Owners Manual - Page 11
use a blade that is too thick to allow the "D" washer to engage with the flats on the spindle. REMOVING BLADE See Figure 2 - 3. Unplug the saw. Depress and hold spindle lock. Remove blade screw by turning it counterclockwise with the provided 6 mm blade wrench, while keeping the spindle lock - Ridgid R3202 | Owners Manual - Page 12
blade depth incorrectly. Sawing into knots or nails in workpiece. Twisting the blade while making a cut. Making a cut with a dull, gummed up, or improperly set blade. Supporting the workpiece incorrectly. Forcing a cut. Cutting warped or wet lumber. Operating the tool incorrectly - Ridgid R3202 | Owners Manual - Page 13
guard attached to the circular saw is there for your protection and safety. Do not alter it for any reason. If it becomes damaged, do not operate the saw until you have the guard repaired or replaced. Always leave guard in operating position when using the saw. CORRECT SUPPORT LOWER BLADE GUARD IS - Ridgid R3202 | Owners Manual - Page 14
OPERATION STARTING/STOPPING THE SAW See Figure 9. To start the saw: Depress the switch trigger. Always let the blade reach full speed, then guide the saw into the workpiece. SWITCH Trigger WARNING: The blade coming in contact with the workpiece before it reaches full speed could cause the saw to - Ridgid R3202 | Owners Manual - Page 15
operating the saw. Refer to the figures in this section to learn the correct and incorrect ways for handling the saw. WARNING: To make sawing easier and safer, always maintain proper control of the saw during the cut. Always place the saw on the workpiece that is supported, not the "cut off" piece. - Ridgid R3202 | Owners Manual - Page 16
OPERATION RIP CUTting See Figures 15 - 16. Use a guide when making long or wide rip cuts with the saw. To rip cut using optional edge guide: Slide the edge guide into the slot. Adjust the guide so that the "0" on the guide is aligned with the edge of your workpiece. Secure the guide manual. - Ridgid R3202 | Owners Manual - Page 17
flat against the workpiece with the rear of the handle raised so the blade does not touch the workpiece. Start the saw and let the blade reach full speed. Guide the saw into the workpiece and make the cut. WARNING: Always cut in a forward direction when pocket cutting. Cutting in the reverse - Ridgid R3202 | Owners Manual - Page 18
bevel adjustment lever upward to release. Turn TORX® T-8 adjustment screw with TORX® T-8 wrench and adjust base until it is square with the saw blade. Securely lock the bevel adjustment lever. WARNING: Attempting a bevel cut without having the bevel adjustment lever securely locked in place can - Ridgid R3202 | Owners Manual - Page 19
servicing use only identical RIDGID® replacement parts. Use of any other parts may create a hazard or cause product damage. WARNING: Always wear safety goggles or safety glasses with side shields during power tool operation or when blowing dust. If operation . Edge Guide...690119003 WARNING: - Ridgid R3202 | Owners Manual - Page 20
NOTES 20 - Ridgid R3202 | Owners Manual - Page 21
-539-1710 or by logging on to the RIDGID® website at www.ridgid.com. When requesting warranty service, you must present the original dated sales receipt. The authorized service center will repair any faulty workmanship, and either repair or replace any part covered under the warranty, at our option - Ridgid R3202 | Owners Manual - Page 22
OPERATOR'S MANUAL 7-1/4 in. CIRCULAR SAW DOUBLE INSULATED R3202 Customer Service Information: For parts or service, contact your nearest RIDGID authorized service center. Be sure to provide all relevant information when you call or visit. For the location of the authorized service center nearest
-
 1
1 -
 2
2 -
 3
3 -
 4
4 -
 5
5 -
 6
6 -
 7
7 -
8
-
9
-
10
-
11
-
12
-
13
-
14
-
15
-
16
-
17
-
18
-
19
-
20
-
21
-
22
 |
 |

Your circular saw has been engineered and manufactured to our high standards for dependability, ease of operation, and
operator safety. When properly cared for, it will give you years of rugged, trouble-free performance.
WARNING:
To reduce the risk of injury, the user must read and understand the operator’s manual before using this product.
Thank you for buying a RIDGID
®
product.
SAVE THIS MANUAL FOR FUTURE REFERENCE
OPERATOR’S MANUAL
7-1/4 in. CIRCULAR SAW
DOUBLE INSULATED
R3202