Ridgid RV2400HF Owners Manual - Page 10
Wet/Dry Vac Assembly - wet dry vac
 |
View all Ridgid RV2400HF manuals
Add to My Manuals
Save this manual to your list of manuals |
Page 10 highlights
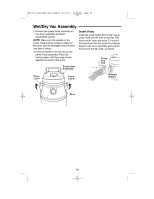
SP6775 RV2400HF ESF RIDGID 8/31/10 3:25 PM Page 10 Wet/Dry Vac Assembly 1. Position the power head assembly on the drum assembly as shown (assembled earlier). NOTE: Make sure the gasket on the power head and the sealing surface on the drum are not damaged and are clean and free of debris 2. Hook the latches over the tab on the power head assembly. Press the latches down until they snap closed against the sides of the drum. Power Head Assembly Insert Hose Insert the push button end of the "Tug-ALong" hose into the inlet of the Vac. The hose should snap into place. To remove the hose from the Vac, press the release button in the hose assembly and pull the hose out of the Vac inlet, as shown. Press and Pull Drum Latch Drum Latch Release Button Drum 10
-
 1
1 -
2
-
3
-
4
-
 5
5 -
 6
6 -
 7
7 -
 8
8 -
 9
9 -
 10
10 -
 11
11 -
 12
12 -
 13
13 -
 14
14 -
 15
15 -
16
-
17
-
18
-
19
-
20
-
21
-
22
-
23
-
24
-
25
-
26
-
27
-
28
-
29
-
30
-
31
-
32
-
33
-
34
-
35
-
36
-
37
-
38
-
39
-
40
-
41
-
42
-
43
-
44
-
45
-
46
-
47
-
48
-
49
-
50
-
51
-
52
-
53
-
54
 |
 |
