Ridgid RV2400HF Owners Manual - Page 7
Filter Installation
 |
View all Ridgid RV2400HF manuals
Add to My Manuals
Save this manual to your list of manuals |
Page 7 highlights
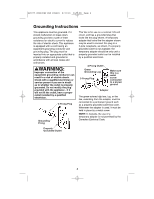
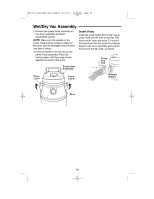
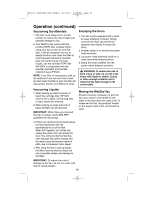
SP6775 RV2400HF ESF RIDGID 8/31/10 3:25 PM Page 7 Filter Installation 1. Place the HEPA filter onto the filter cage until the HEPA filter is snug against the power head. Be sure the filter cage's threaded stud protrudes through the HEPA filter opening. NOTE: Make sure the gasket on the HEPA filter and the sealing surface on the power head are not damaged and are clean and free of debris 2. Position the filter washer with the rubber side against the HEPA filter and then place the filter wing nut onto the threaded stud of the filter cage. Hand-tighten the filter nut to secure the HEPA filter to the power head. Pre-Filter Filter Band Clamp HEPA Filter Filter Wing Nut Filter Washer HEPA Filter Lower End Cap Filter Cage Power Head Power Head 4. Locate the filter band clamp on the pre-filter, over the lower end cap, as shown. Tighten with a screwdriver to secure. NOTE: Damage to filter will occur if filter band clamp is tightened around the filter screen. Pre-Filter Filter Band Clamp ! WARNING: Do not operate without filter cage and float, as they prevent liquid from entering the impeller and damaging the motor. 3. Slide the pre-filter onto the assembled HEPA filter. 7 Pre-Filter Lower End Cap HEPA Filter Power Head Setscrew Filter Band Clamp
-
 1
1 -
 2
2 -
 3
3 -
 4
4 -
 5
5 -
 6
6 -
 7
7 -
 8
8 -
 9
9 -
 10
10 -
 11
11 -
 12
12 -
13
-
14
-
15
-
16
-
17
-
18
-
19
-
20
-
21
-
22
-
23
-
24
-
25
-
26
-
27
-
28
-
29
-
30
-
31
-
32
-
33
-
34
-
35
-
36
-
37
-
38
-
39
-
40
-
41
-
42
-
43
-
44
-
45
-
46
-
47
-
48
-
49
-
50
-
51
-
52
-
53
-
54
 |
 |
