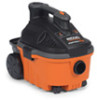
Ridgid WD4070 Owners Manual - Page 9
Maintenance continued - wall accessories
 |
View all Ridgid WD4070 manuals
Add to My Manuals
Save this manual to your list of manuals |
Page 9 highlights
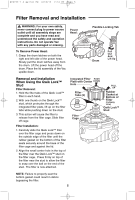
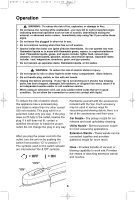
SP6732-1 4 gallon ES 4/18/12 2:14 PM Page 9 Maintenance (continued) Filter Removal Refer to page 5 "Filter Removal and Installation" Section of this manual. IMPORTANT: To avoid damage to the blower wheel and motor, always reinstall the filter before using the Vac for dry material pickup. Cleaning A Dry Filter NOTE: For best cleaning results due to accumulated dust, clean the filter in an open area. Cleaning SHOULD be done outdoors and not in the living quarters. 1. Light cleaning of some dry debris from the filter can be accomplished without removing the filter from the Vac. Simply slap your hand on top of the handle while the Vac is turned off. 2. Remove filter from Vac. Gently tap the filter against the inside wall of your dust drum and the debris will loosen and fall. 3. For thorough cleaning of a dry filter with fine dust (no debris) you may run water through it as described under "Cleaning A Wet Filter" Section. Cleaning and Disinfecting the Wet/Dry Vac To keep your Wet/Dry Vac looking its best, clean the outside with a cloth dampened with warm water and mild soap. To clean the drum: 1. Dump debris out. 2. Wash drum thoroughly with warm water and mild soap. 3. Wipe out with dry cloth. Before prolonged storage or as needed (i.e., waste water pick up) the drum should be disinfected. To disinfect the drum: 1. Pour 1 gallon of water and 1 teaspoon chlorine bleach into the drum. 2. Let solution stand for 20 minutes, carefully swishing every few minutes, making sure to wet all inside surfaces of the drum. 3. Empty drum after 20 minutes. Rinse with water until bleach smell is gone. Allow drum to dry completely before sealing the motor on the drum. Cleaning A Wet Filter After filter is removed, run water through the filter from a hose or spigot. Take care that water pressure from the hose is not strong enough to damage filter. IMPORTANT: After cleaning, check the filter for tears or small holes. Do not use a filter with holes or tears in it. Even a small hole can cause a lot of dust to come out of your Vac. If your filter is damaged or worn, Replace it immediately. Installation Refer to page 5 "Filter Removal and Installation" Section of this manual. Allow the filter to dry before reinstalling and storing the Vac or picking up dry debris. Cord Maintenance When vacuuming is complete, unplug the cord and wrap it around the motor cover. If the power cord is damaged, it must be replaced by the manufacturer or their service agent or by similarly qualified personnel to reduce the risk of accident. Storage Before storing your Vac, the drum should be emptied and cleaned. The cord should be wrapped around the unit and the hose should be stored as described in this manual. Accessories should be kept in the same area as the Vac so they can be readily available. The Vac should be stored indoors. 9
-
 1
1 -
2
-
3
-
 4
4 -
 5
5 -
 6
6 -
 7
7 -
 8
8 -
 9
9 -
 10
10 -
 11
11 -
 12
12 -
 13
13 -
 14
14 -
15
-
16
-
17
-
18
-
19
-
20
-
21
-
22
-
23
-
24
-
25
-
26
-
27
-
28
-
29
-
30
-
31
-
32
-
33
-
34
-
35
-
36
 |
 |
