Rocketfish RF-WSW312 User Manual (English) - Page 15
Troubleshooting, Specifications
 |
View all Rocketfish RF-WSW312 manuals
Add to My Manuals
Save this manual to your list of manuals |
Page 15 highlights
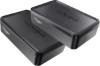
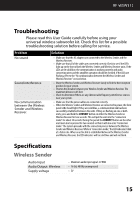
RF-WSW312 Troubleshooting Please read this User Guide carefully before using your universal wireless subwoofer kit. Check this list for a possible troubleshooting solution before calling for service. Problem No sound Sound interference No communication between the Wireless Sender and Wireless Receiver. Solution • Make sure that the AC adapters are connected to the Wireless Sender and the Wireless Receiver. • Make sure that all of the cables are connected correctly. Check to see if the LEDs light up on the front of both the Wireless Sender and Wireless Receiver units. If the LEDs are lit solid blue, the communication is working correctly and audio connecting wires and the amplifier operation should be checked. If the LEDs are flashing, refer to the "No communication between the Wireless Sender and Wireless Receiver" section below. • Move the Wireless Sender and Wireless Receiver slowly to find the best reception position for your system. • Shorten the distance between your Wireless Sender and Wireless Receiver. The maximum distance is 45 feet. • Check to determine if there are any obvious radio frequency interference sources near your system. • Make sure that the power cables are connected correctly. • When the Wireless Sender and Wireless Receiver are connected to power, the front panel LEDs should light. If they are solid blue, a communication link has been successfully established between the units. If they are flashing on one or both units, press and hold the CONNECT button on either the Wireless Sender or Wireless Receiver for two seconds. This will put the unit into the "connection mode" for about 30 seconds. During this period the CONNECT button on the other unit must also be pressed for two seconds so that it will also enter "connection mode." The system proceeds with the connection process between the Wireless Sender and Wireless Receiver. While in "connection mode," the LED indicators blink at a faster rate. When an active link is established between the Wireless Sender and Wireless Receiver, the LED indicators will be solid blue and will not blink. Specifications Wireless Sender Audio Input Audio Output: Wireless Supply voltage • Maximum audio input signal: 2 V RMS • 16-bit, 48 KHz uncompressed • 5V 15
-
 1
1 -
2
-
3
-
4
-
5
-
6
-
7
-
8
-
9
-
 10
10 -
 11
11 -
 12
12 -
 13
13 -
 14
14 -
 15
15 -
 16
16 -
 17
17 -
 18
18 -
 19
19 -
 20
20 -
21
-
22
 |
 |