Ryobi P2090 Operation Manual - Page 10
Operation, Maintenance
 |
View all Ryobi P2090 manuals
Add to My Manuals
Save this manual to your list of manuals |
Page 10 highlights
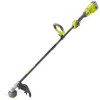
OPERATION TO ADVANCE THE CUTTING LINE Line advance is controlled by tapping the string head on grass while running motor at full speed. Run the motor at full speed. Tap the bump knob on ground to advance line. The line advances each time the knob is tapped. Do not hold the knob on the ground. NOTE: The line trimming cut-off blade on the grass deflector will cut the line to the correct length. NOTE: If the line is worn too short you may not be able to advance the line by tapping it on the ground. If so, stop the motor and manually advance the line. To advance the cutting line manually: Remove the battery pack. Push the bump knob in while pulling on line(s) to manually advance the line. LINE CUT-OFF BLADE See Figure 9. This trimmer is equipped with a line cut-off blade on the grass deflector. For best cutting, advance line until it is trimmed to length by the line cut-off blade. Advance line whenever you hear the motor running faster than normal, or when trimming efficiency diminishes. This will maintain best performance and keep line long enough to advance properly. This trimmer is currently set at the 11 in. cutting swath. To adjust to a cutting swath of 13 in.: Remove the battery pack. Loosen the blade screw then rotate the line cut-off blade 180°. Tighten the blade screw. MAINTENANCE WARNING: To avoid serious personal injury, always remove the battery pack from the tool when cleaning or performing any maintenance. WARNING: Always wear eye protection with side shields marked to comply with ANSI Z87.1. Failure to do so could result in objects being thrown into your eyes, resulting in possible serious injury. WARNING: When servicing, use only identical replacement parts. Use of any other parts can create a hazard or cause product damage. NOTICE: Periodically inspect the entire product for damaged, missing, or loose parts such as screws, nuts, bolts, caps, etc. Tighten securely all fasteners and caps and do not operate this product until all missing or damaged parts are replaced. Please contact customer service or a qualified service center for assistance. GENERAL MAINTENANCE Avoid using solvents when cleaning plastic parts. Most plastics are susceptible to damage from various types of commercial solvents and may be damaged by their use. Use clean cloths to remove dirt, dust, oil, grease, etc. WARNING: Do not at any time let brake fluids, gasoline, petroleumbased products, penetrating oils, etc., come in contact with plastic parts. Chemicals can damage, weaken or destroy plastic which can result in serious personal injury. LINE REPLACEMENT See Figures 10 - 11. Use only 0.080 in. diameter twisted line. Use original manufacturer's replacement line for best performance. Remove the battery pack. R otate the bump knob clockwise as necessary to align the arrows on the bump knob with the arrows on the string head housing. Cut one piece of trimmer line 10 ft. long. Insert the line into the eyelet on the string head housing. Push until the end of the line comes out the other side of the housing. Pull the line until equal amounts of line appear on both sides of the housing. NOTE: Line may jam if more than 10 ft. is loaded. 8 - English
-
 1
1 -
2
-
3
-
4
-
 5
5 -
 6
6 -
 7
7 -
 8
8 -
 9
9 -
 10
10 -
 11
11 -
 12
12 -
 13
13 -
 14
14 -
 15
15 -
16
-
17
-
18
-
19
-
20
-
21
-
22
-
23
-
24
-
25
-
26
-
27
-
28
-
29
-
30
-
31
-
32
-
33
-
34
 |
 |
