Ryobi P3500K Operation Manual - Page 8

Maintenance, Accessories

Page 8 highlights

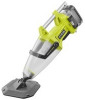
MAINTENANCE WARNING: Always inspect the vacuum and sealed battery compartment before and after each use for damage or cracks. Discontinue use if the sealed battery compartment is damaged, as this can allow corrosive or conductive liquids to enter the battery pack and result in serious personal injury or property damage. REPLACING THE BRUSHES See Figure 13, page 11. n Push back the rubber tab and pull the brush from the vacuum head assembly. n With the notched end of the brush facing the outside edge of the vacuum head assembly, push back the rubber tab on the head and fully insert the brush into the slot. Release the rubber tab and make sure the brush is firmly seated. GENERAL MAINTENANCE Avoid using solvents when cleaning plastic parts. Most plastics are susceptible to damage from various types of commercial solvents and may be damaged by their use. Use clean cloths to remove dirt, dust, oil, grease, etc. NOTICE: Do not use the head assembly if any of the wheels or brushes are broken or missing. Broken or missing parts could tear the lining of the pool. Refer to the Maintenance section for replacing parts. WARNING: Do not at any time let brake fluids, gasoline, petroleumbased products, penetrating oils, etc., come in contact with plastic parts. Chemicals can damage, weaken or destroy plastic which could result in serious personal injury. REPLACING THE WHEELS See Figure 14, page 11. n Grip the wheel and gently pull the wheel from the head assembly. n To install a new wheel, line up the wheel with the slots on the head assembly and push in to lock in place. CLEANING OR REPLACING THE FILTER See Figure 12, page 11. n With one hand holding the handle, lift the collection container handle to detach the collection container from the vacuum. n Twist the filter to unlock and remove. n Inspect filter. Rinse or replace as necessary. n To reinstall the filter, align the tabs on the filter with the slots on the vacuum and twist to lock. NOTICE: Do not use the head assembly if any of the wheels or brushes are broken or missing. Broken or missing parts could tear the lining of the pool. Refer to the Maintenance section for replacing parts. BATTERY COVER SEAL LUBRICATION Periodically lubricate the O-ring seal of the battery compartment cover using a silicone lubricant to help eliminate water entering the battery compartment. If o-ring is damaged or if you observe water in the battery compartment, have the o-ring replaced. ACCESSORIES Look for these accessories where you purchased this product or call 1-800-525-2579:  Filter (2 per pack)...A187FT1  Head Assembly...A187BH1  Wheels (4 per pack)...A187WH1 NOTE: ILLUSTRATIONS START ON PAGE 9 AFTER FRENCH AND SPANISH LANGUAGE SECTIONS. 8 - English

  • 1
  • 2
  • 3
  • 4
  • 5
  • 6
  • 7
  • 8
  • 9
  • 10
  • 11
  • 12
  • 13
  • 14
  • 15
  • 16
  • 17
  • 18
  • 19
  • 20
  • 21
  • 22
  • 23
  • 24
  • 25
  • 26
  • 27
  • 28

8 — English
WARNING:
Always inspect the vacuum and sealed battery compart-
ment before and after each use for damage or cracks.
Discontinue use if the sealed battery compartment is
damaged, as this can allow corrosive or conductive
liquids to enter the battery pack and result in serious
personal injury or property damage.
GENERAL MAINTENANCE
Avoid using solvents when cleaning plastic parts. Most
plastics are susceptible to damage from various types of
commercial solvents and may be damaged by their use. Use
clean cloths to remove dirt, dust, oil, grease, etc.
WARNING:
Do not at any time let brake fluids, gasoline, petroleum-
based products, penetrating oils, etc., come in contact
with plastic parts. Chemicals can damage, weaken or
destroy plastic which could result in serious personal
injury.
CLEANING OR REPLACING THE FILTER
See Figure 12, page 11.
With one hand holding the handle, lift the collection con-
tainer handle to detach the collection container from the
vacuum.
Twist the filter to unlock and remove.
Inspect filter. Rinse or replace as necessary.
To reinstall the filter, align the tabs on the filter with the
slots on the vacuum and twist to lock.
MAINTENANCE
REPLACING THE BRUSHES
See Figure 13, page 11.
Push back the rubber tab and pull the brush from the
vacuum head assembly.
With the notched end of the brush facing the outside edge
of the vacuum head assembly, push back the rubber tab
on the head and fully insert the brush into the slot. Release
the rubber tab and make sure the brush is firmly seated.
NOTICE
:
Do not use the head assembly if any of the wheels or
brushes are broken or missing. Broken or missing parts
could tear the lining of the pool. Refer to the
Maintenance
section for replacing parts.
REPLACING THE WHEELS
See Figure 14, page 11.
Grip the wheel and gently pull the wheel from the head
assembly.
To install a new wheel, line up the wheel with the slots
on the head assembly and push in to lock in place.
NOTICE
:
Do not use the head assembly if any of the wheels or
brushes are broken or missing. Broken or missing parts
could tear the lining of the pool. Refer to the
Maintenance
section for replacing parts.
BATTERY COVER SEAL LUBRICATION
Periodically lubricate the O-ring seal of the battery compart-
ment cover using a silicone lubricant to help eliminate water
entering the battery compartment.
If o-ring is damaged or if you observe water in the battery
compartment, have the o-ring replaced.
NOTE: ILLUSTRATIONS START ON PAGE 9 AFTER
FRENCH AND SPANISH LANGUAGE SECTIONS.
ACCESSORIES
Look for these accessories where you purchased this product or call 1-800-525-2579:
Filter (2 per pack)
..................................................................................................................................................
A187FT1
Head Assembly
....................................................................................................................................................
A187BH1
Wheels (4 per pack)
.............................................................................................................................................
A187WH1