Ryobi P521 English Manual - Page 12
Warning, Blade Selection, Installing Blades, General Cutting, Orbital Motion, Straight Cutting
 |
View all Ryobi P521 manuals
Add to My Manuals
Save this manual to your list of manuals |
Page 12 highlights
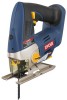
OPERATION WARNING: This tool is designed to work with T-shank blades. Use with non-T-shank blades may result in blades coming loose from tool, resulting in personal injury or property damage. BLADE SELECTION To obtain the best performance from the saw, it is important to select a specific blade for the particular application and type of material you wish to cut. By doing this you will get a smoother, faster cut and prolong blade life. NOTE: This tool is designed to work with T-shank blades. Other types of saw blades are not guaranteed to work properly and may come loose from the tool. INSTALLING BLADES See Figure 6. Remove battery pack. Lift blade clamp lock located on front of saw. Insert saw blade between blade clamp and saw bar. Close blade clamp lock. Replace battery pack. GENERAL CUTTING See Figure 7. Rest the front of the saw base on the workpiece and align cutting edge of the blade with the line on the workpiece. Start the saw and move it forward on the work surface. Apply downward pressure to keep the saw steady and only enough forward pressure to keep the blade cutting. Do not force the saw. Forcing the saw may overheat the motor and break saw blades. Broken saw blades must be replaced with new saw blades. ORBITAL MOTION See Figure 7. The blade of the saw cuts in orbital motion. This feature is adjustable and provides faster, more efficient cutting. With orbital motion, the blade cuts through your work in the upstroke but does not drag across your work in the downstroke. The higher settings should be used when fast cutting in soft material is desired. The lower settings should be used when cutting materials with more resistance. STRAIGHT CUTTING See Figure 7. A straight cut can be made by clamping a piece of wood or straightedge to the workpiece and guiding the edge of the saw against it. Make the cut from one direction only; don't cut halfway and complete the cut from the opposite end. BLADE CLAMP LOCK LOCK-OFF BUTTON ORBITAL ADJUSTMENT KNOB TO INCREASE ORBITAL SETTING 12 BLADE CLAMP T-SHANK SAW BLADE Fig. 6 SWITCH TRIGGER TO DECREASE ORBITAL SETTING Fig. 7
-
 1
1 -
2
-
3
-
4
-
5
-
6
-
 7
7 -
 8
8 -
 9
9 -
 10
10 -
 11
11 -
 12
12 -
 13
13 -
 14
14 -
 15
15 -
 16
16 -
 17
17 -
18
 |
 |
