Ryobi P742 User Manual - Page 6
Operation - set clock
 |
View all Ryobi P742 manuals
Add to My Manuals
Save this manual to your list of manuals |
Page 6 highlights
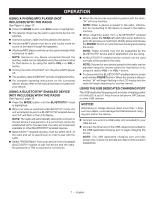
OPERATION Depress the latches to remove the battery pack. NOTE: Always remove battery pack from radio when not in use. FOLD-DOWN FLEXIBLE A NTENNA To decrease interference or electrical noise, extend the antenna or move the radio to a higher elevation. The antenna folds down and out of the way when not in use. LCD DISPLAY Briefly push either button (not press and hold) to tune one frequency step at a time. To decrease interference or electrical noise, adjust the position of the antenna or move the radio to a higher elevation. STORING A PRESET IN MEMORY: The memory feature saves up to 20 frequencies as presets in the radio's memory. You can save up to ten (10) frequencies each for FM and AM modes. When a battery pack is installed and the radio is in the ON position, the LCD display will show the time, frequency, mode, and settings. When the battery pack is removed and AAA batteries are installed, the LCD display will display the time only. NOTE: The illustrations of the LCD display shown in this manual are only examples of the frequencies you may see on your radio and are not the exact frequencies that you may choose to listen to. MENU NAVIGATION BUTTONS See Figure 3, page 9. Use the menu navigation buttons to turn the radio on and off, control the volume, change frequencies, toggle between modes and set the time. TURNING THE RADIO ON AND OFF: Press the power button to turn the radio ON and OFF. When the radio is on and a battery pack is installed, the battery symbol will be shown in the LCD display. If the battery charge is low, a flashing low battery indicator will be displayed. ADJUSTING THE VOLUME: When the radio is turned ON, the unit will return to the last volume setting used. To increase the volume, press the VOL + button. To decrease the volume, press the VOL - button. MODE SELECTION: Press the MODE button to cycle through available modes. There are four modes to choose from: FM mode AM mode AUX mode BLUETOOTH® mode NOTE: When turned on, the radio will return to the last mode that was used if the battery was not disconnected. In the event power is lost to the radio, the display will default to FM mode. FM/AM TUNING: Tune to the desired FM or AM frequency. Press and hold the PRESET button until the word "MEMORY" and the preset position number flash on the screen. Press the SCAN left and right arrow buttons to choose a preset position number. NOTE: There are ten (10) preset positions for FM and ten (10) for AM. Only one station can be saved in each preset position. Press the PRESET button again to store the frequency. TO TUNE TO PRESETS (FM OR AM MODE): Press and release the PRESET button to cycle through each preset position number and its associated frequency. EQUALIZER FUNCTION To adjust the bass and/or treble settings: Press and hold the MODE button until the letter "b" (BASS) is displayed. Press again and the letter "t" (TREBLE) is displayed. Press the VOL + or VOL - button until the desired bass or treble level (-5 to 5) is achieved . Press MODE to store your selection. SETTING THE CLOCK: The time appears on the LCD display when the radio is on. Press and hold the CLK/DSPY button until the "hour" display blinks. Press the VOL + or VOL - button to select the hour. NOTE: Time is displayed in 12-hour format only. To select an hour that is after noon and before midnight, cycle the hours until "PM" appears in the display. Press and release the CLK/DSPY button to lock in the hour setting. "Minutes" will begin to blink. Press the VOL + or VOL - button to select the desired number. Press and release the CLK/DSPY button again to confirm the time. The SCAN left and right arrow buttons are used to tune to the desired radio frequency. The selected frequency is displayed on the LCD. Press and release the left arrow button to tune to a lower frequency. Press and release the right arrow button to tune to a higher frequency. 6 - English
-
 1
1 -
 2
2 -
 3
3 -
 4
4 -
 5
5 -
 6
6 -
 7
7 -
 8
8 -
 9
9 -
 10
10 -
 11
11 -
 12
12 -
13
-
14
-
15
-
16
-
17
-
18
-
19
-
20
-
21
-
22
-
23
-
24
-
25
-
26
-
27
-
28
 |
 |