Ryobi PCL445B Operation Manual - Page 9
Operation
 |
View all Ryobi PCL445B manuals
Add to My Manuals
Save this manual to your list of manuals |
Page 9 highlights
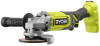
OPERATION WARNING: Always wear eye protection with side shields marked to comply with ANSI Z87.1, along with hearing protection. Failure to do so could result in objects being thrown into your eyes and other possible serious injuries. When task is completed, engage the lock-off button. The switch trigger should not be able to depress. CAUTION: The lock-off button should be in the locked position when the tool is not in use or is being transported. WARNING: Do not use any attachments or accessories not recommended by the manufacturer of this product. The use of attachments or accessories not recommended can result in serious personal injury. POSITIONING THE GUARD See Figures 5 - 6, pages 13 and 14. The guard on the grinder should be correctly positioned depending on which side the handle is mounted. Never use the grinder without the guard correctly in place. APPLICATIONS WARNING: You may use this product for the purpose listed below: Grinding metals Sanding wood or metal surfaces WARNING: Never place the guard so that it is in front of the grinder. This could result in serious injury because sparks and loose particles thrown from the grinding wheel would be directed toward the operator. Always place the guard in the correct location as shown. Battery products are always in operating condition. Therefore, the switch should always be locked when not in use or carrying at your side. INSTALLING/REMOVING BATTERY PACK See Figure 3, page 13. To install: Insert the battery pack. Make sure the latches on each side of the battery pack snap in place and that battery pack is secured in the product before beginning operation. To remove: Depress the latches on each side of the battery pack. For complete charging instructions, see the operator's manuals for your battery pack and charger. STARTING/STOPPING THE ANGLE GRINDER See Figure 4, page 13. The lock-off button, located on the handle above the switch trigger, reduces the possibility of accidental starting. To reposition the guard: Remove the battery pack. � Unlock the guard by holding the latch and pulling away from the grinder. Rotate the guard to its correct position as shown. Lock the guard by pushing in until latch clicks into place. NOTE: Be sure the raised ridge on the guard is seated in the groove on the bearing cap. Never use the grinder without the guard in place and properly adjusted. OPERATING THE GRINDER See Figure 7, page 14. Always carefully select and use grinding wheels that are recommended for the material to be ground. Make sure that the minimum operating speed of any accessory wheel selected is 9,000/min. or more. The grinding wheel provided with the grinder is suitable for grinding welds, preparing surfaces to be welded, grinding structural steel, and grinding stainless steel. To operate the grinder: Secure all work in a vise or clamp to a workbench. To turn the tool ON: Install the battery pack. Hold the tool in front and away from you, keeping the wheel clear of the workpiece. To start the tool, grasp the handle and side handle firmly. Slide the lock-off button to the unlocked position and squeeze the switch trigger. DANGER: Never use the grinder with the guard removed. It has been designed for use only with the guard installed. Attempting to use grinder with guard removed will result in loose particles being thrown against the operator resulting in serious personal injury. To turn the tool OFF: Hold the grinder in front and away from you with both To stop the tool, release the switch trigger. Make sure the hands, keeping the grinding wheel clear of the workpiece. tool comes to a complete stop before laying down the tool. 9 - English
-
 1
1 -
2
-
3
-
 4
4 -
 5
5 -
 6
6 -
 7
7 -
 8
8 -
 9
9 -
 10
10 -
 11
11 -
 12
12 -
 13
13 -
 14
14 -
15
-
16
-
17
-
18
-
19
-
20
-
21
-
22
-
23
-
24
-
25
-
26
-
27
-
28
-
29
-
30
-
31
-
32
-
33
-
34
-
35
-
36
-
37
-
38
-
39
-
40
 |
 |
