Ryobi RY14122 User Manual - Page 16
Operation - extension hose
 |
View all Ryobi RY14122 manuals
Add to My Manuals
Save this manual to your list of manuals |
Page 16 highlights
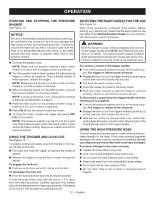
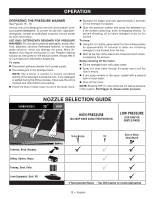
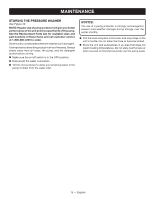
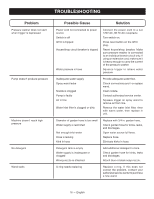
OPERATION STARTING AND STOPPING THE PRESSURE WASHER See Figure 12. NOTICE: Do not run the pressure washer pump without water supply connected and turned on, as this may damage the high pressure seals and decrease pump life. Completely unwind the hose from its reel or coil and make sure the hose is not being restricted by tires, rocks, or any other objects that may lessen or prevent water flow to the pressure washer. Connect the garden hose. NOTE: Make sure the pressure washer's water intake screen is in place and unclogged before connecting. Turn the garden hose on then squeeze the high pressure trigger to relieve air pressure. Once a steady stream of water appears, release the trigger. SELECTING THE RIGHT NOZZLE FOR THE JOB See Figure 14. Each of the nozzles has a different spray pattern. Before starting any cleaning job, determine the best nozzle for the job. Refer to the Nozzle Selection Guide for more information about which nozzle to choose. WARNING: NEVER change nozzles without engaging the lock-out on the trigger handle and NEVER point the wand at your face or at others. The quick-connect feature contains small springs that could eject the nozzle with some force. Failure to heed this warning could cause personal injury. To connect a nozzle to the trigger handle: Turn off the pressure washer and shut off the water sup- ply. Pull trigger to release water pressure. Engage the lock-out on the trigger handle by pushing up on the lock-out until it clicks into the slot. NOTE: Make sure the faucet is turned on fully and that there are no kinks or leaks in the hose. After ensuring the switch is in the OFF position, connect the pressure washer to the power supply. NOTE: If using an extension cord, make sure to arrange a drip loop as described on page 3. Press the reset button on the pressure washer's plug to make sure the unit is ready for operation. Press ON ( I ) on the switch to start the motor. To stop the motor, release the trigger and press OFF ( O ) on the switch. NOTE: The pressure washer may be on and the sytem may have pressure even when the pump and/or motor cannot be heard running. Always use caution around the pressure washer. Pull back the quick-connect collar. Push the nozzle into place in the spray wand. Push the collar forward so that the nozzle is secured properly. Check to see that the nozzle is secure. To disconnect a nozzle from the trigger handle once the cleaning job is complete: Turn off the pressure washer and shut off the water sup- ply. Pull trigger to release water pressure. Engage the lock-out on the trigger handle by pushing up on the lock-out until it clicks into the slot. Remove the nozzle by placing hand over nozzle then pulling back the quick-connect collar. Place nozzle in the nozzle storage area on the trigger handle. USING THE HIGH PRESSURE HOSE USING THE TRIGGER AND LOCK-OUT See Figure 13. For greater control and safety, keep both hands on the trigger handle at all times. n Pull back and hold the trigger to operate the pressure washer. The high pressure hose features an outer covering that provides strength to the hose. If the outer covering becomes damaged, the hose must be replaced immediately. Do not use a high pressure hose if the outer covering is damaged. To prevent damage to the outer covering: n Inspect the hose before every use. n Fully unwrap and straighten hose before use. n Release the trigger to stop the flow of water through the nozzle. To engage the lock-out: n Push up on the lock-out until it clicks into the slot. To disengage the lock-out: n Do not allow the high pressure hose to be kinked. n Keep hose away from hot surfaces and sharp edges. n Do not pull unit by high pressure hose. n Do not allow hose to be crushed or wrapped around objects. n Push the lock-out down and into its original position. To use the spray wand, start with the nozzle 1-2 ft. away from the cleaning surface. Carefully approach the surface just until the desired level of cleaning is achieved. If the spray is too close it can damage the cleaning surface. 12 - English
-
 1
1 -
2
-
3
-
4
-
5
-
6
-
7
-
8
-
9
-
10
-
 11
11 -
 12
12 -
 13
13 -
 14
14 -
 15
15 -
 16
16 -
 17
17 -
 18
18 -
 19
19 -
 20
20 -
 21
21 -
22
-
23
-
24
-
25
-
26
-
27
-
28
-
29
-
30
-
31
-
32
-
33
-
34
-
35
-
36
-
37
-
38
-
39
-
40
-
41
-
42
-
43
-
44
-
45
-
46
-
47
-
48
-
49
-
50
-
51
-
52
 |
 |