Ryobi TS1342L English Manual - Page 13
Loose Parts, Assembly - dust bag
 |
View all Ryobi TS1342L manuals
Add to My Manuals
Save this manual to your list of manuals |
Page 13 highlights
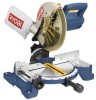
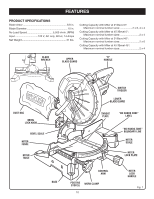
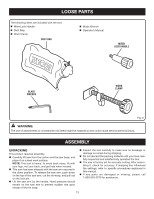
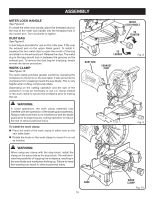
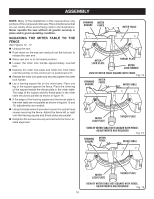
LOOSE PARTS The following items are included with the tool: Miter Lock Handle Dust Bag Work Clamp DUST BAG Blade Wrench Operator's Manual MITER LOCK HANDLE BLADE WRENCH WORK CLAMP Fig. 6 WARNING: The use of attachments or accessories not listed might be hazardous and could cause serious personal injury. ASSEMBLY UNPACKING This product requires assembly. Carefully lift saw from the carton and the saw base, and place it on a level work surface. NOTE: This tool is heavy. To avoid back injury, lift with your legs, not your back, and get help when needed. This saw has been shipped with the saw arm secured in the down position. To release the saw arm, push down on the top of the saw arm, cut the tie-wrap, and pull out on the lock pin. Lift the saw arm by the handle. Hand pressure should remain on the saw arm to prevent sudden rise upon release of the tie wrap. Inspect the tool carefully to make sure no breakage or damage occurred during shipping. Do not discard the packing material until you have carefully inspected and satisfactorily operated the tool. The saw is factory set for accurate cutting. After assembling it, check for accuracy. If shipping has influenced the settings, refer to specific procedures explained in this manual. If any parts are damaged or missing, please call 1-800-525-2579 for assistance. 13
-
 1
1 -
2
-
3
-
4
-
5
-
6
-
7
-
 8
8 -
 9
9 -
 10
10 -
 11
11 -
 12
12 -
 13
13 -
 14
14 -
 15
15 -
 16
16 -
 17
17 -
 18
18 -
19
-
20
-
21
-
22
-
23
-
24
-
25
-
26
-
27
-
28
-
29
-
30
-
31
-
32
 |
 |
