Ryobi TS1342L English Manual - Page 17
Danger, Aligning The Laser Guide Line - blade guard
 |
View all Ryobi TS1342L manuals
Add to My Manuals
Save this manual to your list of manuals |
Page 17 highlights
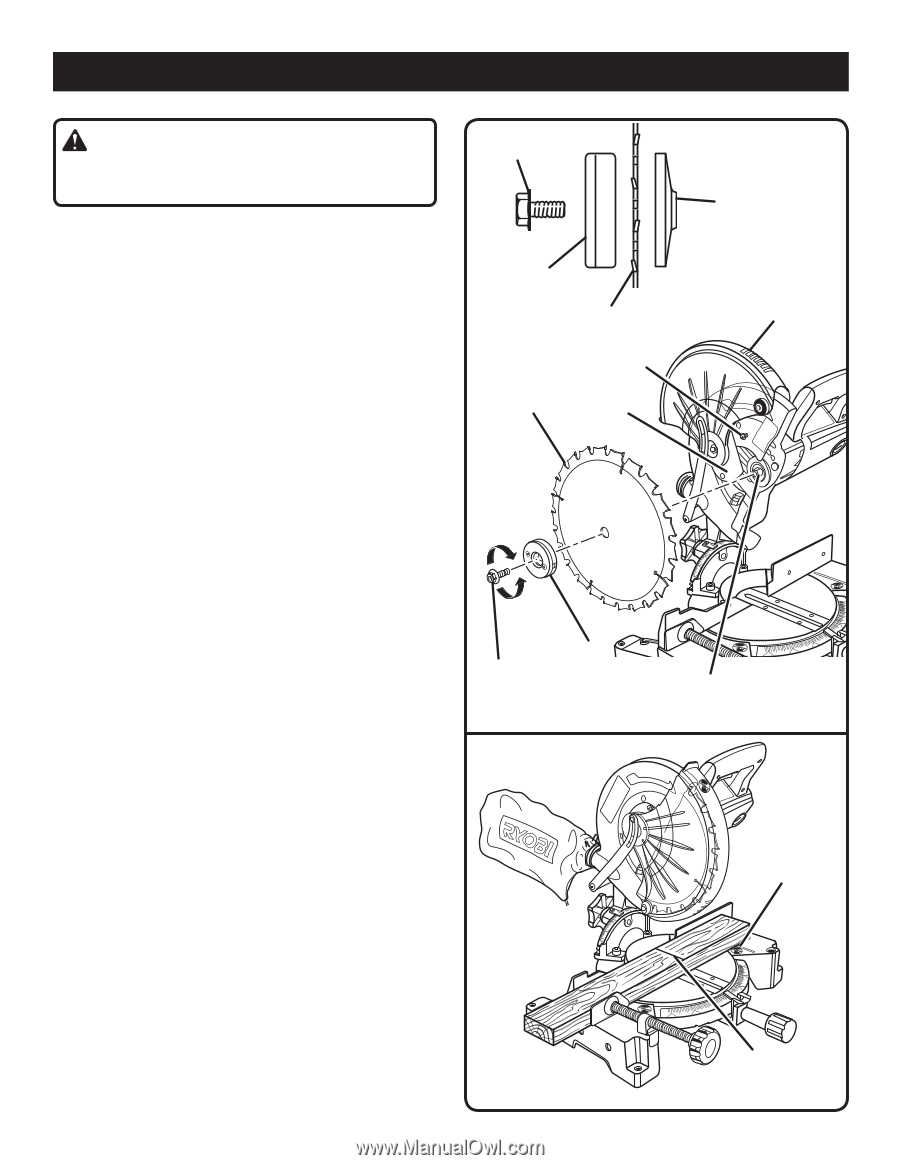
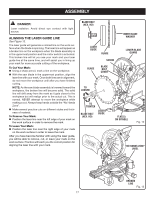
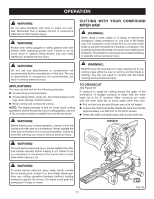
ASSEMBLY Danger: Laser radiation. Avoid direct eye contact with light source. aligning the laser guide line See Figure 13. The laser guide will generate a colored line on the work surface when the blade is spinning. The laser line will appear as a broken line on the workpiece when the blade assembly is in the uppermost position and the motor switch is activated. This broken line will let you see your mark and your laser guide line at the same time, and will assist you in lining up your mark for more accurate cutting of the workpiece. To Cut Your Mark: Using a sharp pencil, mark a line on the workpiece. With the saw blade in the uppermost position, align the laser line with your mark. Once both lines are in alignment, do not move the workpiece until after you have finished cutting. NOTE: As the saw blade assembly is lowered toward the workpiece, the broken line will become solid. The solid line will drift away from the mark as it gets closer to the workpiece but will realign prior to the actual cut. This is normal. NEVER attempt to move the workpiece while making a cut. Always keep hands outside the "No Hands Zone". Make several practice cuts on different styles and thickness of material. To Remove Your Mark: Position the laser line near the left edge of your mark on the work surface in order to remove the mark. To Leave Your Mark: Position the laser line near the right edge of your mark on the work surface in order to leave the mark. After you have become familiar with using the laser guide, you will be able to remove, cut, or leave your mark on the work surface. Practice will teach you the correct position for aligning the laser line with your mark. blade BOLT (hex. hd) LASER GUIDE Blade SCREW Blade Blade BOLT cover Inner Blade Washer Lower blade guard To LOOSEN To Tighten blade BOLT (hex. hd) LASER GUIDE Flat(S) on Spindle Fig. 12 "NO HANDS ZONE" LABEL BROKEN LINE Fig. 13 17
-
 1
1 -
2
-
3
-
4
-
5
-
6
-
7
-
8
-
9
-
10
-
11
-
 12
12 -
 13
13 -
 14
14 -
 15
15 -
 16
16 -
 17
17 -
 18
18 -
 19
19 -
 20
20 -
 21
21 -
 22
22 -
23
-
24
-
25
-
26
-
27
-
28
-
29
-
30
-
31
-
32
 |
 |