Samsung 400UX User Manual - Page 42
Connecting to a Camcorder, AV /COMPONENT AUDIO IN [R-AUDIO-L]
 |
UPC - 729507804750
View all Samsung 400UX manuals
Add to My Manuals
Save this manual to your list of manuals |
Page 42 highlights
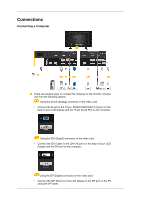
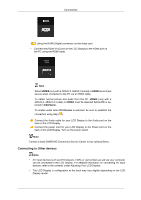
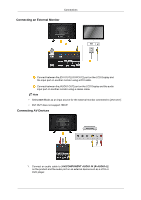
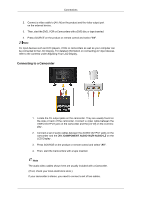
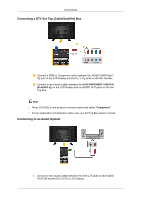
Connections 2. Connect a video cable to [AV IN] on the product and the video output port on the external device. 3. Then, start the DVD, VCR or Camcorders with a DVD disc or tape inserted. 4. Press SOURCE on the product or remote control and select "AV". Note AV input devices such as DVD players, VCRs or camcorders as well as your computer can be connected to the LCD Display. For detailed information on connecting AV input devices, refer to the contents under Adjusting Your LCD Display. Connecting to a Camcorder 1. Locate the AV output jacks on the camcorder. They are usually found on the side or back of the camcorder. Connect a video cable between the VIDEO OUTPUT jack on the camcorder and the [AV IN] on the LCD Display . 2. Connect a set of audio cables between the AUDIO OUTPUT jacks on the camcorder and the [AV /COMPONENT AUDIO IN [R-AUDIO-L]] on the LCD Display . 3. Press SOURCE on the product or remote control and select "AV". 4. Then, start the Camcorders with a tape inserted. Note The audio-video cables shown here are usually included with a Camcorder. (If not, check your local electronics store.) If your camcorder is stereo, you need to connect a set of two cables.
-
 1
1 -
2
-
3
-
4
-
5
-
6
-
7
-
8
-
9
-
10
-
11
-
12
-
13
-
14
-
15
-
16
-
17
-
18
-
19
-
20
-
21
-
22
-
23
-
24
-
25
-
26
-
27
-
28
-
29
-
30
-
31
-
32
-
33
-
34
-
35
-
36
-
 37
37 -
 38
38 -
 39
39 -
 40
40 -
 41
41 -
 42
42 -
 43
43 -
 44
44 -
 45
45 -
 46
46 -
 47
47 -
48
-
49
-
50
-
51
-
52
-
53
-
54
-
55
-
56
-
57
-
58
-
59
-
60
-
61
-
62
-
63
-
64
-
65
-
66
-
67
-
68
-
69
-
70
-
71
-
72
-
73
-
74
-
75
-
76
-
77
-
78
-
79
-
80
-
81
-
82
-
83
-
84
-
85
-
86
-
87
-
88
-
89
-
90
-
91
-
92
-
93
-
94
-
95
-
96
-
97
-
98
-
99
-
100
-
101
-
102
-
103
-
104
-
105
-
106
-
107
-
108
-
109
-
110
-
111
-
112
-
113
-
114
-
115
-
116
-
117
-
118
-
119
-
120
-
121
-
122
-
123
-
124
-
125
-
126
-
127
-
128
-
129
-
130
-
131
-
132
-
133
-
134
-
135
-
136
-
137
-
138
-
139
-
140
-
141
-
142
-
143
-
144
-
145
-
146
-
147
-
148
-
149
 |
 |
