Samsung 460DR User Manual - Page 71
Right-click on the MagicInfo-i icon the image will be inserted and select 'Run' from
 |
UPC - 729507806709
View all Samsung 460DR manuals
Add to My Manuals
Save this manual to your list of manuals |
Page 71 highlights
Adjusting the LCD Display If you select Do not show again and click the Install button, the Scheduler screen is displayed after rebooting. 4. Connect your keyboard and mouse and press the "ESC" keys on your keyboard. 5. The Windows Desktop is displayed and the MagicInfo-i icon (the image will be inserted) appears. Move the cursor over the icon. Note If the MagicInfo-i icon is not displayed on the notification area, double click the MagicInfo-i icon on the window desktop. The icon will appear. 6. Right-click on the MagicInfo-i icon (the image will be inserted) and select 'Run' from the displayed menu. 7. The Player screen of MagicInfo-i is displayed. Note For more information, refer to the MagicInfo-i manual.
-
 1
1 -
2
-
3
-
4
-
5
-
6
-
7
-
8
-
9
-
10
-
11
-
12
-
13
-
14
-
15
-
16
-
17
-
18
-
19
-
20
-
21
-
22
-
23
-
24
-
25
-
26
-
27
-
28
-
29
-
30
-
31
-
32
-
33
-
34
-
35
-
36
-
37
-
38
-
39
-
40
-
41
-
42
-
43
-
44
-
45
-
46
-
47
-
48
-
49
-
50
-
51
-
52
-
53
-
54
-
55
-
56
-
57
-
58
-
59
-
60
-
61
-
62
-
63
-
64
-
65
-
 66
66 -
 67
67 -
 68
68 -
 69
69 -
 70
70 -
 71
71 -
 72
72 -
 73
73 -
 74
74 -
 75
75 -
 76
76 -
77
-
78
-
79
-
80
-
81
-
82
-
83
-
84
-
85
-
86
-
87
-
88
-
89
-
90
 |
 |

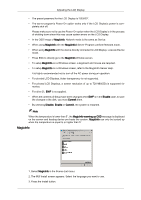
If you select Do not show again and click the Install button, the Scheduler screen is displayed
after rebooting.
4. Connect your keyboard and mouse and press the “ESC” keys on your keyboard.
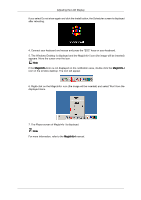
5. The Windows Desktop is displayed and the MagicInfo-i icon (the image will be inserted)
appears. Move the cursor over the icon.
Note
If the
MagicInfo-i
icon is not displayed on the notification area, double click the
MagicInfo-i
icon on the window desktop. The icon will appear.
6. Right-click on the MagicInfo-i icon (the image will be inserted) and select 'Run' from the
displayed menu.
7. The Player screen of MagicInfo-i is displayed.
Note
For more information, refer to the
MagicInfo-i
manual.
Adjusting the LCD Display