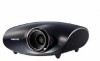
Samsung D300 User Manual (user Manual) (ver.1.0) (English) - Page 20
Àlick the [»K] button to close the window, and click the, window., The computer may restart - 24
 |
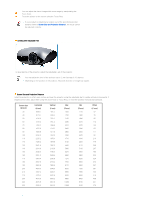
UPC - 729507804330
View all Samsung D300 manuals
Add to My Manuals
Save this manual to your list of manuals |
Page 20 highlights
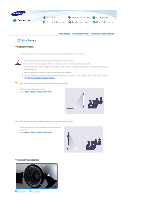
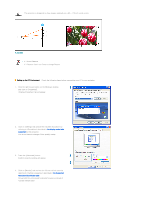
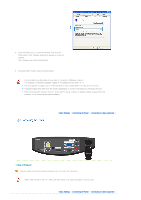
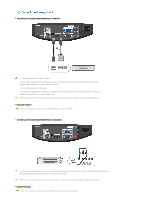
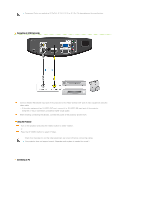
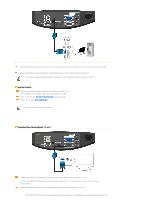
5. Click the [OK] button to close the window, and click the [OK] button of the window to close the window. The computer may restart automatically. 6. Shut down the PC and connect to the projector. Process might vary depending on your type of computer or Windows versions. (For example, [Properties] appears instead of [Properties (R)] as shown in 1.) This unit appliance supports up to 24 bits per pixel in Color quality when it is used as a PC monitor. Projected images may differ from the monitor depending on monitor manufacture or Windows versions. When connecting the projector to a PC, check that PC setup complies to display settings supported by this projector. If not, there may be signal problems. | Basic Settings | Connecting the Power | Connecting to video equipment | 1. Rear of Projector Plug the power cord into the power terminal on the rear side of the projector. When used outside of the U.S., HAR cord with fittings of an approved agency may be used. | Basic Settings | Connecting the Power | Connecting to video equipment |
-
 1
1 -
2
-
3
-
4
-
5
-
6
-
7
-
8
-
9
-
10
-
11
-
12
-
13
-
14
-
 15
15 -
 16
16 -
 17
17 -
 18
18 -
 19
19 -
 20
20 -
 21
21 -
 22
22 -
 23
23 -
 24
24 -
 25
25 -
26
-
27
-
28
-
29
-
30
-
31
-
32
-
33
-
34
-
35
-
36
-
37
-
38
-
39
 |
 |
