Samsung DVD-VR300 Flash Guide (flash Manual) (English) - Page 66
Recording through a DV jack, *VCR Recording, Basic VCR Recording
 |
View all Samsung DVD-VR300 manuals
Add to My Manuals
Save this manual to your list of manuals |
Page 66 highlights
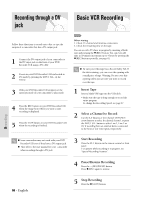
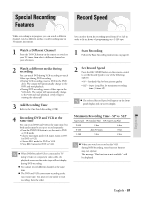
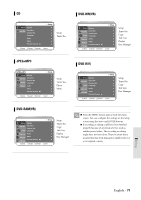
Recording through a DV jack Basic VCR Recording Recording Follow these directions to record onto a disc or tape the outputs of a camcorder that has a DV output jack. 1 Connect the DV output jack of your camcorder to the DV input jack on the front of your DVD Recorder-VCR using a DV cable. 2 Power on your DVD Recorder-VCR and switch to DV mode by pressing the INPUT SEL. on the remote. 3 With your DVD Recorder-VCR stopped, set the operation mode of your camcorder to play mode. 4 Press the REC button on your DVD Recorder-VCR when the image from which you want to start recording is displayed. 5 Press the STOP button on your DVD Recorder-VCR when the recording is finished. Before starting 1. Check TV channel and Antenna connections. 2. Check the remaining time on the tape. You can record a TV show in progress by inserting a blank tape and pressing the (REC) button. You can even add time in 30-minute increments up to 4 hours by pressing the (REC)button repeatedly; see page 61. Be sure your videotape has a Record Safety Tab. If Note the tab is missing, you can cover the opening with a small piece of tape. Warning: Do not cover this opening unless you are sure you want to record over the tape. 1 Insert Tape Insert a blank VHS tape into the VCR deck. • Make sure the tape is long enough to record the entire program. To change the Recording Speed, see page 67. 2 Select a Channel to Record Use the 0-9 buttons or the Channel UP/DOWN arrow buttons to select the desired channel, or press the INPUT SEL. button to select Line 1, Line 2 or DV if recording from an external device connected to the front or rear Line inputs, respectively. Some camcorders may not work with your DVD Note Recorder-VCR even if they have a DV output jack. Also refer to the user manual for your camcorder when recording through a DV jack. 3 Start Recording Press the REC button on the remote control or front panel. For options while recording is in progress, see "Special Recording Features". 4 Pause/Resume Recording Press the (REC/PAUSE) button. Press (REC) again to resume. 66 - English 5 Stop Recording Press the (STOP) button.
-
 1
1 -
2
-
3
-
4
-
5
-
6
-
7
-
8
-
9
-
10
-
11
-
12
-
13
-
14
-
15
-
16
-
17
-
18
-
19
-
20
-
21
-
22
-
23
-
24
-
25
-
26
-
27
-
28
-
29
-
30
-
31
-
32
-
33
-
34
-
35
-
36
-
37
-
38
-
39
-
40
-
41
-
42
-
43
-
44
-
45
-
46
-
47
-
48
-
49
-
50
-
51
-
52
-
53
-
54
-
55
-
56
-
57
-
58
-
59
-
60
-
 61
61 -
 62
62 -
 63
63 -
 64
64 -
 65
65 -
 66
66 -
 67
67 -
 68
68 -
 69
69 -
 70
70 -
 71
71 -
72
-
73
-
74
-
75
-
76
-
77
-
78
-
79
-
80
-
81
-
82
-
83
-
84
-
85
-
86
-
87
-
88
-
89
-
90
-
91
-
92
-
93
-
94
-
95
-
96
-
97
-
98
 |
 |
