Samsung HTQ70 Quick Guide (easy Manual) (ver.1.0) (English) - Page 11
Connecting External Components - display
 |
UPC - 036725616479
View all Samsung HTQ70 manuals
Add to My Manuals
Save this manual to your list of manuals |
Page 11 highlights
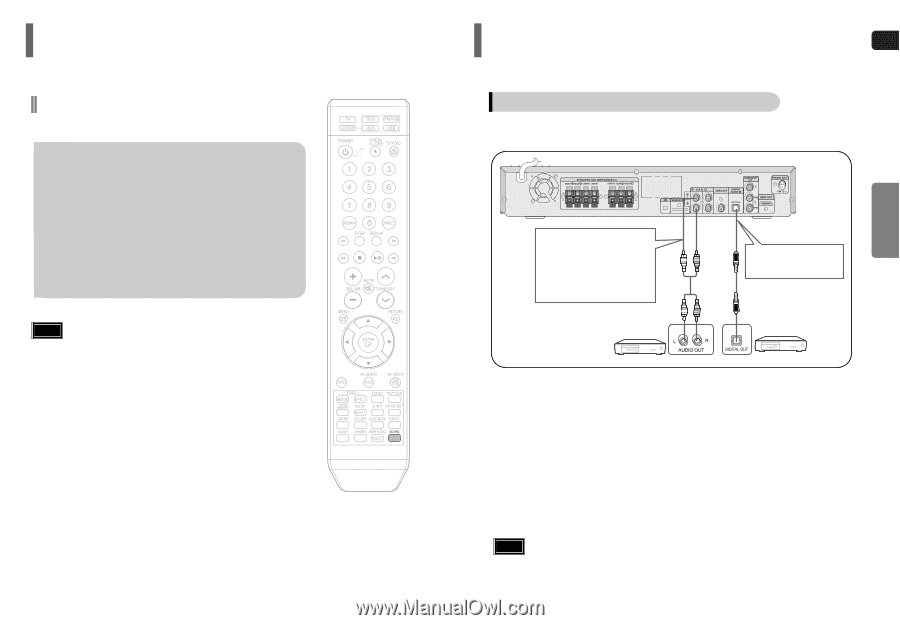
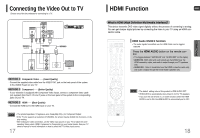
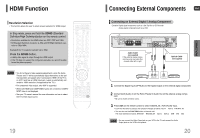
HDMI Function Resolution Selection • This function allows the user to select screen resolution for HDMI output. In Stop mode, press and hold the SD/HD (Standard Definition/High Definition)button on the remote control. • Resolutions available for the HDMI output are 480P, 720P and 1080i. • SD(Standard Definition) resolution is 480p and HD(High Definition) reso- lution is 720p/1080i. Example:If the TV supports resolution up to 480p: Press the SD/HD button. • A 480p video signal is output through the HDMI output. • If the TV does not support the configured resolution, you will not be able to see the picture properly. Note • You do not have to make separate adjustments, since the Home Theater and TV will be automatically adjust themselves to the optimal resolution and aspect ratio if connected to HDMI. (If the TV is an HDTV and has an HDMI Input jack, output is automatically converted to 1080i resolution (if supported by the TV).) • For component video output, only 480P is supported. • When both HDMI and COMPONENT jacks are connected, COMPO- NENT video is not displayed. • See your TV owner's manual for more information on how to select the TV's Video Input source. 19 Connecting External Components ENG Connecting an External Digital / Analog Component Example: Digital signal components such as a Set-Top Box or CD Recorder. Analog signal components such as a VCR. CONNECTIONS Audio Cable (not supplied) If the external analog component has only one Audio Out, connect either left or right. Optical Cable (not supplied) 1 Connect the Digital Input (OPTICAL) to the Digital Output on the external digital component. 2 Connect AUX (Audio) In on the Home Theater to Audio Out on the external analog component. • Be sure to match connector colors. 3 Press AUX on the remote control to select 'DIGITAL IN / AUX1/AUX2' input. • Each time the button is pressed, the selection changes as follows: AUX 1 ➝ AUX 2➝ DIGITAL IN. • You can also use the FUNCTION button on the main unit. The mode switches as follows: DVD/CD ➝ DIGITAL IN ➝ AUX 1 ➝ AUX 2 ➝ USB ➝ FM ➝ XM. Note • You can connect the Video Output jack on your VCR to the TV, and connect the Audio Output jacks on the VCR to this product. 20
-
 1
1 -
2
-
3
-
4
-
5
-
 6
6 -
 7
7 -
 8
8 -
 9
9 -
 10
10 -
 11
11 -
 12
12 -
 13
13 -
 14
14 -
 15
15 -
 16
16 -
17
-
18
-
19
-
20
-
21
-
22
-
23
-
24
-
25
-
26
-
27
-
28
-
29
-
30
-
31
-
32
-
33
-
34
-
35
-
36
-
37
-
38
-
39
-
40
-
41
-
42
-
43
 |
 |