Samsung HW-D7000 User Manual (user Manual) (ver.1.0) (English) - Page 23
Connecting the Speakers, Connecting Speaker Wire - parts
 |
UPC - 036725617582
View all Samsung HW-D7000 manuals
Add to My Manuals
Save this manual to your list of manuals |
Page 23 highlights
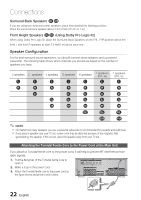
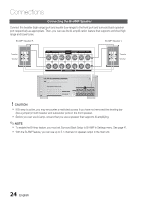
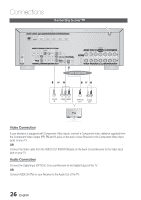
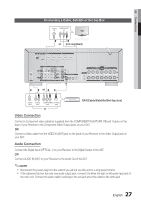
02 Connections Connecting the Speakers Connecting Speaker Wire 1. Loosen the knob by turning counterclockwise. 2. Insert the bare part of the wire into the hole in the side of each terminal. 3. Tighten the knob by turning clockwise to secure the wire. ACTIVE SUBWOOFER FRONT (R) SURROUND(R) SURROUNDBACK(R) SURROUNDBACK(L) SURROUND(L) FRONT (L) FRONT SURROUND SURROUND BACK SURROUND BACK SURROUND /FRONT HEIGHT CENTER /FRONT HEIGHT FRONT SUBWOOFER OUT LAN iPod HDMI OUT ARC (MONITOR) HDMI 1 (SAT) MDMI IN HDMI 2 (GAME) HDMI 3 (AUX1) HDMI 4 (AUX2) FM ANT VIDEO IN VIDEO OUT COMPONENT IN/OUT SAT GAME TV MONITOR 1 (SAT) 2 (GAME) Y PB/CB PR/CR GAME SAT TV CD AUDIO IN IN OUT OPTICAL 1 OPTICAL 2 OPTICAL 3 COAXIAL (SAT) (GAME) (TV) (CD) FRONT SPEAKER IMPEDANCE : 4~8 SURROUND SURROUND BACK SURROUND BACK SURROUND /FRONT HEIGHT CENTER /FRONT HEIGHT FRONT SUBWOOFER OUT SPEAKERS OUT SPEAKERS OUT CENTER ✎ NOTE Keep the subwoofer speaker out of reach of children to prevent them from inserting their hands or objects into the duct (hole). Never touch speaker terminals while the power is on. Doing so could result in electric shock. Make sure the polarities (+ and -) are correct. If you want to use two active subwoofer speakers, connect both subwoofer speakers into the SUBWOOFER OUT terminals in the rear panel. We recommend more than 120W of permited input and connection with speaker that more than 4ohm impedance. If you use lower level products than our recommend, it can be cause of Speaker Unit or Amplifer's trouble so be cations about it. 23 English
-
 1
1 -
2
-
3
-
4
-
5
-
6
-
7
-
8
-
9
-
10
-
11
-
12
-
13
-
14
-
15
-
16
-
17
-
 18
18 -
 19
19 -
 20
20 -
 21
21 -
 22
22 -
 23
23 -
 24
24 -
 25
25 -
 26
26 -
 27
27 -
 28
28 -
29
-
30
-
31
-
32
-
33
-
34
-
35
-
36
-
37
-
38
-
39
-
40
-
41
-
42
-
43
-
44
-
45
-
46
-
47
-
48
-
49
-
50
-
51
-
52
-
53
-
54
-
55
-
56
-
57
-
58
-
59
-
60
-
61
-
62
-
63
-
64
-
65
-
66
-
67
-
68
-
69
-
70
-
71
-
72
-
73
-
74
-
75
-
76
-
77
-
78
-
79
-
80
-
81
-
82
-
83
-
84
-
85
-
86
-
87
 |
 |
