Samsung HW-E450C User Manual Ver.1.0 (English) - Page 11
cOnnecting tHe WireLess sUBWOOfer - remote
 |
View all Samsung HW-E450C manuals
Add to My Manuals
Save this manual to your list of manuals |
Page 11 highlights
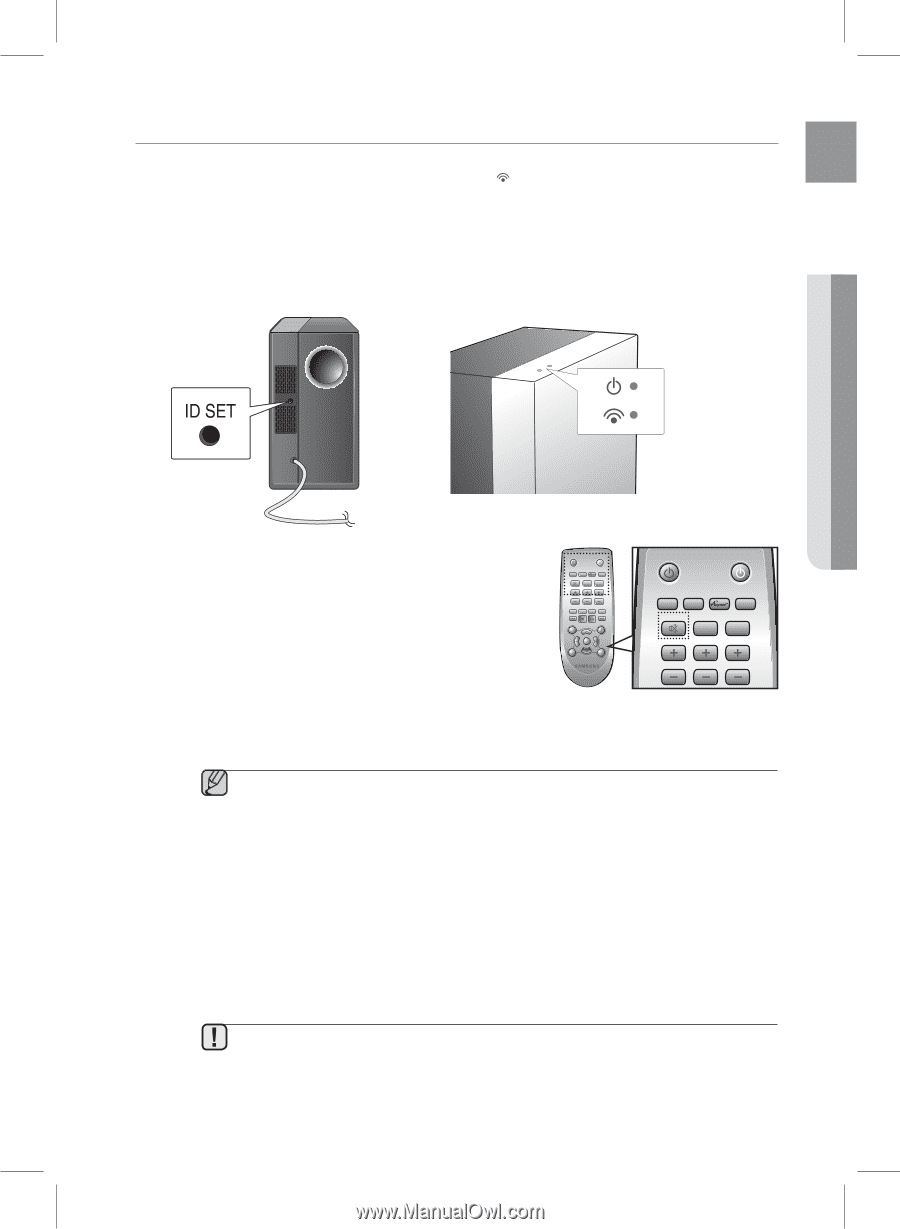
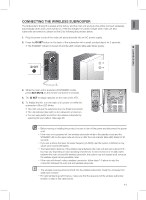
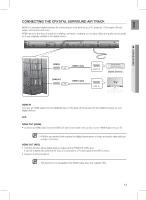
EnG CONNECTING THE WIrElESS SUBWOOFEr The Subwoofer's linking ID is preset at the factory and the main unit and sub should link (connect wirelessSlTyAN)DBY automatically when main unit is turned on. If the link indicator ( ) does not light when main unit and LINK subwoofer are turned on, please set the ID by following the process below. 1. Plug the power cords of the main unit and subwoofer into an AC power supply. 2. Press the ID SET button on the back of the subwoofer with a small, pointed object for 5 seconds. • The STANDBY indicator is turned off and the LINK indicator (Blue LED) blinks quickly. ● connections 3. While the main unit is powered off (STANDBY mode), press SAT MUTE on the remote control for 5 seconds. 4. The ID SET message appears on the main unit's VFD. 5. To finalize the link, turn the main unit's power on while the subwoofer's Blue LED blinks. • The main unit and the subwoofer are now linked (connected). • The Link indicator (blue LED) on the subwoofer is turned on. • You can enjoy better sound from the wireless subwoofer by selecting the sound effect. (See page 20) POWER TV POWER SAT SOURCE SOUND EFFECT SAT MUTE SMART VOLUME SPEAKER 3D SOUND VOLUME S/W LEVEL AUDIO SYNC REPEAT DRC DIMMER AUTO POWER TV SOURCE TV CH TV INFO TV VOL TV MUTE TV VOL TV PRE-CH AH59-02434A TV CH TV EXIT POWER TV POWER SAT SOURCE SOUND EFFECT SAT MUTE SMART VOLUME SPEAKER 3D SOUND VOLUME S/W LEVEL AUDIO SYNC REPEAT DRC DIMMER AUTO POWER TV SOURCE TV CH TV INFO ▪ Before moving or installing the product, be sure to turn off the power andTV VdOLisconnMeTUVTcE t the TpV VoOLwer cord. ▪ If the main unit is powered off, the wireless subwoofer will be in the standTbV PyREm-CH odeTV CaHnd the TV EXIT STANDBY LED on the upper side will come on after the Link indicator (Blue LED) AH59-02434A blinks for 30 seconds. ▪ If you use a device that uses the same frequency (2.4GHz) near the system, interference may cause some sound interruption. ▪ The transmission distance of the wireless signal between the main unit and sub is about 33 ft., but may vary depending on your operating environment. If a steel-concrete or metallic wall is between the main unit and the wireless subwoofer, the system may not operate at all, because the wireless signal cannot penetrate metal. ▪ If the main unit doesn't make a wireless connection, follow steps 1-5 above to retry the connection between the main unit and wireless subwoofer. ▪ The wireless receiving antenna is built into the wireless subwoofer. Keep the unit away from water and moisture. ▪ For optimal listening performance, make sure that the area around the wireless subwoofer location is clear of any obstructions. 11
-
 1
1 -
2
-
3
-
4
-
5
-
 6
6 -
 7
7 -
 8
8 -
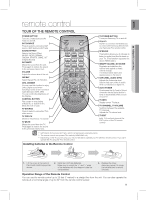 9
9 -
 10
10 -
 11
11 -
 12
12 -
 13
13 -
 14
14 -
 15
15 -
 16
16 -
17
-
18
-
19
-
20
-
21
-
22
-
23
-
24
-
25
-
26
 |
 |