Samsung Mp User Manual (user Manual) (ver.1.0) (English) - Page 7
Connecting Your LCD Monitor
 |
UPC - 729507702681
View all Samsung Mp manuals
Add to My Manuals
Save this manual to your list of manuals |
Page 7 highlights
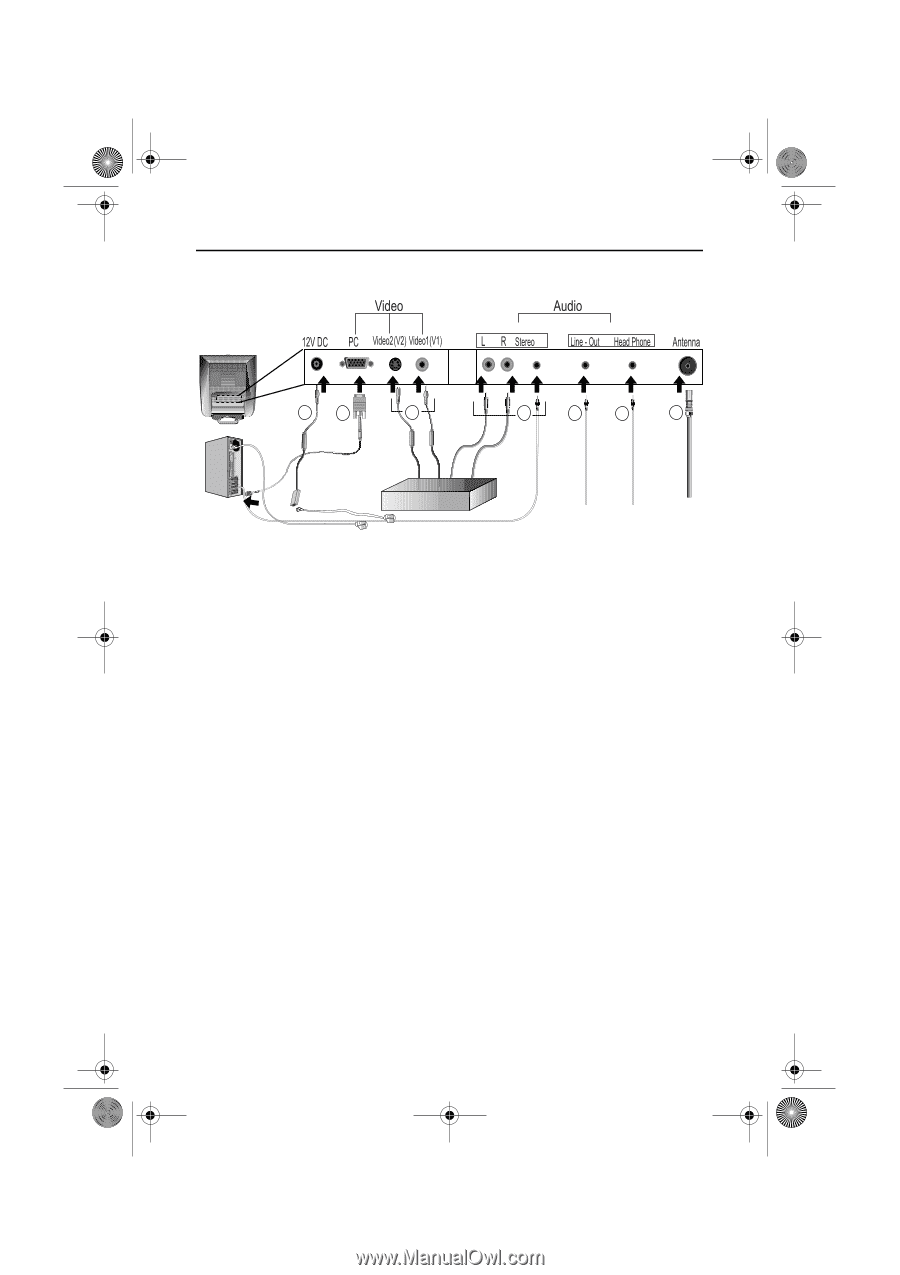
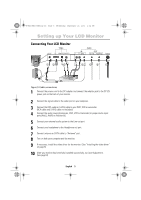
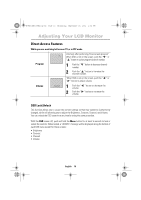
4_E150MP170MPbody.fm Page 5 Wednesday, September 19, 2001 2:54 PM Setting up Your LCD Monitor Connecting Your LCD Monitor IN OUT 12 3 4 5 6 7 DVD or VCR Figure 3. Cable connections 1 Connect the power cord to the DC adapter and connect the adapter jack to the DC12V power port on the back of your monitor. 2 Connect the signal cable to the video port on your computer. 3 Connect the RCA cable or S-VHS cable to your DVD, VCR or camcoder. (RCA cable and S-VHS cable not included) 4 Connect the audio sources(computer, DVD, VCR or Camcoder) to proper Audio input ports(Ain(L), Ain(R) or Ain(stereo)). 5 Connect your external audio system to the Line-out port. 6 Connect your headphone to the Headphone-out port. 7 Connect antenna or CATV cable to "Antenna" port. 8 Turn on both your computer and the monitor. 9 If necessary, install the video driver for the monitor. (See "Installing the video driver" on page 6) 10 After your monitor has been fully installed successfully, run Auto-Adjustment. (See page12) English 5
-
 1
1 -
 2
2 -
 3
3 -
 4
4 -
 5
5 -
 6
6 -
 7
7 -
 8
8 -
 9
9 -
 10
10 -
 11
11 -
 12
12 -
13
-
14
-
15
-
16
-
17
-
18
-
19
-
20
-
21
-
22
-
23
-
24
-
25
-
26
-
27
-
28
-
29
-
30
-
31
-
32
-
33
-
34
-
35
-
36
-
37
 |
 |