Samsung NA30N6555TG/AA Installation Guide - Page 16
Step 3. Connect the cooktop to gas supply, on other gas appliances when you turn the gas back on.
 |
View all Samsung NA30N6555TG/AA manuals
Add to My Manuals
Save this manual to your list of manuals |
Page 16 highlights
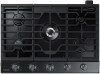
Installation instructions Rubber 1. Remove screws from all 5 burner cups and 4 screws from the cooktop frame. Remove the rubber protecting Smart connect module. Pull out all knob dials and lift up to remove the frame cooktop. 5. Return all burner cups and cooktop frame to original position, reinstall all knob dials. Installation instructions Smart connect module 2. Detach Smart connect module from case burner. Disconnect wire connector from the PCB. Cover 3. Install supplied cover in place of Smart connect module. Top view 4. Insert the wire connector diagonally into the cover. Make sure it fits firmly. Insert the wire connector Wire connector Step 3. Connect the cooktop to gas supply Shut off the main gas supply valve before disconnecting the old cooktop and leave it off until the new hookup has been completed. Don't forget to relight the burner on other gas appliances when you turn the gas back on. Because hard piping restricts movement of the cooktop, the use of a CSA International-certified flexible metal appliance connector is recommended unless local codes require a hard-piped connection. WARNING If the information in this manual is not followed exactly, a fire or explosion may result, causing death, personal injury, or property damage. - Do not store or use gasoline or other flammable vapors and liquids in the vicinity of this or any other appliance. - WHAT TO DO IF YOU SMELL GAS: • DO NOT light a match, candle, or cigarette. • DO NOT try to light any appliance. • DO NOT touch any electrical switch. • DO NOT use any phone in your building. 16 English Install_NA30N6555TG_DG68-01091A-02_EN+MES+CFR.indb 16 10/24/2018 4:29:19 PM
-
 1
1 -
2
-
3
-
4
-
5
-
6
-
7
-
8
-
9
-
10
-
 11
11 -
 12
12 -
 13
13 -
 14
14 -
 15
15 -
 16
16 -
 17
17 -
 18
18 -
 19
19 -
 20
20 -
 21
21 -
22
-
23
-
24
-
25
-
26
-
27
-
28
-
29
-
30
-
31
-
32
-
33
-
34
-
35
-
36
-
37
-
38
-
39
-
40
-
41
-
42
-
43
-
44
-
45
-
46
-
47
-
48
-
49
-
50
-
51
-
52
-
53
-
54
-
55
-
56
-
57
-
58
-
59
-
60
-
61
-
62
-
63
-
64
-
65
-
66
-
67
-
68
-
69
-
70
-
71
-
72
-
73
-
74
-
75
-
76
-
77
-
78
-
79
-
80
-
81
-
82
-
83
-
84
 |
 |
