Samsung NE58F9710WS/AA User Manual Ver.1.0 (English, French) - Page 42
Using The Gliding Rack - installation guide
 |
View all Samsung NE58F9710WS/AA manuals
Add to My Manuals
Save this manual to your list of manuals |
Page 42 highlights
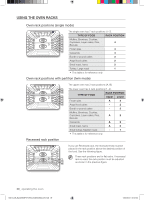
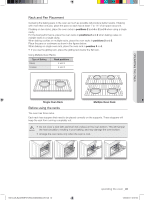
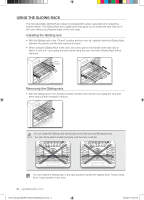
USING THE GLIDING RACK The fully extendable Gliding Rack makes food preparation easier, especially when preparing heavier dishes. The Gliding Rack has 2 glide tracks that allow you to extend the rack well out of the oven without touching the sides of the oven walls. Installing the Gliding rack • With the Gliding rack in the "Closed" position and the oven off, carefully insert the Gliding Rack between the guides until the rack reaches the back. • When using the Gliding Rack in the oven, be sure to pull on the handle of the rack only to slide it in and out. If you grasp the frame while using the rack, the entire Gliding Rack will be removed. Rack Guides Removing the Gliding rack • With the Sliding rack in the "Closed" position and the oven off and cool, grasp the rack and frame and pull both forward to remove. Do not install the Gliding rack directly above the Flat rack and Recessed rack. CAUTION You will not be able to install it properly and the rack could fall. You can install the Gliding rack in any rack positions except the highest (level 7) and lowest (level 1) rack position in the oven. 41_ operating the oven 130513_(IB_Best)NE58F9710WS_DG68-00506A_EN.indd 41 13/05/2013 08:27:05
-
 1
1 -
2
-
3
-
4
-
5
-
6
-
7
-
8
-
9
-
10
-
11
-
12
-
13
-
14
-
15
-
16
-
17
-
18
-
19
-
20
-
21
-
22
-
23
-
24
-
25
-
26
-
27
-
28
-
29
-
30
-
31
-
32
-
33
-
34
-
35
-
36
-
 37
37 -
 38
38 -
 39
39 -
 40
40 -
 41
41 -
 42
42 -
 43
43 -
 44
44 -
 45
45 -
 46
46 -
 47
47 -
48
-
49
-
50
-
51
-
52
-
53
-
54
-
55
-
56
-
57
-
58
-
59
-
60
-
61
-
62
-
63
-
64
-
65
-
66
-
67
-
68
-
69
-
70
-
71
-
72
-
73
-
74
-
75
-
76
-
77
-
78
-
79
-
80
-
81
-
82
-
83
-
84
-
85
-
86
-
87
-
88
-
89
-
90
-
91
-
92
-
93
-
94
-
95
-
96
-
97
-
98
-
99
-
100
-
101
-
102
-
103
-
104
-
105
-
106
-
107
-
108
-
109
-
110
-
111
-
112
-
113
-
114
-
115
-
116
-
117
-
118
-
119
-
120
-
121
-
122
-
123
-
124
-
125
-
126
-
127
-
128
-
129
-
130
-
131
-
132
-
133
-
134
-
135
-
136
-
137
-
138
-
139
-
140
-
141
-
142
-
143
-
144
-
145
-
146
-
147
-
148
-
149
-
150
-
151
-
152
-
153
-
154
-
155
-
156
-
157
-
158
-
159
-
160
 |
 |
