Samsung RF28R7551SR/AA User Manual - Page 27
Lift up to remove the, Remove
 |
View all Samsung RF28R7551SR/AA manuals
Add to My Manuals
Save this manual to your list of manuals |
Page 27 highlights
Installation To reattach the fridge door After you have moved the refrigerator to its final location, reattach the doors by following the removal instructions in reverse order. A 02 B 01 03 CAUTION To prevent water leaks from the dispenser, the water line must be fully connected. Make sure both tubes of the water line are inserted fully to the center of transparent coupler (A) or the guidelines (B). 01 Dispenser 02 Center of transparent coupler 03 Guidelines Detach the FlexZone™ drawer 1. Lift up to remove the FlexZone™ basket. 2. Remove the wire cover along with the connector harness using a flat-head screwdriver. Untitled-5 27 English 27 2020-03-31 12:26:06
-
 1
1 -
2
-
3
-
4
-
5
-
6
-
7
-
8
-
9
-
10
-
11
-
12
-
13
-
14
-
15
-
16
-
17
-
18
-
19
-
20
-
21
-
 22
22 -
 23
23 -
 24
24 -
 25
25 -
 26
26 -
 27
27 -
 28
28 -
 29
29 -
 30
30 -
 31
31 -
 32
32 -
33
-
34
-
35
-
36
-
37
-
38
-
39
-
40
-
41
-
42
-
43
-
44
-
45
-
46
-
47
-
48
-
49
-
50
-
51
-
52
-
53
-
54
-
55
-
56
-
57
-
58
-
59
-
60
-
61
-
62
-
63
-
64
-
65
-
66
-
67
-
68
-
69
-
70
-
71
-
72
-
73
-
74
-
75
-
76
-
77
-
78
-
79
-
80
-
81
-
82
-
83
-
84
-
85
-
86
-
87
-
88
-
89
-
90
-
91
-
92
-
93
-
94
-
95
-
96
-
97
-
98
-
99
-
100
-
101
-
102
-
103
-
104
-
105
-
106
-
107
-
108
-
109
-
110
-
111
-
112
-
113
-
114
-
115
-
116
-
117
-
118
-
119
-
120
-
121
-
122
-
123
-
124
-
125
-
126
-
127
-
128
-
129
-
130
-
131
-
132
-
133
-
134
-
135
-
136
-
137
-
138
-
139
-
140
-
141
-
142
-
143
-
144
-
145
-
146
-
147
-
148
-
149
-
150
-
151
-
152
-
153
-
154
-
155
-
156
-
157
-
158
-
159
-
160
-
161
-
162
-
163
-
164
-
165
-
166
-
167
-
168
-
169
-
170
-
171
-
172
-
173
-
174
-
175
-
176
-
177
-
178
-
179
-
180
-
181
-
182
-
183
-
184
-
185
-
186
-
187
-
188
-
189
-
190
-
191
-
192
-
193
-
194
-
195
-
196
-
197
-
198
-
199
-
200
-
201
-
202
-
203
-
204
-
205
-
206
-
207
-
208
-
209
-
210
-
211
-
212
-
213
-
214
-
215
-
216
-
217
-
218
-
219
-
220
-
221
-
222
-
223
-
224
-
225
-
226
-
227
-
228
-
229
-
230
-
231
-
232
-
233
-
234
-
235
-
236
-
237
-
238
-
239
-
240
-
241
-
242
-
243
-
244
-
245
-
246
-
247
-
248
-
249
-
250
-
251
-
252
-
253
-
254
-
255
-
256
-
257
-
258
-
259
-
260
-
261
-
262
-
263
-
264
-
265
-
266
-
267
-
268
-
269
-
270
-
271
-
272
 |
 |

English
27
Installation
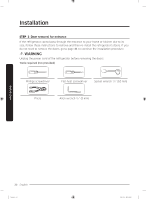
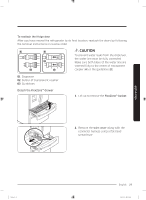
To reattach the fridge door
After you have moved the refrigerator to its final location, reattach the doors by following
the removal instructions in reverse order.
A
01
02
03
B
01
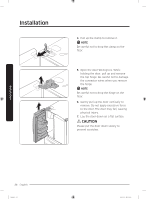
Dispenser
02
Center of transparent coupler
03
Guidelines
CAUTION
To prevent water leaks from the dispenser,
the water line must be fully connected.
Make sure both tubes of the water line are
inserted fully to the center of transparent
coupler (
A
) or the guidelines (
B
).
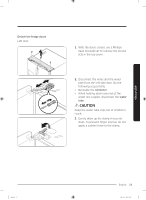
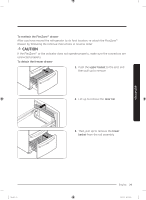
Detach the FlexZone™ drawer
1.
Lift up to remove the
FlexZone™ basket
.
2.
Remove the
wire cover
along with the
connector harness using a flat-head
screwdriver.
Untitled-5
27
2020-03-31
°° 12:26:06