Samsung RS27T5561SG User Manual - Page 36
Voice ID : Change the Voice ID settings. You, About Bixby : View the Bixby version
 |
View all Samsung RS27T5561SG manuals
Add to My Manuals
Save this manual to your list of manuals |
Page 36 highlights
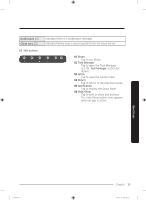
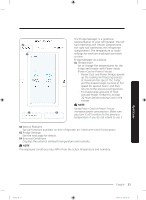
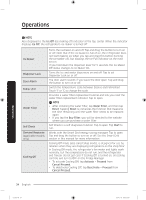
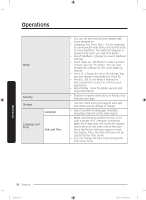
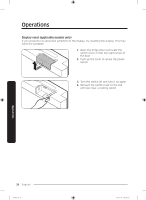
Operations Bixby Security Storage Language Language and Time Date and Time • You can set the function that related with voice recognition. • Language and Voice Style : Set the language to communicate with Bixby and set the style of voice feedback. The selected language is applied only when you talk with Bixby. • Sound feedback : Change the sound feedback settings. • Voice wake-up : Set Bixby to wake up when it hears you say "Hi, Bixby". You can also change the settings for the voice wake-up feature. • Voice ID : Change the Voice ID settings. You can also register and delete the Voice ID. • Privacy : Set to use Bixby's interactive and customised services to enhance your experience. • About Bixby : View the Bixby version and legal information. • Enable or disable restrictions on Family Hub features and apps. • You can check saving storage of each app and check saving storage of Images. • Select a preferred language. Available languages depend on the sales region. • Make sure the Auto update function is on with a proper Wi-Fi network connection. Open the fridge door and locate the display reset button on the inner side of the door. Press the button and press again to reset the display. Then, the date and time will be synced by the time server. • You can change the time zone through the Time zone menu. Operations 36 English Untitled-10 36 2019-11-11 PM 6:55:56
-
 1
1 -
2
-
3
-
4
-
5
-
6
-
7
-
8
-
9
-
10
-
11
-
12
-
13
-
14
-
15
-
16
-
17
-
18
-
19
-
20
-
21
-
22
-
23
-
24
-
25
-
26
-
27
-
28
-
29
-
30
-
 31
31 -
 32
32 -
 33
33 -
 34
34 -
 35
35 -
 36
36 -
 37
37 -
 38
38 -
 39
39 -
 40
40 -
 41
41 -
42
-
43
-
44
-
45
-
46
-
47
-
48
-
49
-
50
-
51
-
52
-
53
-
54
-
55
-
56
-
57
-
58
-
59
-
60
-
61
-
62
-
63
-
64
-
65
-
66
-
67
-
68
-
69
-
70
-
71
-
72
-
73
-
74
-
75
-
76
-
77
-
78
-
79
-
80
-
81
-
82
-
83
-
84
-
85
-
86
-
87
-
88
-
89
-
90
-
91
-
92
-
93
-
94
-
95
-
96
-
97
-
98
-
99
-
100
-
101
-
102
-
103
-
104
-
105
-
106
-
107
-
108
-
109
-
110
-
111
-
112
-
113
-
114
-
115
-
116
-
117
-
118
-
119
-
120
-
121
-
122
-
123
-
124
-
125
-
126
-
127
-
128
-
129
-
130
-
131
-
132
-
133
-
134
-
135
-
136
-
137
-
138
-
139
-
140
-
141
-
142
-
143
-
144
-
145
-
146
-
147
-
148
-
149
-
150
-
151
-
152
-
153
-
154
-
155
-
156
-
157
-
158
-
159
-
160
-
161
-
162
-
163
-
164
-
165
-
166
-
167
-
168
-
169
-
170
-
171
-
172
-
173
-
174
-
175
-
176
-
177
-
178
-
179
-
180
-
181
-
182
-
183
-
184
-
185
-
186
-
187
-
188
-
189
-
190
-
191
-
192
-
193
-
194
-
195
-
196
-
197
-
198
-
199
-
200
-
201
-
202
-
203
-
204
-
205
-
206
-
207
-
208
-
209
-
210
-
211
-
212
-
213
-
214
-
215
-
216
-
217
-
218
-
219
-
220
-
221
-
222
-
223
-
224
-
225
-
226
-
227
-
228
 |
 |
