Samsung SC-HMX10C User Manual (user Manual) (ver.1.0) (English, Chinese) - Page 91
Direct Printing With A Pictbridge Printer
 |
View all Samsung SC-HMX10C manuals
Add to My Manuals
Save this manual to your list of manuals |
Page 91 highlights
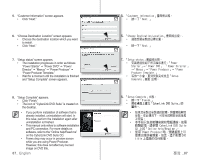
DIRECT PRINTING WITH A PICTBRIDGE PRINTER If your printer is compatible with PictBridge, photo images can be printed easily by connecting the camcorder with the USB cable directly to the printer. DPOF setting can also be used. page 82 NOTICE: After selecting "PictBridge" in the menu, connect the USB cable. 1. Set the "USB Connect" to "PictBridge". page 70 2. Connect your HD camcorder to the printer using the provided USB cable. PictBridge 3. Turn your printer power on. • The thumbnail index view of the photo image will appear. 4. Touch a photo image to print, then touch Print ( ) tab. 100-0001 • To search photo image, touch previous image ( ) or next image ( ) tab. • The selected photo image will be printed. • After the connection, the easy printing menu will display on the LCD screen. To display the PictBridge menu, touch the Menu ( ) tab. For more information about the PictBridge menu, refer to page 84. 使用 PICTBRIDGE HD camcorder PictBridge USB DPOF 82 頁 PictBridge」後, 連接 USB 纜線。 1. 將「USB Connect」設定為 「PictBridge 70 頁 2 USB 纜線將 HD 1 / 12 80 Min 3 4 標籤。 01 LCD 螢幕 PictBridge PictBridge 84 頁。 Setting the number of copies to print Touch decrease ( ) or increase ( ) tab to select the number of prints. • If the image moves to the previous or next, the number of copies is reset. To cancel print setting Touch Return ( ) tab on the screen. To stop printing after printing starts The confirmation screen appears while printing. Touch "Cancel" on the screen. Cancel」。 83_ English 臺灣 _83
-
 1
1 -
2
-
3
-
4
-
5
-
6
-
7
-
8
-
9
-
10
-
11
-
12
-
13
-
14
-
15
-
16
-
17
-
18
-
19
-
20
-
21
-
22
-
23
-
24
-
25
-
26
-
27
-
28
-
29
-
30
-
31
-
32
-
33
-
34
-
35
-
36
-
37
-
38
-
39
-
40
-
41
-
42
-
43
-
44
-
45
-
46
-
47
-
48
-
49
-
50
-
51
-
52
-
53
-
54
-
55
-
56
-
57
-
58
-
59
-
60
-
61
-
62
-
63
-
64
-
65
-
66
-
67
-
68
-
69
-
70
-
71
-
72
-
73
-
74
-
75
-
76
-
77
-
78
-
79
-
80
-
81
-
82
-
83
-
84
-
85
-
 86
86 -
 87
87 -
 88
88 -
 89
89 -
 90
90 -
 91
91 -
 92
92 -
 93
93 -
 94
94 -
 95
95 -
 96
96 -
97
-
98
-
99
-
100
-
101
-
102
-
103
-
104
-
105
-
106
-
107
-
108
-
109
-
110
-
111
-
112
-
113
-
114
-
115
-
116
-
117
-
118
-
119
 |
 |
