Samsung SDS-P4082 User Manual - Page 51
Setting the Monitor, Screen Setup
 |
View all Samsung SDS-P4082 manuals
Add to My Manuals
Save this manual to your list of manuals |
Page 51 highlights
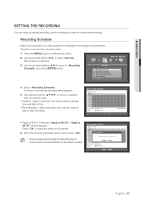
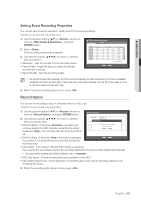
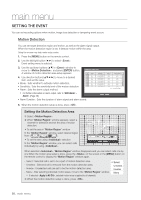
! main menu Monitor You can configure information to be displayed and its format for Spot Out monitor. Setting the Monitor Using the mouse may help make setup easier. 1. Use the up/down buttons (▲▼) in window to move to , and press [ENTER] button. Monitor Monitor Mode 2. Select . 3. Use direction buttons to move to a desired item, and set the value. • Event Display : Sets the dwell time of the event channel display on the monitor when an event occurs. Event Display OFF Display Date Multi CH SEQ Time 5 sec Time VGA/HDMI 1280X720 HDMI Resolution Auto Detection ON CH Name Icon If selected , it displays the channel until you Display Position Setup press [ALARM] button to release it. OK Cancel • Display : Displays only checked items on the monitor screen. • Multi CH SEQ Time : Sets the interval between automatic display switching in 4-split and 9-split mode of the Live screen. • VGA/HDMI : Set your preferred screen resolution to or . If the monitor does not support selected resolution of or , it may not display video properly. • HDMI Resolution Auto Detection: If the option is checked on and the HDMI is available, DVR will automatically adjust optimized resolution based on monitor's setting. If you need to configure the resolution manually, please turn the option off. 4. When the monitor setup is done, press . Screen Setup Some monitors many not display information (camera name, icon, time information, etc.) about the DVR, depending on the condition. Then, you can change the display position of the data. 1. In the window, press the up/down (▲▼) button to move to and press the [ENTER] button. 2013-01-01 01:10:25 2. Select the item. 3. Select in the bottom. You will move to the window. 4. Use the four direction buttons or the number buttons on the remote control to adjust the data position. Display Position Setup 30 30 30 30 OK Cancel English _51
-
 1
1 -
2
-
3
-
4
-
5
-
6
-
7
-
8
-
9
-
10
-
11
-
12
-
13
-
14
-
15
-
16
-
17
-
18
-
19
-
20
-
21
-
22
-
23
-
24
-
25
-
26
-
27
-
28
-
29
-
30
-
31
-
32
-
33
-
34
-
35
-
36
-
37
-
38
-
39
-
40
-
41
-
42
-
43
-
44
-
45
-
 46
46 -
 47
47 -
 48
48 -
 49
49 -
 50
50 -
 51
51 -
 52
52 -
 53
53 -
 54
54 -
 55
55 -
 56
56 -
57
-
58
-
59
-
60
-
61
-
62
-
63
-
64
-
65
-
66
-
67
-
68
-
69
-
70
-
71
-
72
-
73
-
74
-
75
-
76
-
77
-
78
-
79
-
80
-
81
-
82
-
83
-
84
-
85
-
86
-
87
-
88
-
89
-
90
-
91
-
92
-
93
-
94
-
95
-
96
-
97
-
98
-
99
-
100
-
101
-
102
-
103
-
104
-
105
-
106
-
107
-
108
-
109
-
110
-
111
-
112
-
113
-
114
-
115
-
116
-
117
-
118
-
119
-
120
-
121
-
122
-
123
-
124
-
125
-
126
-
127
-
128
-
129
-
130
-
131
-
132
-
133
-
134
-
135
-
136
-
137
-
138
-
139
-
140
-
141
-
142
-
143
-
144
-
145
-
146
 |
 |
