Samsung SDS-P4082 User Manual - Page 60
Network Configuration
 |
View all Samsung SDS-P4082 manuals
Add to My Manuals
Save this manual to your list of manuals |
Page 60 highlights
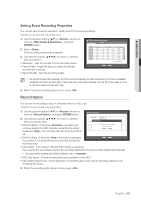
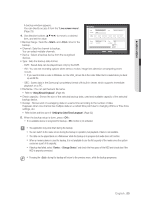
main menu Network Configuration It provides networked monitoring of Live screen from a remote place, and supports mail forwarding function with events. You can configure the network environment which enables such functions. Connection Mode You can set the network connection route and protocol. Setting the Connection Sets the protocol and environment of the network. Using the mouse may help make setup easier. 1. Press the [MENU] button on the remote control. 2. Use the left/right button (_ +) to select . Network menu is selected. 3. Use the up/down buttons (▲▼) to move to , and press [ENTER] button. Logout Return Connection Mode DDNS Live Transfer Mailing Service Network 4. Select . A window of connection mode setup appears. 5. Use direction buttons to move to a desired item, and set the value. • IP Type : Sets the network connection mode. • Transfer Bandwidth : Sets the maximum data flow to be transferred. (Upload speed) Options will vary depending on the selected connection mode. -- For , : Select one from 50 kbps ~ 2Mbps, and Unlimited. -- For , select one from 50 kbps ~ 600 kbps. • IP Address, Gateway, Subnet Mask, and DNS -- For : You can directly input IP Address, Gateway, Subnet Mask and DNS. -- For : IP Address, Gateway, and Subnet Mask are set automatically. -- For : IP Address, Gateway, and Subnet Mask are set automatically. • ID, Password : In case you selected PPPoE, provide the "ID" and its "Password". MM `` DNS server for and can be set by user only if you selected . 6. When the connection setup is done, press . Connection Mode Interface Port IP Type Transfer Bandwidth Static 2Mbps IP Address Gateway Subnet Mask DNS 192.168.1.200 192.168.1.1 255.255.255.0 Manual 168.126.63.1 OK Cancel Connection Mode Interface Port IP Type Transfer Bandwidth PPPoE 600kbps IP Address Gateway Subnet Mask DNS 192.168.1.200 192.168.1.1 255.255.255.0 Manual 168.126.63.1 OK Cancel 60_ main menu
-
 1
1 -
2
-
3
-
4
-
5
-
6
-
7
-
8
-
9
-
10
-
11
-
12
-
13
-
14
-
15
-
16
-
17
-
18
-
19
-
20
-
21
-
22
-
23
-
24
-
25
-
26
-
27
-
28
-
29
-
30
-
31
-
32
-
33
-
34
-
35
-
36
-
37
-
38
-
39
-
40
-
41
-
42
-
43
-
44
-
45
-
46
-
47
-
48
-
49
-
50
-
51
-
52
-
53
-
54
-
 55
55 -
 56
56 -
 57
57 -
 58
58 -
 59
59 -
 60
60 -
 61
61 -
 62
62 -
 63
63 -
 64
64 -
 65
65 -
66
-
67
-
68
-
69
-
70
-
71
-
72
-
73
-
74
-
75
-
76
-
77
-
78
-
79
-
80
-
81
-
82
-
83
-
84
-
85
-
86
-
87
-
88
-
89
-
90
-
91
-
92
-
93
-
94
-
95
-
96
-
97
-
98
-
99
-
100
-
101
-
102
-
103
-
104
-
105
-
106
-
107
-
108
-
109
-
110
-
111
-
112
-
113
-
114
-
115
-
116
-
117
-
118
-
119
-
120
-
121
-
122
-
123
-
124
-
125
-
126
-
127
-
128
-
129
-
130
-
131
-
132
-
133
-
134
-
135
-
136
-
137
-
138
-
139
-
140
-
141
-
142
-
143
-
144
-
145
-
146
 |
 |
