Samsung SM-N920P User Manual - Page 24
Complete the Setup Screens
 |
View all Samsung SM-N920P manuals
Add to My Manuals
Save this manual to your list of manuals |
Page 24 highlights
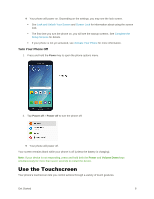
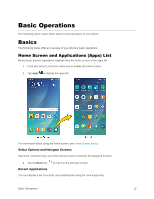
Tip: Do not press the Power key while the phone is being activated. Pressing the Power key cancels the activation process. Note: If you are having any difficulty with activation, visit sprint.com/support. Complete the Setup Screens The setup screens help you set up certain features and preferences on your phone. Once your phone has been turned on, you will see a Welcome message. You can then complete the setup process. Note: You may be able to complete the setup screens before your phone has been activated on your Sprint account. 1. At the Welcome screen, choose options, and then tap to begin setup: Language: Choose the default language for your phone's operation. Accessibility: Configure settings to access settings to improve the accessibility of your phone's features if you are visually impaired or hard of hearing. Emergency call: Make an emergency call. 2. Follow the prompts to complete setup for each topic. Tap Next, or the right arrow, to move through the steps. You can skip options to continue to the next one. During setup, you may see these options: Note: Screens may vary based on the activation status of your phone. Wi-Fi: By default, your phone prompts you to use Wi-Fi when accessing data services. Tap a Wi-Fi access point to connect to it, or you can continue setup using your phone's connection to the wireless network. Terms and conditions: Read the End User License Agreement (EULA) and then tap Agree to confirm that you understand and agree to it terms and conditions. If you do not agree to the EULA, you cannot continue with setup. • If you consent to provide diagnostic and usage data to Samsung, tap the check box. Hands Free Activation: Automatically connect to Sprint network and set up voice and data services. • After Hands Free Activation completes, tap OK to continue. • You may see a message indicating your phone needs to restart. Tap OK again and wait for your phone to restart. Tap & Go: Quickly copy any Google Accounts, backed up apps, and data from your existing Android device. Follow the prompts to use Tap & Go, or tap Skip to continue setup. Add your account (Google): Your phone uses your Google Account to provide access to many features and apps. Complete the steps to sign in to your current Google Account, or Get Started 13
-
 1
1 -
2
-
3
-
4
-
5
-
6
-
7
-
8
-
9
-
10
-
11
-
12
-
13
-
14
-
15
-
16
-
17
-
18
-
 19
19 -
 20
20 -
 21
21 -
 22
22 -
 23
23 -
 24
24 -
 25
25 -
 26
26 -
 27
27 -
 28
28 -
 29
29 -
30
-
31
-
32
-
33
-
34
-
35
-
36
-
37
-
38
-
39
-
40
-
41
-
42
-
43
-
44
-
45
-
46
-
47
-
48
-
49
-
50
-
51
-
52
-
53
-
54
-
55
-
56
-
57
-
58
-
59
-
60
-
61
-
62
-
63
-
64
-
65
-
66
-
67
-
68
-
69
-
70
-
71
-
72
-
73
-
74
-
75
-
76
-
77
-
78
-
79
-
80
-
81
-
82
-
83
-
84
-
85
-
86
-
87
-
88
-
89
-
90
-
91
-
92
-
93
-
94
-
95
-
96
-
97
-
98
-
99
-
100
-
101
-
102
-
103
-
104
-
105
-
106
-
107
-
108
-
109
-
110
-
111
-
112
-
113
-
114
-
115
-
116
-
117
-
118
-
119
-
120
-
121
-
122
-
123
-
124
-
125
-
126
-
127
-
128
-
129
-
130
-
131
-
132
-
133
-
134
-
135
-
136
-
137
-
138
-
139
-
140
-
141
-
142
-
143
-
144
-
145
-
146
-
147
-
148
-
149
-
150
-
151
-
152
-
153
-
154
-
155
-
156
-
157
-
158
-
159
-
160
-
161
-
162
-
163
-
164
-
165
-
166
-
167
-
168
-
169
-
170
-
171
-
172
-
173
-
174
-
175
-
176
-
177
-
178
-
179
-
180
-
181
-
182
-
183
-
184
-
185
-
186
-
187
-
188
-
189
-
190
-
191
-
192
-
193
-
194
-
195
-
196
-
197
-
198
-
199
-
200
-
201
-
202
-
203
-
204
-
205
-
206
-
207
-
208
-
209
-
210
-
211
-
212
-
213
-
214
-
215
-
216
-
217
-
218
-
219
-
220
-
221
-
222
-
223
-
224
-
225
-
226
-
227
-
228
-
229
-
230
-
231
-
232
-
233
-
234
-
235
-
236
-
237
-
238
-
239
-
240
-
241
-
242
-
243
-
244
-
245
-
246
-
247
-
248
-
249
-
250
-
251
-
252
-
253
-
254
-
255
-
256
-
257
-
258
-
259
-
260
-
261
-
262
-
263
-
264
-
265
-
266
-
267
-
268
-
269
-
270
-
271
-
272
-
273
-
274
-
275
-
276
-
277
-
278
-
279
-
280
-
281
-
282
-
283
-
284
-
285
-
286
-
287
-
288
-
289
-
290
-
291
-
292
-
293
-
294
-
295
-
296
-
297
-
298
-
299
-
300
-
301
-
302
-
303
-
304
-
305
-
306
-
307
-
308
-
309
-
310
-
311
-
312
-
313
-
314
-
315
-
316
-
317
-
318
-
319
-
320
-
321
-
322
-
323
-
324
-
325
-
326
-
327
-
328
-
329
-
330
-
331
-
332
-
333
-
334
-
335
-
336
-
337
-
338
-
339
-
340
-
341
-
342
-
343
-
344
-
345
-
346
-
347
-
348
-
349
-
350
-
351
-
352
-
353
-
354
-
355
-
356
-
357
-
358
-
359
-
360
-
361
-
362
-
363
-
364
-
365
-
366
-
367
-
368
-
369
-
370
-
371
-
372
-
373
-
374
-
375
-
376
-
377
-
378
-
379
-
380
-
381
-
382
-
383
-
384
-
385
-
386
-
387
-
388
-
389
-
390
-
391
-
392
-
393
-
394
-
395
-
396
-
397
-
398
-
399
-
400
-
401
-
402
-
403
-
404
-
405
-
406
-
407
-
408
-
409
-
410
-
411
-
412
-
413
-
414
-
415
-
416
-
417
-
418
-
419
-
420
-
421
-
422
-
423
-
424
-
425
 |
 |