Samsung SMX-K40SN User Manual (ENGLISH) - Page 70
:9 Wide, White Balance, 9 Wide
 |
View all Samsung SMX-K40SN manuals
Add to My Manuals
Save this manual to your list of manuals |
Page 70 highlights
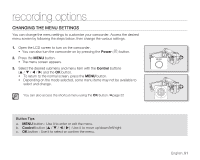
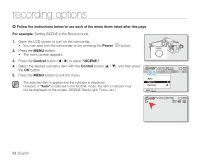
recording options 16:9 Wide You can select the desired LCD display aspect ratio for recording or playback (16:9 Wide/4:3 aspect ratio). item "Off" contents Disables the function. Displays the image in 4:3 aspect ratio. Select to use the standard display aspect ratio of 4:3 on the screen. on-screen display None "On" Recording and viewing of 16:9 aspect ratio. None • Please set the aspect ratio before recording. The default setting is "16:9 Wide : On." • If you record videos in 4:3 mode, then connect the camcorder to an HDTV via HDMI, your videos will play back in 16:9 mode. • Video resolution settings of "Web Fine" and "Web Normal" record movie in 4:3 aspect ratio even when you set it to 16:9. White Balance This memory camcorder automatically adjusts the color of subject. Change the white balance setting depending on the recording conditions. item contents on-screen display "Auto" Adjusts the White Balance automatically. None "Daylight" Controls the white balance according to the outdoor lighting. "Cloudy" Adjusts for a cloudy sky or shady location. "Fluorescent " Adjusts for white fluorescent lighting. "Tungsten" Adjusts for places under incandescent lamp, or under bright lighting, such as in a photo studio. "Custom WB" Adjusts White Balance manually to match the light source or situation. Setting the white balance manually : 1. Select "Custom WB". • The indicator ( ) and the message "Set White Balance." are displayed. 2. Frame a white object such as a piece of paper so that it fills the screen. Use an object that is not transparent. • If the object that fills the screen is not focused, correct the focus using "Manual Focus." ➥page 62 3. Press the OK button. • The white balance setting will be applied and indicator ( ) is displayed. 56_English STBY 0:00:00 [475Min9]999 Set White Balance. ~ Set { Exit White thick paper vvmum tvkl STBY 0:00:00 [475Min] 9999 Set White Balance. Exit Set
-
 1
1 -
2
-
3
-
4
-
5
-
6
-
7
-
8
-
9
-
10
-
11
-
12
-
13
-
14
-
15
-
16
-
17
-
18
-
19
-
20
-
21
-
22
-
23
-
24
-
25
-
26
-
27
-
28
-
29
-
30
-
31
-
32
-
33
-
34
-
35
-
36
-
37
-
38
-
39
-
40
-
41
-
42
-
43
-
44
-
45
-
46
-
47
-
48
-
49
-
50
-
51
-
52
-
53
-
54
-
55
-
56
-
57
-
58
-
59
-
60
-
61
-
62
-
63
-
64
-
 65
65 -
 66
66 -
 67
67 -
 68
68 -
 69
69 -
 70
70 -
 71
71 -
 72
72 -
 73
73 -
 74
74 -
 75
75 -
76
-
77
-
78
-
79
-
80
-
81
-
82
-
83
-
84
-
85
-
86
-
87
-
88
-
89
-
90
-
91
-
92
-
93
-
94
-
95
-
96
-
97
-
98
-
99
-
100
-
101
-
102
-
103
-
104
-
105
-
106
-
107
-
108
-
109
-
110
-
111
-
112
-
113
-
114
-
115
-
116
-
117
-
118
-
119
-
120
-
121
-
122
-
123
-
124
-
125
-
126
-
127
-
128
-
129
-
130
-
131
-
132
-
133
-
134
-
135
-
136
-
137
-
138
-
139
-
140
-
141
-
142
 |
 |
