Samsung SPF-72V User Manual (user Manual) (ver.1.0) (English) - Page 27
Setting up the Web Configuration, Checking your Space Photos on your Digital Photo Frame
 |
UPC - 729507801148
View all Samsung SPF-72V manuals
Add to My Manuals
Save this manual to your list of manuals |
Page 27 highlights
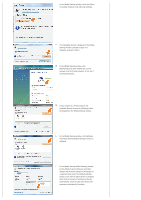
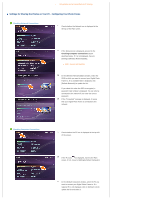
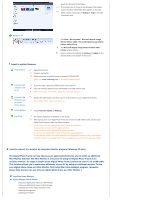
In your space, change to edit mode. Add albums and photos by clicking on Add under the Photos category. Setting up the Web Configuration In your Digital Photo Frame, go to [Settings][Management Web Address]. Make a note of the web address (URL) displayed in the Management Web Address window. Connect to that address using Internet Explorer on your PC. Alternatively, if you click the Frame Manager icon ( ) in the tray menu at the bottom right of the PC screen, a linked frame list will be displayed. If you select a frame name, the Samsung Photo Frame Web Configuration screen for the corresponding frame appears. When connected, the Welcome page will be displayed. On the Welcome page, enter the password displayed in the [Settings]-[Management Password] screen of your Digital Photo Frame in the [Password] box and click [Sign in]. You can change the password (default: Admin) in the Settings of the Samsung Photo Frame Web Configuration. On the Samsung Photo Frame Web Configuration page, click the [Web Photos] tab and add the space address (for example, if it is 'http://test.space.live.com', you have only to type 'test'.) to the URL input box for the Photos From Windows Live Spaces list and click [Add]. Checking your Space Photos on your Digital Photo Frame First check the network connections. (Refer to Viewing the Photos Shared from Vista Windows on your Digital Photo Frame - What You Should Do on Your Digital Photo Frame - Checking Network Connections.)
-
 1
1 -
2
-
3
-
4
-
5
-
6
-
7
-
8
-
9
-
10
-
11
-
12
-
13
-
14
-
15
-
16
-
17
-
18
-
19
-
20
-
21
-
 22
22 -
 23
23 -
 24
24 -
 25
25 -
 26
26 -
 27
27 -
 28
28 -
 29
29 -
 30
30 -
 31
31 -
 32
32 -
33
-
34
-
35
-
36
-
37
-
38
 |
 |
