Samsung SRD-470D User Manual - Page 56
Backup
 |
View all Samsung SRD-470D manuals
Add to My Manuals
Save this manual to your list of manuals |
Page 56 highlights
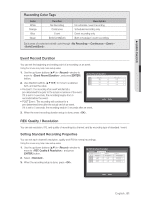
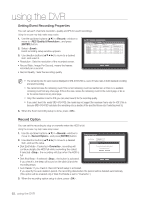
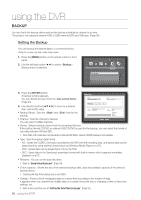
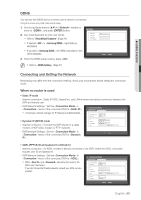
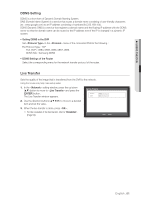
using the DVR BACKUP You can check the backup device and set the backup schedule by channel or by time. The product only supports external HDD of USB memory/DVD and USB type. (Page 96) Setting the Backup You can backup the desired data to a connected device. Using the mouse may help make setup easier. 1. Press the [MENU] button on the remote control or front panel. 2. Use the left/right button (◄ ►) to select . Backup menu is selected. Backup Logout Exit Backup 3. Press the [ENTER] button. A backup window appears. You can directly access it from the "Live screen menu". (Page 24) 4. Use direction buttons to move to a desired item, and set the value. • Backup Range : Sets the and time for the backup. Backup Start 2011-01-01 00:01:06 End ~ 2011-01-01 08:25:45 ALL 1 2 3 4 Device Folder USB-Storage \20110101\ Check capacity Type Filename DVR 0001 Change Backup Used Free • Channel : Sets the channel to backup. You can select multiple channels. OK Cancel • Device : Select a backup device from the recognized devices. If the built-in internal CD/DVD or external USB CD/DVD is used for the backup, you can select the format of recording between AVI and SEC. Since SRD-470 model does not have built-in internal DVD Writer, internal CD/DVD backup is not available. • Type : Sets the backup data format. - AVI : Saves the CODEC information provided by the DVR with the recording data, and saved data can be played back by using external viewers (such as Windows Media Player) on a PC. - DVR : Saved data can be played back only by the DVR. - SEC : Saves data in the Samsung's proprietary format with built-in viewer, which supports immediate playback on a PC. • Filename : You can set the back file name. Refer to "Using Virtual Keyboard". (Page 34) • Check capacity : Shows the size of the selected backup data, used and available capacity of the selected backup device. Checking will stop if the backup size is over 200%. • Overlap : Shows a list of overlapping data on a same time according to the number of data. It appears when one channel has multiple data on a certain time point due to changing of time or time zone settings, etc. Refer to time and time zone of "Setting the Date/Time/Language". (Page 32) 56_ using the DVR
-
 1
1 -
2
-
3
-
4
-
5
-
6
-
7
-
8
-
9
-
10
-
11
-
12
-
13
-
14
-
15
-
16
-
17
-
18
-
19
-
20
-
21
-
22
-
23
-
24
-
25
-
26
-
27
-
28
-
29
-
30
-
31
-
32
-
33
-
34
-
35
-
36
-
37
-
38
-
39
-
40
-
41
-
42
-
43
-
44
-
45
-
46
-
47
-
48
-
49
-
50
-
 51
51 -
 52
52 -
 53
53 -
 54
54 -
 55
55 -
 56
56 -
 57
57 -
 58
58 -
 59
59 -
 60
60 -
 61
61 -
62
-
63
-
64
-
65
-
66
-
67
-
68
-
69
-
70
-
71
-
72
-
73
-
74
-
75
-
76
-
77
-
78
-
79
-
80
-
81
-
82
-
83
-
84
-
85
-
86
-
87
-
88
-
89
-
90
-
91
-
92
-
93
-
94
-
95
-
96
-
97
-
98
-
99
-
100
-
101
-
102
-
103
-
104
-
105
-
106
-
107
-
108
-
109
-
110
-
111
-
112
-
113
-
114
-
115
-
116
-
117
-
118
-
119
-
120
-
121
-
122
-
123
 |
 |