Samsung ST700 User Manual (user Manual) (ver.1.0) (English) - Page 97
Adjusting your photos, an adjusting option.
 |
UPC - 044701015536
View all Samsung ST700 manuals
Add to My Manuals
Save this manual to your list of manuals |
Page 97 highlights
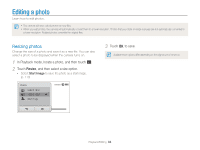
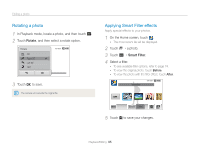
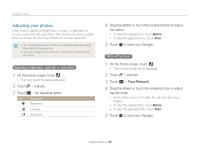
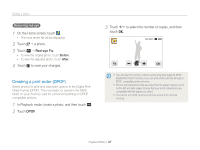
Editing a photo Adjusting your photos Learn how to adjust the brightness, contrast, or saturation or how to correct the red-eye effect. The camera will save an edited photo as a new file, but may convert it to a lower resolution. • You can adjust brightness, contrast, and saturation and apply Smart Filter effects at the same time. • You cannot apply the Face Retouch, and Red-eye Fix effects at the same time. Adjusting brightness, contrast, or saturation 1 On the Home screen, touch . • The most recent file will be displayed. 2 Touch “ a photo. 3 Touch m “ an adjusting option. Icon Description Brightness Contrast Saturation 4 Drag the sliders or touch the sample photos to adjust the option. • To view the original photo, touch Before. • To view the adjusted photo, touch After. 5 Touch V to save your changes. Retouching faces 1 On the Home screen, touch . • The most recent file will be displayed. 2 Touch “ a photo. 3 Touch m “ Face Retouch. 4 Drag the sliders or touch the sample photos to adjust the skin tone. • As the slider moves to the right, the skin tone becomes brighter. • To view the original photo, touch Before. • To view the adjusted photo, touch After. 5 Touch V to save your changes. Playback/Editing 96
-
 1
1 -
2
-
3
-
4
-
5
-
6
-
7
-
8
-
9
-
10
-
11
-
12
-
13
-
14
-
15
-
16
-
17
-
18
-
19
-
20
-
21
-
22
-
23
-
24
-
25
-
26
-
27
-
28
-
29
-
30
-
31
-
32
-
33
-
34
-
35
-
36
-
37
-
38
-
39
-
40
-
41
-
42
-
43
-
44
-
45
-
46
-
47
-
48
-
49
-
50
-
51
-
52
-
53
-
54
-
55
-
56
-
57
-
58
-
59
-
60
-
61
-
62
-
63
-
64
-
65
-
66
-
67
-
68
-
69
-
70
-
71
-
72
-
73
-
74
-
75
-
76
-
77
-
78
-
79
-
80
-
81
-
82
-
83
-
84
-
85
-
86
-
87
-
88
-
89
-
90
-
91
-
 92
92 -
 93
93 -
 94
94 -
 95
95 -
 96
96 -
 97
97 -
 98
98 -
 99
99 -
 100
100 -
 101
101 -
 102
102 -
103
-
104
-
105
-
106
-
107
-
108
-
109
-
110
-
111
-
112
-
113
-
114
-
115
-
116
-
117
-
118
-
119
-
120
-
121
-
122
-
123
-
124
-
125
-
126
-
127
-
128
-
129
-
130
-
131
-
132
-
133
-
134
-
135
-
136
-
137
-
138
-
139
-
140
-
141
-
142
-
143
 |
 |
