Samsung TL9 User Manual - Page 64
Creating a print order
 |
View all Samsung TL9 manuals
Add to My Manuals
Save this manual to your list of manuals |
Page 64 highlights
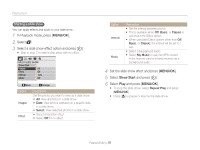
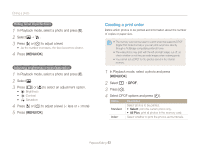
Editing a photo Hiding facial imperfections 1 In Playback mode, select a photo and press [E]. 2 Select “ . 3 Press [e] or [t] to adjust a level. • As the number increases, the face becomes clearer. 4 Press [MENU/OK]. Adjusting brightness/contrast/saturation 1 In Playback mode, select a photo and press [E]. 2 Select . 3 Press [w] or [r] to select an adjustment option. • : Brightness • : Contrast • : Saturation 4 Press [e] or [t] to adjust a level. (-: less or +: more) 5 Press [MENU/OK]. Creating a print order Define which photos to be printed and information about the number of copies or paper size. • The memory card can be taken to a print shop that supports DPOF (Digital Print Order Format) or you can print out photos directly through a PictBridge-compatible printer at home. • The wide photos may print with the left and right edges cut off, so check whether or not they are wide images when ordering prints. • You cannot set a DPOF for the photos stored in the internal memory. 1 In Playback mode, select a photo and press [MENU/OK]. 2 Select “ DPOF. 3 Press [t]. 4 Select DPOF options and press [t]. Option Standard Index* Description Select photos to be printed. • Select: print the current photo only. • All Pics: print all photos in the memory card. Select whether to print the photos as thumbnails. Playback/Editing 63
-
 1
1 -
2
-
3
-
4
-
5
-
6
-
7
-
8
-
9
-
10
-
11
-
12
-
13
-
14
-
15
-
16
-
17
-
18
-
19
-
20
-
21
-
22
-
23
-
24
-
25
-
26
-
27
-
28
-
29
-
30
-
31
-
32
-
33
-
34
-
35
-
36
-
37
-
38
-
39
-
40
-
41
-
42
-
43
-
44
-
45
-
46
-
47
-
48
-
49
-
50
-
51
-
52
-
53
-
54
-
55
-
56
-
57
-
58
-
 59
59 -
 60
60 -
 61
61 -
 62
62 -
 63
63 -
 64
64 -
 65
65 -
 66
66 -
 67
67 -
 68
68 -
 69
69 -
70
-
71
-
72
-
73
-
74
-
75
-
76
-
77
-
78
-
79
-
80
-
81
-
82
-
83
-
84
-
85
-
86
-
87
-
88
-
89
-
90
-
91
-
92
-
93
-
94
-
95
 |
 |
