Samsung TX-P3076WH User Manual (user Manual) (ver.1.0) (English) - Page 11
Rear Panel Jacks, DVI Digital Visual Interface
 |
View all Samsung TX-P3076WH manuals
Add to My Manuals
Save this manual to your list of manuals |
Page 11 highlights
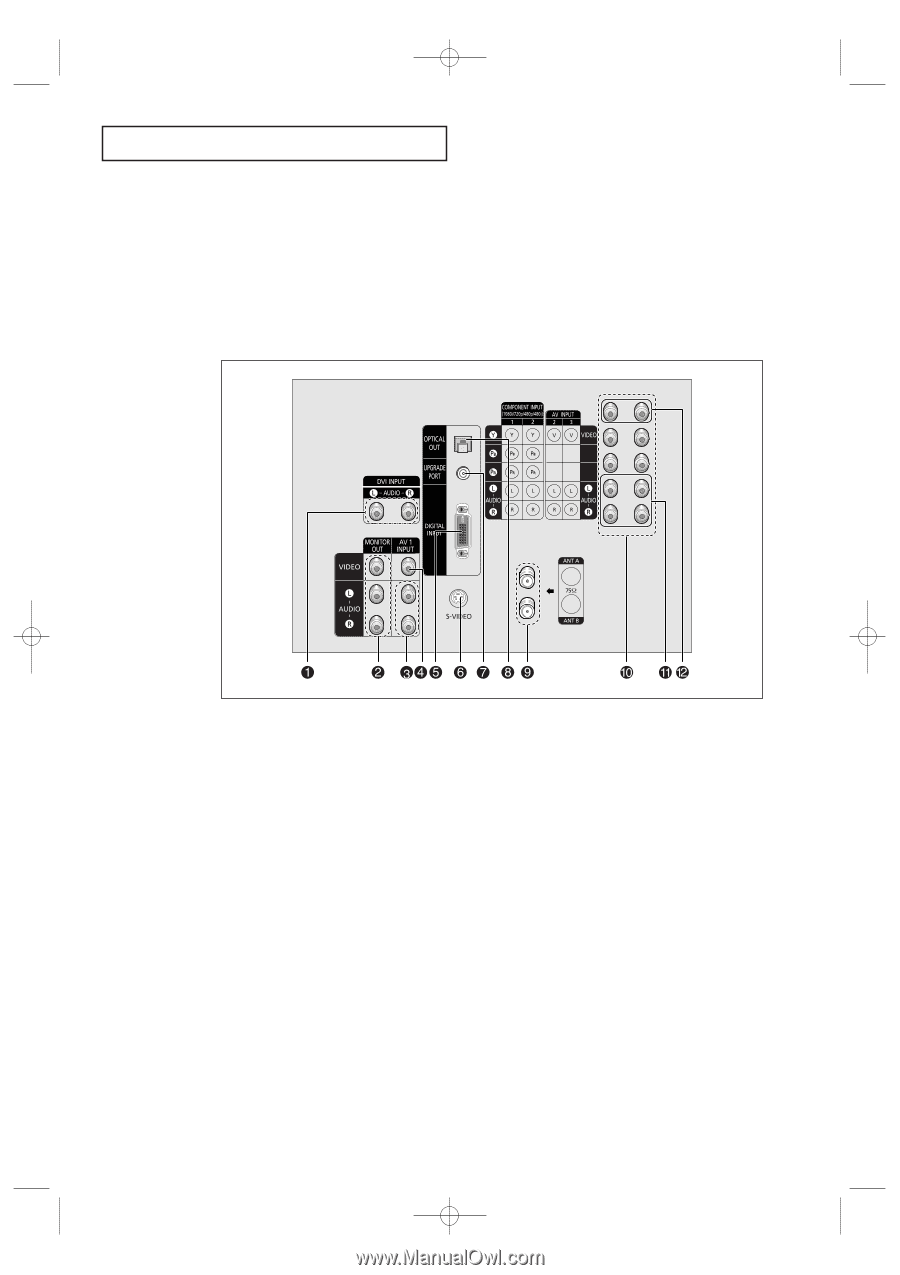
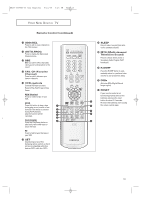
AA68-03388A-00_eng_Chapter1 4/21/04 5:25 PM Page 11 YOUR NEW DIGITAL TV Rear Panel Jacks Use the rear panel jacks to connect an A/V component that will be connected continuously, such as a VCR or a DVD player. Your TV has several input jacks, so you can connect different A/V components simultaneously (i.e., a VCR and a DVD, 2 VCRs, etc.). For more information on connecting equipment, see page 14~24. Œ DVI (Digital Visual Interface) AUDIO INPUT jacks Receives the digital audio signals from AV devices. ´ AUDIO-VIDEO MONITOR OUTPUT jacks Connect to the audio/video input jacks of a recording VCR. ˇÔ AUDIO INPUT1, 2, 3 jacks Connect to the audio output jacks of VCRs, DVD players and similar devices. ¨ VIDEO INPUT1, 2, 3 jacks Connect to the video output jacks of VCRs, DVD players and similar devices (Three sets are available: Video1, Video2 and Video3). ˆ DIGITAL VIDEO INPUT (Digital Visual Interface) jack Receives the digital signals from a Set-top Box. Ø S-VIDEO INPUT jack Connect to S-VIDEO output jacks of an S-VHS VCR or DVD player. Note: In S-Video mode, Audio Output depends what kind of audio input source is connected to the side audio input jacks (AV1). ∏ UPGRADE PORT For service only. " OPTICAL OUTPUT jack Connect to a Digital Audio component. ' ANTENNA terminals Two independent cables or antennas can be connected to these terminals. Use ANT A and ANT B terminals to receive a signal from VHF/UHF antennas or your cable system. ˝ COMPONENT1, 2 (480i, 480p, 720p, 1080i) AUDIO/VIDEO INPUT jacks Connect to the Audio & Video outputs of DVD or DTV Set-Top-Box. 11
-
 1
1 -
2
-
3
-
4
-
5
-
 6
6 -
 7
7 -
 8
8 -
 9
9 -
 10
10 -
 11
11 -
 12
12 -
 13
13 -
 14
14 -
 15
15 -
 16
16 -
17
-
18
-
19
-
20
-
21
-
22
-
23
-
24
-
25
-
26
-
27
-
28
-
29
-
30
-
31
-
32
-
33
-
34
-
35
-
36
-
37
-
38
-
39
-
40
-
41
-
42
-
43
-
44
-
45
-
46
-
47
-
48
-
49
-
50
-
51
-
52
-
53
-
54
-
55
-
56
-
57
-
58
-
59
-
60
-
61
-
62
-
63
-
64
-
65
-
66
-
67
-
68
-
69
-
70
-
71
-
72
-
73
-
74
-
75
-
76
-
77
-
78
-
79
-
80
-
81
-
82
-
83
-
84
-
85
-
86
-
87
-
88
-
89
-
90
-
91
-
92
 |
 |