Samsung VR330 Instruction Manual - Page 63
Recording mode VCR, ENTER, If the timer settings overlap, To exit without saving the current setting
 |
UPC - 036725603325
View all Samsung VR330 manuals
Add to My Manuals
Save this manual to your list of manuals |
Page 63 highlights
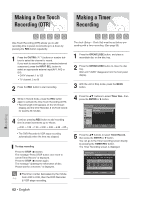
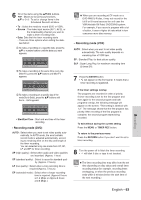
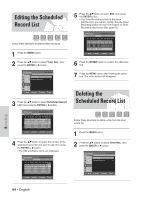
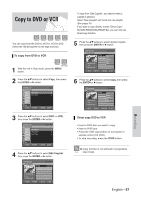
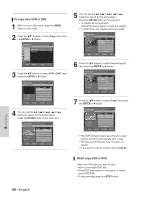
6 Fill in the items using the buttons. œ √ : Moves to the previous/next item, ...† or 0~9 : To set or change items in the Scheduled Record List Menu. • To : Select the media to record (DVD or VCR). • Source : The video input source (AV 1, AV 2), or the broadcasting channel you want to make a timer recording from. • Date: Date that the timer recording starts - There are three options when setting the date. see below: ! To make a recording on a specific date, press the ...† or number buttons until the date you want appears. No. 01 To Source Date Start End Mode DVD CH06 01/01 03:05 AM 05:05 AM SP Recordable Time 00:45 SP @ To make a recording at the same time every day (Mon-Fri), press the ...† buttons until Mon-Fri appears: No. 01 To Source Date Start End Mode DVD CH06 Mon~Fri 03:05 AM 05:05 AM SP Recordable Time 00:45 SP # To make a recording on a specific day of the week(Sun's-Sat's), press the ...† buttons until Sun's....Sat's appears: No. 01 To Source Date Start End Mode DVD CH06 Sun's 03:05 AM 05:05 AM SP Recordable Time 00:45 SP • Start/End Time : Start and end time of the timer recording. • Recording mode (DVD) AUTO : Select when you want to set video quality automatically. In AUTO mode, the most suitable record mode is adjusted automatically, according to remaining time on the disc and length of the timer recording. You can selected only one mode from XP, SP, LP and EP for timer recording. XP (high quality) : Select when audio and video qualities are important. (Approx. 1 hour) SP (standard quality) : Select to record in standard quality. (Approx. 2 hours) LP (low quality) : Select when a long recording time is required.(Approx. 4 hours) EP (extended mode) : Select when a longer recording time is required. (Approx.6 hours at 1.2 Mbps or Approx.8 hours at 0.8 Mbps ) When you are recording at EP mode on a Note DVD-RW(V)/-R disc, it may not record for the full 6 or 8 hours because the unit uses the VBR(Variable Bit Rate) ENCODING system. For example, if you record a program with a lot of action, it uses a higher bit rate which in turn consumes more disc memory. • Recording mode (VCR) AUTO : Select when you want to set video quality automatically. The auto quality depends on remaining time of VCR tape. SP : Standard Play, for best picture quality. SLP : Super Long Play, for maximum recording time (3 times SP). 7 Press the ENTER button. • will appear on the front panel. It means that a timer recording is registered. If the timer settings overlap The programs are recorded in order of priority. If timer recording is set for the first program and then again for the second program and both programs overlap, the following message will appear on the screen: "This setting is identical with 1,2." The message shows that the first program has priority. After recording of the first program is complete, the second program starts being recorded. To exit without saving the current setting Press the MENU or TIMER REC button. To return to the previous menu Press the RETURN button if you don't want to set a timer recording. 8 Turn the power off to finish the timer recording. • will blink if disc or tape is not inserted. The timer recording time may differ from the set Note time depending on disc status and overall timer recording status (for example, recording times overlapping, or when the previous recording ends within 3 minutes before the start time of the next recording.) Recording English - 63
-
 1
1 -
2
-
3
-
4
-
5
-
6
-
7
-
8
-
9
-
10
-
11
-
12
-
13
-
14
-
15
-
16
-
17
-
18
-
19
-
20
-
21
-
22
-
23
-
24
-
25
-
26
-
27
-
28
-
29
-
30
-
31
-
32
-
33
-
34
-
35
-
36
-
37
-
38
-
39
-
40
-
41
-
42
-
43
-
44
-
45
-
46
-
47
-
48
-
49
-
50
-
51
-
52
-
53
-
54
-
55
-
56
-
57
-
 58
58 -
 59
59 -
 60
60 -
 61
61 -
 62
62 -
 63
63 -
 64
64 -
 65
65 -
 66
66 -
 67
67 -
 68
68 -
69
-
70
-
71
-
72
-
73
-
74
-
75
-
76
-
77
-
78
-
79
-
80
-
81
-
82
-
83
-
84
-
85
-
86
-
87
-
88
-
89
-
90
-
91
-
92
-
93
-
94
-
95
-
96
-
97
-
98
-
99
 |
 |
