SanDisk Marantz PMD620 16/24-bit Professional Handheld Rec User Guide - Page 64
Low Cut, Mic Power
 |
UPC - 011179300549
View all SanDisk Marantz PMD620 16/24-bit Professional Handheld Rec manuals
Add to My Manuals
Save this manual to your list of manuals |
Page 64 highlights
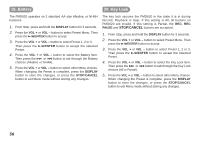
11. Low Cut 12. Mic Power The bass region of the input audio is cut and the audio is recorded. Set to On to reduce noise, such as the sound of the wind when recording outdoors. The Mic Power allows you to switch the power on or off so supply to the external condenser microphone from the MIC jack of the PMD620. 1. From Stop, press and hold the DISPLAY button for 3 seconds. 2. Press the VOL + or VOL - button to select Preset Menu. Then press the 3/8/ENTER button to accept. 3. Press the VOL + or VOL - button to select Preset 1, 2 or 3. Then press the3/8/ENTER button to accept the selected Preset. 4. Press the VOL + or VOL - button to select the Low Cut item. Then press the ¢ or 4 button to tab through the Low Cut choices (On or Off). 5. Press the VOL + or VOL - button to select other Menu choices. When changing the Preset is complete, press the DISPLAY button to store the changes, or press the STOP/CANCEL button to exit Menu mode without storing any changes. 1. From Stop, press and hold the DISPLAY button for 3 seconds. 2. Press the VOL + or VOL - button to select Preset Menu. Then press the 3/8/ENTER button to accept. 3. Press the VOL + or VOL - button to select Preset 1, 2 or 3. Then press the 3/8/ENTER button to accept the selected Preset. 4. Press the VOL + or VOL - button to select the Mic Power item. Then press the ¢ or 4 button to tab through the Mic Power choices (On or Off). 5. Press the VOL + or VOL - button to select other Menu choices. When changing the Preset is complete, press the DISPLAY button to store the changes, or press the STOP/CANCEL button to exit Menu mode without storing any changes. 52
-
 1
1 -
2
-
3
-
4
-
5
-
6
-
7
-
8
-
9
-
10
-
11
-
12
-
13
-
14
-
15
-
16
-
17
-
18
-
19
-
20
-
21
-
22
-
23
-
24
-
25
-
26
-
27
-
28
-
29
-
30
-
31
-
32
-
33
-
34
-
35
-
36
-
37
-
38
-
39
-
40
-
41
-
42
-
43
-
44
-
45
-
46
-
47
-
48
-
49
-
50
-
51
-
52
-
53
-
54
-
55
-
56
-
57
-
58
-
 59
59 -
 60
60 -
 61
61 -
 62
62 -
 63
63 -
 64
64 -
 65
65 -
 66
66 -
 67
67 -
 68
68 -
 69
69 -
70
-
71
-
72
-
73
-
74
-
75
-
76
-
77
 |
 |
